
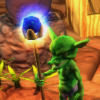
Implemented object hovering today. Now you can hover over an object on the map to see information about it. Right now, it just handles displaying a tooltip text, but eventually for combat objects I'll do a portrait panel instead, or possibly in addition.
Also worked on the Forge workbench. I'm trying to refine my modeling processes. I'm not a "classic" modeler. I use a lot of procedural stuff, like the bumpy stone surfaces for the rock walls, the forge, the cauldron firepit, etc... Unfortunately, I haven't really standardized the process. I did another rock wall today, but I don't really like how the diffuse turned out so I'll probably rewrite that function. This iteration of the rock wall just really didn't turn out all that well, but at least it has proper LoD levels now, unlike the previous. Also doesn't have that hideous seam the other had.
My process consists roughly of this:
1) Rough out the shape. Mostly box modeling here.
2) Mark seams and unwrap UVs. Structures like the forge and such are easy to unwrap.
3) Apply a level or two of subdivision, then add a multi-resolution modifier. The initial subdivisions help the model to retain it's basic shape. In the case of the hex theme I have going here, it prevents the multi-res mod from collapsing hexes down into circles. The multi-res mod gives the shape some nice rounded corners. Usually, I will use the base shape as the furthest LoD level, and the shape with one level of multi-res as the main LoD level. (I am considering doing a third level for extreme near shots, but I wonder if it's really even necessary).
4) Export the shape at one level of multi-res to a .OBJ file. Take this .OBJ file into a script written for the ANL and bake a displacement map. In the case of the stonework here, most of the functions used are some perturbed variant of cellular noise; very simple and quick to setup.
5) Bake the model again for a diffuse channel. This bake is usually a layered function that takes the displacement map as an input to blend between different colormap functions. I usually tweak the displacement with some bias and gain in order to isolate edges and creases, in order to apply a highlight to edges.
6) Take the displacement map back into Blender, duplicate the model, and crank up the multi-res on the duplicate. Apply the displacement bake as a displace modifier on the highres mesh, tweak the strength and midrange to suit.
7) Bake out normal map and AO to the mid-level model and save those maps to file.
8) Load the diffuse and AO maps in GIMP and do some tweaking. Usually, I do a straight multiply of AOxdiffuse, then adjust saturation, brightness and contrast as needed.
9) Apply modifiers (1 level of multi-res and the displacement) to the model, and export it it to Urho3D using the new, handy-dandy exporter plugin. If I'm doing LoDs, then this is where it needs to be done, by creating multiple instance of the model, one for each LoD level, and naming them appropriately so that the exporter knows how to look for them. Export the model to my data directory.
10) Set up a material. LoD settings for the material usually roughly correspond to the model LoDs; for the far range I use a simple Diff technique, with no normal mapping. For the near range, I use a DiffNormal technique. (No specular at the moment, as I'm trying to keep the cartoony look and feel that I have going here.)
11) Load it into the map.
I don't do a lot of hand detailing on a rock piece like this, since despite the hours I have spent practicing it, I just simply such at rock modeling. There are tutorials out there that make me weep for the beauty of the rock they create, but damned if I can emulate them. But if I do have to do some hand-detailing, I just swap my high-res model into sculpt mode and go for it.


Do you know of any good sites that have a good beginners tutorial for Urho3d?