Abstract
This tutorial provides the groundwork that should allow C++ UE4 developers to construct new Blueprint nodes that can be much more powerful and user friendly than a simple C++ function that has been tagged BlueprintCallable. Ultimately these custom nodes function almost the same way as a Blueprint function or macro. The custom node is meant to act as a kind of wrapper around another collection of blueprint nodes. The only difference is instead of placing them on a visual graph and connecting pins visually, it's all done in code. The engineer that introduced this to me likened it to a quasi-Assembly language. It may feel a little weird at first, but it'll become easier as you do more with it (as with most things).
Intro
Target Audience
I'd like to make a quick note about the target audience for this article before getting started. From the title, it's clear that this is directed at Unreal Engine 4 developers. I can also only speak to its truth for 4.16 and beyond. If you're still working with an earlier version, some things may not be quite the same. I assume a certain level of familiarity with C++ development within UE4 and an understanding of the UPROPERTY and UFUNCTION macros. I also assume that you're doing some combination of C++ and Blueprint development in your project. A purely C++ project won't require custom blueprint nodes and a purely Blueprint project won't be able to extend or use the required classes. Lastly having the engine source available when making custom nodes can be very helpful but not required. The code snippets and examples provided in this tutorial should be enough to create your own custom Blueprint nodes, but having the engine source (especially when using an IDE with good search features) can be helpful as the nodes you build increase in complexity.
Background
To suggest that Blueprints are a fundamental authoring tool in UE4 probably isn't exactly revolutionary. Epic has very intentionally positioned Blueprints as an important component of the content authoring and runtime execution. They've also made it easy to write functions in C++ that are callable from Blueprints. Epic's code generation support and the "meta" tags (specified within macros like UFUNCTION) make it easy to interface C++ and Blueprints. But sometimes it just isn't enough. For example, take this node:
With UFUNCTION markup there's no way (at least that I ever found) for a C++ function to trigger an output multiple times as one would expect. Similarly it's not possible to create a Blueprint function/macro that correctly assigns the map key and value types to the outputs (everything I tried always ended up with the key type assigned to both the key and value output). However, we can solve both with a custom Blueprint node.
Some quick terminology. "Node" refers to the entire object that you place in the Blueprint graph. "Pin" refers to all the circle and triangle elements that one or more lines can be drawn between. "Input Pin"s are those on the left side of a node and "Output Pin"s are those on the right side.
I have yet to find a comprehensive writeup of this information. It was either paywalled or focused on how to manipulate the UFUNCTION meta specifiers to make a Blueprint node. So I decided to finally write down everything I've learned up to this point.
Most of this tutorial will focus on the code required to make a working node, but I include some personal observations and suggestions that I hope will save you future work if you plan to write more than one custom node (which I highly recommend). It's based on my experiences building nodes both for my personal project as well as in a professional team environment. I identify these observations/suggestions by starting with Personally. Don't take any of my suggestions as gospel though. They're what I've found work for me and that's it.
There will also be places where I can't provide much additional guidance beyond pointing out some thing's existence. If I haven't had personal need for some extended functionality I won't have spent much time trying to figure it out. They're great places to explore from on your own though!
It's also worth mentioning that the custom nodes for Blueprints are part of a much larger system UE4 has available for generalized node graphs. This tutorial will primarily be concerned with the specific corner of the system related to Blueprints, however much of the information presented is applicable in the wider node graph situations. Many of the overrides and functions I'll discuss are provided by lower level classes than the UK2Node we'll be primarily concerned about. Just be aware that some of this tutorial may range anywhere from inaccurate to wrong when dealing with any graph type other than Blueprints.
General Setup
Before we get started with any code for an actual node there is a little bit of required setup work related to how UE4 handles it's build configurations. For the purposes of this step it's worth recognizing three of the modes a UE4 exe runs in: Editor, Uncooked and Cooked. The code we write for custom nodes can't be run in cooked, because UE4 assumes that the Blueprints have already been compiled as part of the cooking process. What this means is that our custom node code cannot be a part of the regular project/plugin code. When running the game Uncooked (an Editor with the -game command line argument or a non-Editor, non-Cooked build) the custom node code is required as all Blueprints are compiled as part of the startup process for an uncooked build.
To accomplish this, we need to create a new module. A module is a subdivision of plugins and projects and can be added to either. If you're not familiar with creating a new module this is a pretty good rundown of how to do that. In order to make the custom node code available correctly we'll need a Module that is configured as "Type" : "UncookedOnly" (in versions prior to 4.24 the type would be "Developer" instead) in the Build.cs file for the Module. The other two types you'll regularly encounter are "Runtime" and "Editor". You'll recognize "Runtime" as the type of your main project module. "Editor" modules are only loaded with the Editor and not in Uncooked builds which is why our custom node code can't go in an "Editor" module either (even though you could easily think it's just Editor code).
Personally: I make every new project or plugin with a Runtime, Uncooked and Editor module from the very start. It's easy to setup/remember when you're already creating module source files and it doesn't hurt anything to have an empty module around. It's also easier to add source to existing modules then interrupting your work to add a new one.
Personally: At this point I also recommend making a source file (in your new Uncooked module) for utility functions related to custom nodes. I'll include a few code snippets from my own utilities that you might find useful and it's worth having a place to put them. All of mine exist in a namespace which is slightly unorthodox for UE4 which usually prefers static functions in a UObject type of some sort. However in this case we're basically guaranteed that these utilities have no use for the UFUNCTION macro, so I opt'd for a more classic C++ coding style.
Node Setup
Now we're ready to create source files for a custom node, placed in an "UncookedOnly" module. As usual for UE4, you should keep the cpp files in the Private folder while the header files can go into either the Private or Public folders. For purposes of editing Blueprints it doesn't really matter, even if the header is in the Private folder you'll still be able to place nodes of that type. The only thing to consider is if want to reference your node from another plugin/project (as part of another custom node implementation), keep the header files in the Public folder.
To create a new node, make a new class that derives from UK2Node, making sure the header and cpp files go in the correct module folders. It's good practice (though not required) to follow the UE4 naming conventions for built-in nodes, which looks like this: UK2Node_<MyNodeName>. K2Node classes no different from other classes in the engine. If you're making multiple Blueprint nodes that share functionality, you're free to make intermediate classes to hold common data and functionality. You may also consider deriving your new node from UK2Node_ConstructObjetFromClass instead of UK2Node. I'll go into more detail about this later. For now, you've got an empty class that derives from UK2Node, and it won't do very much. It should look something like this:
UCLASS( )
class UK2Node_Tutorial : public UK2Node
{
	GENERATED_BODY( )
public:

private:
};
Next you'll want to start your cpp file off as (more or less):
#include "K2Node_Tutorial.h"

#define LOCTEXT_NAMESPACE "K2Node_Tutorial"

#undef LOCTEXT_NAMESPACE
This should look like a normal UE4 C++ class, except for the LOCTEXT_NAMESPACE macros in the cpp file. If you're not familiar with these, just go with me. Blueprint nodes do a lot with text, and these macros make it convenient to define localized strings in C++. Make sure whatever you define LOCTEXT_NAMESPACE is unique to your node. Otherwise, you may run into text identifier conflicts. I've used "K2Node_Tutorial" here so that my localized strings won't conflict with those in other Blueprint nodes. All the rest of the K2Node code will go between the #define and #undef macros. If you include any additional header files, make sure to put them before the LOCTEXT_NAMESPACE macro (headers you include may also define localization namespaces).
UPROPERTYs and UFUNCTIONs
The main difference you'll run into when writing custom nodes is that for the most part you won't have any methods using the UFUNCTION macro or member variables using the UPROPERTY macro. There are two reasons for this: The first is pretty straight forward in that many/most of the types (like UEdGraphPin) used throughout graph nodes aren't themselves UCLASSes/USTRUCTs/etc and as such can't participate in reflection. The second is that due to the nature of custom nodes, there really isn't a whole lot to do with them. Most roles that members have are filled by the inputs and outputs instead.
Now, I did say for the most part.
The first case where the usual macros are useful is the first case you might expect: serialization. Any UPROPERTY member will be saved as part of the Blueprint asset and restored when the Blueprint is loaded. This can be useful for maintaining certain types of dynamic information. Since the pin class is not a UCLASS, the input and output pins are not directly saved, so any changes made to pins during runtime need some sort of saved information with which to restore their state. I'll discuss this more later when I cover the AllocateDefaultPins function.
The second case where you'll still want to use the UPROPERTY macro is for traditionally editable properties. For this to work, you'll use the EditDefaultsOnly specifier as well as overriding UK2Node::ShouldShowNodeProperties so that it returns true. These properties won't show up on the node itself, but while the node is selected they will show up in the details panel (the same way properties show up when variable or function node are selected). I haven't found many other specifiers that are of much use in this case, but I encourage you to experiment. The main downside to this approach is that any value configured this way cannot be selected at runtime. They are all equivalent to compile-time constants.
The last case that I've encountered is using UFUNCTION to create reflection information for functions as a placeholder to work with delegates. Creating delegate pins require access to a UFunction object. It's possible to be able to find that elsewhere in your projects reflection data but it can be significantly easier to declare a UFUNCTION that does nothing and has exactly the signature that you want. I'll talk about what this means a little more when I cover the AllocateDefaultPins function.
It's possible that there are other cases, these are just the ones that I've encountered so far. I encourage you to explore what UE4 supports to solve your specific problems.
Node Basics
Now we can get into the real meat of a custom node. There are a few required and optional function overrides that are fairly simple and straight forward. Then I'll cover the two most important and complicated functions to override.
bool IsNodeSafeToIgnore( ) const- As you will see later, writing the business logic for a Blueprint isn't as simple as writing a function. When Blueprint nodes are compiled, each node either emits a connected graph of more primitive nodes or Kismet bytecode. Ours will be of the first type. Overriding this function to always return true tells the Blueprint compiler that after compilation, our node can be ignored since it will have emitted other nodes in its place. (These emitted nodes are then further compiled until all that's left is bytecode, which the virtual machine executes at runtime.) If this function returns false, the compiler will complain about the node not being connected to the rest of the graph once it has been 'expanded'.void GetMenuActions( FBlueprintActionDatabaseRegistrar& ActionRegistrar ) const- Override this function to get your node to show up in the right click menu when selecting a node to place in your Blueprint graph. To implement this function you'll need to include BlueprintActionDatabaseRegistrar.h and provide a minimum implementation of:
UClass* ActionKey = GetClass();
if (ActionRegistrar.IsOpenForRegistration(ActionKey))
{
	UBlueprintNodeSpawner* NodeSpawner = UBlueprintNodeSpawner::Create(GetClass());
	check(NodeSpawner != nullptr);

	ActionRegistrar.AddBlueprintAction(ActionKey, NodeSpawner);
}
Personally: This is the first code snippet that I'd recommend creating as a utility function. I have yet to run across any other functionality that requires working with the ActionRegistrar.
FText GetMenuCategory( ) const- This function returns the category your node will appear in when selecting a node to place in the Blueprint graph. Epic's convention is to return something using theLOCTEXTmacro. If you defined theLOCTEXT_NAMESPACEthen you can easily reuse the same localization key (the first parameter), like "NodeMenu", across all your custom nodes, making this boilerplate easier to copy/paste. The second parameter to theLOCTEXTmacro is the actual category name to display (in English I assume) and is exactly like the string you would specify as the "Category" specifier you would include inUPROPERTYorUFUNCTIONmacros.FText GetNodeTitle( ENodeTitleType::Type TitleType ) const- This function returns the title used to describe your node under various UI circumstances. I'll leave the individual types as an exercise to the reader (the enum declaration comments explain this pretty well) but the easiest implementation is an unconditional return of the same string in all circumstances. Again, as it's anFTextit's helpful to giveLOCTEXTan easy key that can be copy/pasted to new nodes. You can insert a newline character in the title string to create a subtitle as in this node:
though that is probably only a good idea for the ENodeTitleType::FullTitle value. This function you can have a lot of fun with. Using the FText::Format function you can insert all sorts of strings into the name like property values or data from pins!
FText GetTooltipText( ) const- Similar toGetNodeTitle. It's optional but I've found its useful to override, especially in a team environment.
void AllocateDefaultPins( )
This is the first of the really meaty functions to override that give your node any real functionality. As with many UE4 virtual functions, I recommend always starting this function out with a call to the parent class's version (Super::AllocateDefaultPins( )). This may or may not do anything (depending on what type you've inherited from), but I've been bitten too many times by some critical Unreal thing that fails to happen because of a missed Super:: call.
This function's purpose is to construct the input and output pins of your node through a series of CreatePin function calls. This function is called every time a node is created, both when you place the node in a graph but also when the graph asset is opened. This is where that first UPROPERTY member case comes in: Let's say that after having been placed (and AllocateDefaultPins called) your node does something that changes the state of one of the pins (as an easy example let's say it hides the pin). The pins themselves are always created fresh in this function so the next time you opened up that Blueprint the pin you hid would now be visible. If you also tracked that state in a separate UPROPERTY, the property would get saved and you would be able to re-hide your pin after creating it (as UPROPERTYs will be serialized before AllocateDefaultPins is called).
This is also important when it comes to any pins your node has that may change their types dynamically. I've found that nodes generally function better if certain data from pins is duplicated into properties and applied as part of AllocateDefaultPins. The alternative is to override PostLoad and redo the logic to determine what the dynamic type should be. There's also a bit of a gotcha, that if you're changing the type of an output pin you may need to update any pins/nodes that may be connected to it (in case that input also supports a dynamic type in some way like a Wildcard pin). Personally: For those two reasons, duplicated decision logic and poking outside objects during PostLoad, I've favored the data duplication approach so that I can create the nodes in the right state instead of trying to fix them up later. I've also had issues getting the PostLoad approach working correctly in all cases, and while it works in most of the cases I've encountered I'm not 100% sure there isn't some other case I just haven't encountered yet.
CreatePin
There are a few different overrides for this function that you can explore but UEdGraphPin* CreatePin(EEdGraphPinDirection Dir, const FName PinCategory, const FName PinName, const FCreatePinParams& PinParams) and UEdGraphPin* CreatePin(EEdGraphPinDirection Dir, const FName PinCategory, UObject* PinSubCategoryObject, const FName PinName, const FCreatePinParams& PinParams) are the main ones to focus on.
Dirhas two possible values:EGPD_InputandEGPD_Output. As their names suggest, these define whether a pin is an input or output pin.PinCatgoryhas a number of possibilities, all of which you can find as static constants inUEdGraphSchema_K2. In addition to basic PoD types (PC_Bool,PC_Int,PC_Float, etc), you can find important value types as well (PC_Class,PC_Object,PC_SoftObject, etc). If you can make a Blueprint Callable function with a type as an input or output, there's a corresponding PC_ value available for it somehow.PinSubCategoryObjectis sort of weird because it doesn't mean one thing. It means something different based on thePinCategory. Some categories don't need an object (PC_BoolorPC_Intfor example). In the case ofPC_Class, it's theUClassthat should act as the base type for a class selection (similar to aTSubclassOf<Type> function param). In the case ofPC_Object, it's theUClassof the type of object instances that should match the pin. These idiosyncrasies are well documented inUEdGraphSchema_K2.- This is the case where the third use of
UFUNCTIONcomes into play. ThePC_Delegatetype needs aUFunctionobject to operate. One easy way to do that is to declare a function as part of the custom node. Since it will never be called (we're only using it for the signature information), it doesn't matter that it's in a Module that won't be loaded by the final game.
- This is the case where the third use of
PinNameis the unique ID that you'd like to give the pin. This ID only needs to be unique for this node so you don't have to worry about the name overlapping with the pin names for other node types. Personally: I suggest creatingstatic const FNamesas private members of your node declaration and public accessor functions that wrap a call to theFindPinCheckedfunction with that constant as the input.PinParamsis mostly self explanatory if you look at the declaration. It has a default parameter, so unless you need it, you can basically ignore it. Personally: That's what I do as everything it does you can do directly to the pin returned by the call itself.
The most important PinCategory to be aware of is PC_Exec and the PinName constants to know are PN_Execute and PN_Then (also found in UEdGraphSchema_K2). The PC_Execs are the triangular pins that control execution flow from one node to the next. If you're making a node designed to be Blueprint Pure, you can ignore these, but if not, you want to create PC_Exec pins with an input pin named PN_Execute and an output pin named PC_Then at a minimum. These are the standard names for the main input and output that certain Blueprint processes are designed to look for. You can then create additional output PC_Exec pins depending on the needs of your particular node, and you can call them whatever you like.
Configure Pin
Now that you've created the pin, let's look at a few of its more immediately useful member variables.
FText PinFriendlyName- This is the name actually shown on the pin in the Editor. By default, it'll be thePinName(following the usual UE4 conversion rules of camel case strings into display strings). As with otherFText, theLOCTEXTmacro is a solid start here.FString PinTooltip- This controls the string that shows up for this pin as a tooltip. Since it's only anFString, you can just use theTEXTmacro. All Epic's nodes useLOCTEXT( ... ).ToString( ), presumably to support localized tooltips. You can follow that pattern or not, it's really up to you.DefaultValue,DefaultObject&DefaultTextValue- These are various members that define the default for the pin. Which one to use will depend on thePinCategoryand is well documented where the PC_ constants are declared.PinType.bIsReference&PinType.bIsConst- These are members that match the '&' and 'const' type declaration elements in C++. This is no different than declaring constant or reference parameters in the signature of a Blueprint CallableUFUNCTION.PinType.ContainerType- A value that lets you switch up the type of the pin to an array, map or set. The default none option is for regular non-container types. Whatever type you specified with thePinCategoryis the type contained within the container.
void ExpandNode( FKismetCompilerContext& CompilerContext, UEdGraph* SourceGraph )
This is the second workhorse function of your custom node and is where we construct the graph of nodes this node will produce when compiled. It's helpful to think of these nodes like a very fancy Blueprint macro, in that all they do replace themselves with graphs of other simpler nodes. The other option mentioned earlier, Kismet bytecode, is a bit different and beyond the scope of this tutorial. The basic structure of this function looks like this:
void UK2Node_Tutorial::ExpandNode( FKismetCompilerContext &CompilerContext, UEdGraph *SourceGraph )
{
	Super::ExpandNode( CompilerContext, SourceGraph );

	if (Any Errors)
	{
 		BreakAllNodeLinks( )
 		return;
	}

	// All the custom blueprint node stuff
	...

	BreakAllNodeLinks( );
}
It starts with the usual Super:: call that is fairly routine with UE4 object virtual functions. Next a check for errors, like required pins inputs or other data validation. Personally: I've taken to always including a function like this:
bool UK2Node_Tutorial::CheckForErrors( FKismetCompilerContext &CompilerContext )
{
	bool bError = false;

	if (error check)
	{
 		CompilerContext.MessageLog.Error( *LOCTEXT( "Error", "Node @@ had an input error." ).ToString( ), this );
 		bError = true;
	}

	return bError;
}
It returns a bool so that it can just be slotted directly into the "Any Errors" conditional in ExpandNode.
Note that the function doesn't return when it encounters an error (it just sets the bError flag). This is to that the function can report multiple errors at a time. You'll notice the LOCTEXT( ... ).ToString( ) makes a reappearance here. Again I'm just following the convention I've cribbed from the UE4 code I've examined. The "@@" insert is particularly interesting though. Combined with the 'this' argument, it will make a link to your node in the message log, making it easy to hop directly to the offending node. You may also use the different trace functions of the MessageLog object to change the way your messages display (Warning and Log are the other common versions). I have found this to be a very useful function to build into all my nodes, but you should handle the data validation however you think is best.
Back to ExpandNode. You'll notice that in both the error case and at the very end of the function there are calls to BreakAllNodeLinks. If you use a non-centralized error checking you'll want to make sure that all your error cases eventually flow to a call to this function. Similarly to the reason you'll always overload IsNodeSafeToIgnore, our custom node isn't meant to be on the final, compiled, graph. Calling this function makes sure that it has no remaining links to the "outside" that might make the Blueprint compiler do something with it we don't want.
Next, we programmatically create the nodes that will actually provide the functionality. I'll only cover three in this tutorial (IfThenElse, DynamicCast and CallFunction) but the overall pattern will hold true for any UK2Node-derived types that you can find (or that you've created). At a minimum you'll need to do:
auto Node = CompilerContext.SpawnIntermediateNode< K2Node_Type >( this, SourceGraph );
...
Node->AllocateDefaultPins( );
SourceGraph is one of the arguments passed into ExpandNode. The "..." section is for any node-specific initialization that needs to happen between the creation of the node and the creation of the pins. Nothing is needed for UK2Node_IfThenElse. For UK2Node_DynamicCast you must set the TargetType member to the UClass of the type you would like to cast to and an optional member function SetPurity that allows you to decide if you want a pure version or not (ie with or without execution pins). For UK2Node_CallFunction you'll need to set the FunctionReference member with the SetExternalMember method. This will look something like:
static const FName FunctionName = GET_FUNCTION_NAME_CHECKED( UKismetSystemLibrary, IsValid );
Node->FunctionReference.SetExternalMember( FunctionName, UKismetSystemLibrary::StaticClass( ) );
The GET_FUNCTION_NAME_CHECKED macro will create an FName for the function in a way that will generate useful compile errors if you get it wrong. If you use a raw FName instead of the macro, you may not catch the error until you try to test your code. The first parameter is the type that has the function that you'd like to call, in this case the UKismentSystemLibrary Blueprint Function Library. The function you choose can be any method of the class (static or member) but it must be a UFUNCTION, it must be callable from the node, and it must be BlueprintCallable. When I say it must be callable, I mean with the usual C++ calling convention rules around public/protected/private. If the function you want to call is private, your node class will need to be a friend of the class providing the function. There is also an interesting UFUNCTION meta tag BlueprintInternalUseOnly = true which will allow the function to be accessible by your node but hidden from Blueprints in the editor. It's not required, the IsValid example isn't marked as internal only, but it can be helpful at maintaining reasonable usability. Personally: I've gotten into the habit of appending "_BP" to the names of my UFUNCTIONs written specifically for use by Blueprint. I append "_K2" to any UFUNCTION that exists specifically to be called by one of my custom K2 nodes.
Once you've created a few nodes, you need to connect them to each other. You do this by using the pins each node creates in their version of AllocateDefaultPins. First you'll want to gather all the pins from your custom node. If you followed my pattern above, you'll use the public accessors you've written but you'll need a call to FindPin or FindPinChecked in some way for each of the pins you created during AllocateDefaultPins. Next, you need the pins from from each of the nodes that you spawned with SpawnIntermediateNode. To start with, just about every node will return a pin from the UK2Node implementation of GetExecPin. This is the input PC_Exec pin that you would connect an execution line to in the Blueprint editor. The exceptions here are pure nodes, which won't have an input or output PC_Exec pin. Fetching pins from nodes other than these defaults depends on the specific node. UK2Node_IfThenElse has one additional input data pin, GetConditionalPin, and two output exec pins: GetThenPin (when the conditional is true) and GetElsePin (when the conditional is false). UK2Node_DynamicCast has two data pins available all the time: GetCastSourcePin (the object to be cast) and GetCastResultPin (the object cast to the TargetType). It also has two exec pins that are available when it's not configured as pure: GetValidPin (CastResult is non-nullptr) and GetInvalidPin (CastResult is nullptr). A quick glance at an unfamiliar K2Node's header file will give you a good idea of the pins it has, and how to access them.
UK2Node_CallFunction is more complicated. It returns an output exec pin from the GetThenPin if it's not pure and returns an output data pin from GetReturnValuePin if the function has a return value. You can access all of the function's parameters by using FindPin or FindPinChecked. Just pass in an FName of the parameter you want to fetch. Unfortunately there isn't a similar macro to GET_FUNCTION_NAME_CHECKED that works for function parameters, so you'll just have to do your best with copy/paste. All the same rules for a Blueprint Callable function apply to the node you've created here as when placing the node in an actual Blueprint, rules like non-const reference parameters being output pins or the Then pin being replaced by other exec pins if you've used the ExpandEnumAsExecs meta tag. If you call a member function that would normally have a self/this pointer, you'll find it as parameter named "self." If you have difficulty picturing what a function might look like based on it's parameters and UFUNCTION settings, you can always omit any BlueprintInternalUseOnly markup (or change it to equal false) to allow you to place it in a Blueprint to see it visually. Just remember to change it back before you finish (or check-in if you're using source control).
Next you hook up pins in code the same way you would hook them up when editing a Blueprint: by making links from input pins to output pins. There are a couple different ways to do this.
The first is to simply call MakeLinkTo on one pin and pass it the pin you would like it linked to. There is no requirement that you call it on the input or output pin, only that one pin is an input and one is an output.
The next option is to use UEdGraphSchema_K2::TryCreateConnection:
auto Schema = Cast< UEdGraphSchema_K2 >( GetSchema( ) );
Schema->TryCreateConnection( Pin1, Pin2 );
GetSchema is an inherited method, and if you keep a pointer to the schema for the entire scope of ExpandNode, you don't have to call GetSchema() and cast every time you want to call TryCreateConnection. The same restrictions on Pin1 and Pin2 exist here as they do for MakeLinkTo: order doesn't matter but one must be an input and the other an output. The main difference between using TryCreateConnection and MakeLinkTo is that TryCreateConnection triggers some callbacks on the node to respond to the link changes (I will discuss those later on as an intermediate feature). An example of when you must use TryCreateConnection instead of MakeLinkTo is the For-Each loop node. Using MakeLinkTo to connect an array to the input of For-Each won't cause the Element output pin to change to the array's element type. Using TryCreateConnection the output pin will the array type updated correctly. However the distinction is not related directly to wildcard input types. Personally: I tried to get some direction from Epic on a best practice for one to prefer but they didn't provide any real guidance.
You also don't have to connect any pins at all. In cases where DefaultValue, DefaultObject or DefaultTextValue are available you can assign values to whichever of those is appropriate for the PinCategory, and that value will be passed along to the function/node/etc. This is an option if you're calling a general purpose function and don't want a parameter exposed as a pin of your custom node or if you've included editable properties on your node. The most difficult part is that the defaults only support FString, UObject* and FText. This means that for any other type you have to convert your value to an FString. Some conversions are easier than others, some are more difficult (enumerations especially).
Lastly you must treat your node's pins a little differently than the pins of the intermediate nodes you've hooked together. Your node's input pins are meant to become the inputs of the spawned nodes and your output pins are meant to be outputs from the spawned nodes. And MakeLinkTo (or TryCreateConnection) can't link input-input or output-output. Instead we'll rely on the FKismetCompilerContext param and one of it's methods: FPinConnectionResponse MovePinLinksToIntermediate(UEdGraphPin &SourcePin, UEdGraphPin &IntermediatePin). On the off chance that one of your inputs is an input to more than one intermediate node, there is also FPinConnectionResponse CopyPinLinksToIntermediate(UEdGraphPin& SourcePin, UEdGraphPin& IntermediatePin). You'll want to have at least one call to Move or Copy for each of your input and output pins. The only other thing to consider is the possibility that some of your input pins may have been configured using one of the default value members. This is how it works when the user edits the values of a pin, like int or vector, instead of connecting it with a link. This is the next useful utility to have on hand:
void MovePinLinksOrCopyDefaults( FKismetCompilerContext &CompilerContext, UEdGraphPin *Source, UEdGraphPin *Dest )
{
	if (Source->LinkedTo.Num( ) > 0)
	{
 		CompilerContext.MovePinLinksToIntermediate( *Source, *Dest );
	}
	else
	{
 		Dest->DefaultObject = Source->DefaultObject;
 		Dest->DefaultValue = Source->DefaultValue;
 		Dest->DefaultTextValue = Source->DefaultTextValue;
	}
}
You can see that this function will move links if there are any, and will just blindly copy over all the default values if there are no links. I figured there wasn't really any purpose trying to just copy the one used by the PinCategory and make that branch become some crazy switch statement (or in reality a huge if-else if chain since the PC_'s are FNames). You could also create one for Copy, or just create one for Copy instead of Move. This was the version I created before I found I ever needed to use the Copy version and haven't personally needed a CopyLinksOrCopyDefaults sort of function.
Layout
You'll want to figure out a coding layout that works for you and makes it easy to reason about the functionality of your node. You've lost the biggest advantage of Blueprint which is the visual layout. One option would be to lay it out in the same order I've described all the components in:
Super::- Error Handling
- Spawn Nodes
- Get All Pins
- Make All Links
BreakAllNodeLinks( )
Alternately you could code in the execution order of the nodes in a more interleaved fashion:
Super::- Error Handling
- Get Custom Node Pins
- Spawn Node
- Get Pins
- Make Links to Previously Spawned Nodes
- Repeat Spawn/Get/Link For Each Needed Node
BreakAllNodeLinks( )
This appears to be how the Epic organzes their nodes, and I've found it to work for me as well. But you'll want to do what works for you.
Lastly, when you've finished with your implementation of ExpandNode it's can be a good idea to go back over it and for every pin that you got from a node (including your own) do a quick search to make sure it's used at least one other time as part of a Move, Copy, MakeLinkTo or TryCreateConnection call. It can be easy to miss one and I have yet to find a good alternative solution. You may still run into trouble if you should be using a pin more than once, but you should be guaranteed that any pin you get will be the Source or Destination of at least one link modifier call.
At this point, you should be able to create very simple custom nodes. Before moving onto more advanced features, I'll cover the UK2Node_ConstructObjectFromClass (referred to as Construct from here on out) that I mentioned earlier as another good candidate class to derive your own nodes from. For the most part, your custom node works exactly the same as if you derived from any other UK2Node, but there are a few differences.
- If you derive your node from Construct, it will already have overrides for
IsNodeSafeToIgnoreandGetMenuActions. If all you do is return true and use the snippet I provided, respectively, then you don't need to do anything about these functions in your node. FText GetBaseNodeTitle( ) const&FText GetNodeTitleFormat( ) const- Construct overriddes theGetNodeTitlefunction. Instead of overriding it again, you'll override these two functions and Construct will figure out the function to call.GetBaseNodeTitlereturns the more traditional node name that shows up in menus.GetNodeTitleFormatis text that should include "{ClassName}" somewhere. Construct will then use UE4's formatting to insert the name of the class being created into the node title.UClass* GetClassPinBaseClass( ) const- Override this function to define the type of object the user will create. This will result in an input pin of typePC_Classthat allows the user to select any concrete class that derives from it. When the user sets this class, Construct will also create input pins for all the class properties that use theExposeOnSpawnmeta tag.bool IsSpawnVarPin( UEdGraphPin *Pin ) const- Override this function if you create any of your own pins inAllocateDefaultPins. When the Class pin changes, all the input pins get removed unless this function returns false for that particular pin.void CreatePinsForClass( UClass *InClass, TArray< UEdGraphPin* > *OutClassPins )- This function is called when the Class pin changes. By default, this creates all theExposeOnSpawnproperties (so don't forget theSuper::call!). Override this if you have additional pins that aren'tExposeOnSpawnproperties but depend on the selected type.GetExecPin,GetClassPin,GetThenPin&GetResultPin- These are the pin accessor functions for the exec and data pins that Construct creates and that you'll need to Move (or Copy) from duringExpandNode. Obviously, since Construct creates these pins, you don't have to worry about creating any of them as part of your ownAllocateDefaultPins.UEdGraphPin* FKismetCompilerUtilities::GenerateAssignmentNodes( class FKismetCompilerContext& CompilerContext, UEdGraph* SourceGraph, UK2Node_CallFunction* CallBeginSpawnNode, UEdGraphNode* SpawnNode, UEdGraphPin* CallBeginResult, const UClass* ForClass )- This is a super-important function that you must call as part of yourExpandNodeimplementation. Its purpose is to connect all theSpawnVarPinsfrom your node to the spawned object so that all theExposeOnSpawnproperties are assigned however the pins are configured. Call this function after spawning and setting-up aCallFunctionnode that actually creates or spawns an object of the right type. Another tricky part of this is that you must callGenerateAssignmentNodesafter you're done working with any of your nodes' pins. This function implicitly calls MovePins on all the pins of your node, and as already discussed, that will empty the source pin. The return value is an output exec pin that is the end of the execution required to set all the Class properties. This is meant to allow you to spawn your object, callGenerateAssignmentNodesand then setup additional nodes (likeCallFunction) that use the fully initialized object.CompilerContextandSourceGraphand the parameters that were passed in as the parameters toExpandNode.CallBeginSpawnNodeis theCallFunctionnode you created that created or spawned the object when this node is executed.SpawnNodeis your custom node, so passthishere.CallBeginResultis the output pin fromCallBeginSpawnNodethat has created the object. Usually this is the result ofCallFunction::GetReturnValuePin, but there are probably cases where it isn't.ForClassis the Class type to spawn (or more accurately the type theExposeOnSpawnoptions are based on). Construct provides a function,GetClassToSpawn, that you can call for this parameter.
Intermediate Features
Now that you've got the basics of building a node, I'll move on to a few more interesting tidbits that can open a lot of possibilities. With just the basics, you can make nodes that are just a little bit better than what you would get with the auto-generated solution. Incorporating these tools will allow you to make nodes that blow them out of the water!
More Pin Properties
Before we cover more properties, it's worth mentioning that as with any variable, a pin member is just that variable. While there are minimum requirements that you have to provide to create a pin, once it has been created you should feel free to update it as the needs of the node change.
UEdGraphPin::PinType.PinCategorySubObject- This is the actual storage of theCategoryObjectyou passed intoCreatePin. However it's good to know about the actual member as well because it can be very useful to modify it dynamically.UEdGraphPin::bHidden- This flag can make the pin become visible or hidden to the user in the Blueprint Editor.UEdGraphPin::bAdvanced- This flag makes pins that show up in the advanced section of the node the same way theAdvancedDisplaymeta UFUNCTION markup does. If your node has any advanced pins, do something like this inAllocateDefaultPins:
if (AdvancedPinDisplay == ENodeAdvancedPins::NoPins)
AdvancedPinDisplay = ENodeAdvancedPins::Hidden;AdvancedPinDisplayis an inherited property that defaults toENodeAdvancedPins::NoPins. If you don't update it toENodeAdvancedPins::Hidden, then your node won't have an advanced section, the pins will just be listed normally.AdvancedPinDiplayis also aUPROPERTYso it's saved. This is why it's a check/set instead of just a set, because the visibility state last set by the user is maintained across Editor sessions.UEdGraphPin::PinType.PinValueType- I already mentionedPinType.ContainerTypeabove and that it can be used to configure a pin as a map. Well, maps require two types.PinCategoryis treated as the type of the map's key while thePinValueTypeis treated as the type of the value.PinValueTypeis itself a structure with a few members, but they are basically the same category and sub-object values that I've already covered while discussing pin creation.void PinConnectionListChanged( UEdGraphPin *Pin )&void PinDefaultValueChanged( UEdGraphPin *Pin )- Override these functions to execute code when a connections or pin default has been changed. These hooks become the basis for making nodes that dynamically update other pins based on pin state. This is especially required when using thePC_Wildcardpin category.- If you go with the
PostLoadroute to re-update your pins when opening a blueprint in the Blueprint Editor,PinConnectionListChangedis the function you'll want to be aware of for another reason. After updating an output pin, you'll need to do something like this:
- If you go with the
for (UEdGraphPin *LinkedPin : OutputPin->LinkedTo)
	LinkedPin->GetOwningNode( )->PinConnectionListChanged( LinkedPin );
this should make sure that any dynamic type functionality in linked nodes is re-triggered so that the graph is correct. As I mentioned in the AllocateDefaultPins section, this appears to work for the use cases I've encountered but I'm not positive that those are the only use cases that exist.
Properties
PostEditChangeProperty&PostEditChangeChainedProperty- If you've done any Editor UI work, you'll recognize these functions. These are actually part of theUObjectAPI and allow responding to property changes. You'd only need these if you overrideShouldShowNodePropertiesto return true and have node properties that are user-editable. Because custom nodes are available outside Editor builds, you'll have to remember to make sure these overrides are blocked off with#if WITH_EDITOR. It's also perfectly fine to override any of the otherUObjectfunctions related to property editing as you would for any other properties accessible by details panel. Depending on how you change your node in response, you may also need to call one or both of these functions to update the Blueprint visual state:
GetGraph( )->NotifyGraphChanged( );
FBlueprintEditorUtils::MarkBlueprintAsModified( GetBlueprint( ) );
You don't need to do this from PinConnectionListChanged or PinDefaultValueChanged since the graph is already changing and will update after the function is completes. There is also a GET_MEMBER_NAME_CHECKED macro very much like the GET_FUNCTION_NAME_CHECKED that was used for the CallFunction node. You would use this macro to provide a compile time catch for the name of any members you are trying to catch a value change for.
Other
FNodeTextCache- this is a helper structure for use with dynamic text.FTextformat isn't always the fastest of functions (especially given how oftenGetNodeTitleis apparently called). It's not aUSTRUCTso it can't be aUPROPERTY. It has a few important functions:bool IsOutOfDate(EdGraphNode *InOwningNode)- Allows you to check if something has happened with the node that might cause your node's text to change.void SetCachedText(const FText &InText)- Updates the text to something new.- There is an implicit cast to
FTextthat makes it really easy to use as the return value ofGetNodeTitle. void MarkDirty( )- Forces the cache to be out of date the next time that it's checked. This is optional.IsOutOfDatealready updates based on pin values, but sometimes (such as with editableUPROPERTYs) there are other changes to the node that should force the text to change.
Warning
One downside to making custom nodes is that you do lose out on some of the built-in functionality that UE4 provides as macros and blueprint function library functions. And it turns out that some very useful Blueprint features are (surprisingly) implemented as macros instead of in C++. Earlier, I showed a function call of IsValidObject from the Kismet System Library. However that's just this function:
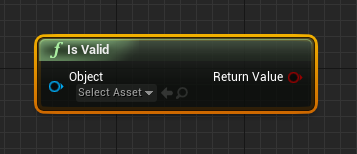
The node you may be more more familiar with is:
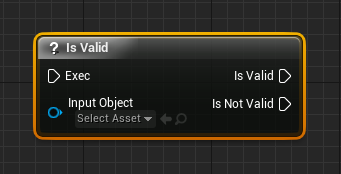
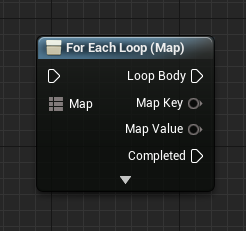
which is implemented as a macro and so it won't be available in that form to any of your custom nodes. A little more problematic is the For Each node:
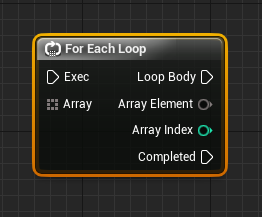
This is also implemented as a macro! There are probably quite a few more, but these are the ones that I've personally run into, and it's worth being aware of when trying to build any new nodes. Recreating the IsValidObject macro as a custom C++ node is a good exercise that you could use to try out making a custom node, as it only requires a single CallFunction and a IfThenElse node. For Each is much more complicated, but by the time you're writing a node that requires it, you'll probably have the experience required to create a replacement. One note when re-implementing existing macros as custom nodes: if you follow all the advice/steps from this tutorial, you'll end up with two entries in the node placement menu. Whether or not that's a problem for you is, well, up to you. But if it is a problem you can skip the overrides of GetMenuActions and the various UI functions (like GetMenuCategory, GetNodeTitle and GetTooltipText). Omitting GetMenuActions will prevent it from showing up in the node placement menu, and if it's not placed or in any UI you don't really need any UI related functions.
Advanced Features
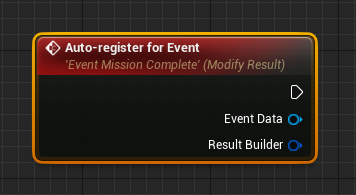
FSlateIcon GetIconAndTint( FLinearColor& OutColor ) const- Override this to control the icon on the left side of the node title. You can see one such icon back in the image of Auto-Register for Event:FSlateIcon( "EditorStyle", "GraphEditor.CustomEvent_16x" ). I've only ever used existing icons (this is where engine source comes in handy to borrow from existing nodes) but I'm sure there's some way to load custom graphics that would be accessible from here. Not something I've had reason to explore yet, but I have it on good authority it's pretty easy. Some of the colors have config values that can found in theUGraphEditorSettingsclass which can be accessed withGetDefault< UGraphEditorSettings >( ).FLinearColor GetNodeTitleColor( ) const- This one should be obvious: override this function to change the node's title color. I used it with the Auto-Register for Event node above so that it would match the other built in event nodes. Engine source can again be helpful if you're trying to match other UE4 provided color schemes. Most have config values that can found in theUGraphEditorSettingsclass which can be accessed withGetDefault< UGraphEditorSettings >( ).FName GetCornerIcon( ) const- This is similar toGetIconAndTintexcept that it goes on the upper right corner. The return value I've usually used with this function is pretty exclusively "Graph.Latent.LatentIcon" which shows up like:
Others that appear to be supported: "Graph.Replication.ClientEvent", "Graph.Replication.Replicated", "Graph.Replication.AuthorityOnly", "Graph.Replication.AuthorityOnly", "Graph.Message.MessageIcon", "Graph.Event.InterfaceEventIcon", "Graph.Editor.EditorOnlyIcon". Most (if not all) of these should be pretty apparent what they're related to (such as the network related support around replication).
void GetNodeContextMenuActions( UToolMenu* Menu, UGraphNodeContextMenuContext* Context ) const- This is an interesting function that you can override to add menu options to the right click menu that appears when you right click on your node. I haven't done much with it, mostly cribbing some functionality from UE4 nodes that can swap between pure and impure modes of operation. Menu building is probably something that deserves it own tutorial, but I really haven't done very much here on my own. Just copied from existing nodes. I wanted to mention it less to explain how it do it and more to give you a jumping off point for your own exploration of source code.bool IsCompatibleWithGraph( const UEdGraph* TargetGraph ) const- Override this is a function to restrict the placement of your node to specific types of blueprint graphs. Here is an example of the one I wrote for my auto registration event:
bool UK2Node_AutoEventRegistration::IsCompatibleWithGraph( const UEdGraph* TargetGraph ) const
{
	if (!Super::IsCompatibleWithGraph( TargetGraph ))
		return false;

	auto GraphSchema = TargetGraph->GetSchema( );
	auto GraphType = GraphSchema->GetGraphType( TargetGraph );
	if ((GraphType != EGraphType::GT_Ubergraph) && (GraphType != EGraphType::GT_Macro))
		return false;

	auto BlueprintType = FBlueprintEditorUtils::FindBlueprintForGraph( TargetGraph );
	if (BlueprintType == nullptr)
		return false;

	return BlueprintType->GeneratedClass->ImplementsInterface( UEventAutoRegistrar::StaticClass( ) );
}
After a bit of usual boilerplate, the first major check is on the type of the graph. In this case I only want to allow it in the Event Graphs and macros, but not in functions. Other options you can test against are GT_Function, GT_Animation & GT_StateMachine (if you want). The BlueprintType->GeneratedClass is the actual UClass for the Blueprint. If you care about the type of the object that would get instantiated from your Blueprint that's the class you'd check (as I do here by checking if it implements a particular interface). The example here (except for the interface check) would generally go hand-in-hand with using the "LatentIcon" corner icon mention earlier.
A word of caution, the implementation of this function (or even the use of the "LatentIcon" corner icon) does not appear to have affect on the creation of macros. Normally, when a macro has a latent node in it (at least one of the node types the engine understands), it is then able to treat the macro itself as being latent and thereby restrict the macro node to the same places as the latent node (Event Graphs and Macros). But the engine is weird and very explicitly checks only 4 node types. One solution is to be careful, depending on your situation, just knowing the pitfall is enough. Another would be to omit the GT_Macro allowance from the above implementation, though that does reduce the utility of your node somewhat. You can do nothing; depending on the implementation of your node you may get compiler errors when the node is placed in the wrong graph but the ones I have gotten aren't helpful. I was able to figure out what they meant, you may be able to figure out what they mean, but others you're working with (or future-you) may not be as successful. If you have engine source you could also modify FBlueprintEditorUtils::CheckIfGraphHasLatentFunctions to take into account other node types. Personally: This is the route I've taken, adding a virtual function to UK2Node. If the entire code-base was mine I would have refactored the existing 4 checks to become implementations of that virtual... but it's not so I didn't. It would just make engine upgrades more difficult.
IK2Node_EventNodeInterface- This is an interesting interface that I found that allows your custom nodes to function in similar ways to the Custom Event nodes. It has one virtual functionGetEventNodeActionthat can be best summarized with a code snippet:
TSharedPtr< FEdGraphSchemaAction > UK2Node_AutoEventRegistration::GetEventNodeAction( const FText& ActionCategory )
{
	FText Title = ...
	FText Tooltip = ...
	int GroupID = ...

	TSharedPtr< FEdGraphSchemaAction_K2Event > EventNodeAction = MakeShareable( new FEdGraphSchemaAction_K2Event( ActionCategory, Title, Tooltip, GroupID ) );
	EventNodeAction->NodeTemplate = this;

	return EventNodeAction;
}
Similarly to the Menu Actions, I haven't done a lot with the FEdGraphSchemaAction type. Just enough to replicate what the Custom Event does to get what I needed.
The last tip is one of my own crazy inventions (or at the very least I haven't seen any UE4 node work in a similar fashion). I've been a big fan of the Instanced properties that UE4 supports and the interesting possibilities it allows when writing extensible systems. Start with a property that is marked up with EditDefaultsOnly and Instanced, along with the usual override of ShouldShowNodeProperties. This gets you as far as having the instanced property in the details panel when your node is selected. Next, that member will need to be passed to a node through one of its pins during ExpandNode, which can be done by assigning to a pin's DefaultObject member. So far, so standard. But it turns out there's a bit of a quirk when it comes to cooked builds or else you'll end up with a nullptr for that parameter being passed to that node. This can be solved by duplicating the instanced object into a different Outer, an Outer that will be present in the cooked build.
const EObjectFlags NewFlags = (RF_AllFlags & (~RF_Transient));
ObjectPin->DefaultObject = StaticDuplicateObject( InstancedProperty, CompilerContext.NewClass, NAME_None, NewFlags );
Start by determining the object flags we want to keep, which is everything except the transient flag. Next, duplicate the instanced object and assign that to the pin default instead of the assigning the property itself. The second parameter is the new Outer to use for the duplicated object. In this case I use CompilerContext.NewClass, which is the UClass of the Blueprint. Since this UClass is required to be available at runtime, even in a cooked build, it's as good a candidate as any for a new Outer.
Conclusion
That's it for this tutorial. I'd like to stress that the information listed here is not exhaustive, but I hope it gives you a good start. If you have engine source, it is a fantastic resource when building (or maybe "cobbling" is a better adjective) the nodes you need. Start by finding the nodes that have similar behavior (or something close) and use them as the hook to find how it does what it does. That's how I've found much of the information that I've described here.
Happy Development!
Post Script (Edit 3/2/2022)
I've been excited to see this tutorial gain a bit of traction over the last year. Having it pop up on reddit and discord servers by being linked by other people is amazing. Especially when they include they think it's a good resource. I was asked by someone to share code related to the custom node for map iteration (container maps, not map assets) and after a few CYA questions at work I've uploaded some source code to a github repository here: https://github.com/MagForceSeven/UE-K2-Nodes.


SPAM REMOVED