In this article by Christer Kaitila, author of Adobe Flash 11 Stage3D (Molehill) Game Programming , we will:
- Obtain Flash 11 for your browser
- Get all the tools ready to compile Stage3D games
- Initialize 3D graphics in Flash
- Send mesh and texture data to the video card
- Animate a simple 3D scene
Before we begin programming, there are two simple steps required to get everything ready for some amazing 3D graphics demos. Step 1 is to obtain the Flash 11 plugin and the Stage3D API. Step 2 is to create a template as3 project and test that it compiles to create a working Flash SWF file.
Once you have followed these two steps, you will have properly "equipped" yourself. You will truly be ready for the battle. You will have ensured that your tool-chain is set up properly. You will be ready to start programming a 3D game.
Step 1: Downloading Flash 11 (Molehill) from Adobe
Depending on the work environment you are using, setting things up will be slightly different. The basic steps are the same regardless of which tool you are using but in some cases, you will need to copy files to a particular folder and set a few program options to get everything running smoothly.
If you are using tools that came out before Flash 11 went live, you will need to download some files from Adobe which instruct your tools how to handle the new Stage3D functions. The directions to do so are outlined below in Step 1.
In the near future, of course, Flash will be upgraded to include Stage3D. If you are using CS5.5 or another new tool that is compatible with the Flash 11 plugin, you may not need to perform the steps below. If this is the case, then simply skip to Step 2.
Assuming that your development tool-chain does not yet come with Stage3D built in, you will need to gather a few things before we can start programming. Let's assemble all the equipment we need in order to embark on this grand adventure, shall we?
Time for action - getting the plugin
It is very useful to be running the debug version of Flash 11, so that your trace statements and error messages are displayed during development. Download Flash 11 (content debugger) for your web browser of choice.
At the time of writing, Flash 11 is in beta and you can get it from the following URL:
http://labs.adobe.co...shplayer11.html
Naturally, you will eventually be able to obtain it from the regular Flash download page:
http://www.adobe.com.../downloads.html
On this page, you will be able to install either the Active-X (IE) version or the Plugin (Firefox, and so on) version of the Flash player. This page also has links to an uninstaller if you wish to go back to the old version of Flash, so feel free to have some fun and don't worry about the consequences for now.
Finally, if you want to use Chrome for debugging, you need to install the plugin version and then turn off the built-in version of Flash by typing about:plugins in your Chrome address bar and clicking on Disable on the old Flash plugin, so that the new one you just downloaded will run.
We will make sure that you installed the proper version of Flash before we continue.
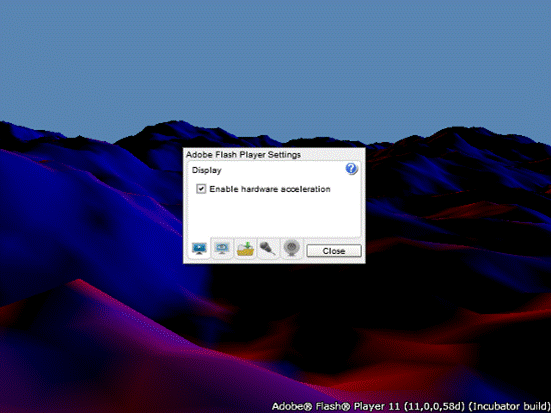
To test that your browser of choice has the Stage3D-capable incubator build of the Flash plugin installed, simply right-click on any Flash content and ensure that the bottom of the pop-up menu lists Version 11,0,1,60 or greater, as shown in the following screenshot. If you don't see a version number in the menu, you are running the old Flash 10 plugin.

Additionally, in some browsers, the 3D acceleration is not turned on by default. In most cases, this option will already be checked. However, just to make sure that you get the best frame rate, right-click on the Flash file and go to options, and then enable hardware acceleration, as shown in the following screenshot:
You can read more about how to set up Flash 11 at the following URL:
http://labs.adobe.com/technologies/flashplatformruntimes/flashplayer11/
Time for action - getting the Flash 11 profile for CS5
Now that you have the Stage3D-capable Flash plugin installed, you need to get Stage3D working in your development tools. If you are using a tool that came out after this book was written that includes built-in support for Flash 11, you don't need to do anything--skip to Step 2.
If you are going to use Flash IDE to compile your source code and you are using Flash CS5, then you need to download a special .XML file that instructs it how to handle the newer Stage3D functionality. The file can be downloaded from the following URL:
http://download.macromedia.com/pub/labs/flashplatformruntimes/incubator/flashplayer_inc_flashprofile_022711.zip
If the preceding link no longer works, do not worry. The files you need are included in the source code that accompanies this book. Once you have obtained and unzipped this file, you need to copy some files into your CS5 installation.
- FlashPlayer11.xml goes in:
Adobe Flash CS5\Common\Configuration\Players
- playerglobal.swc goes in:
Adobe Flash CS5\Common\Configuration\ActionScript 3.0\FP11
Restart Flash Professional after that and then select 'Flash Player 11' in the publish settings. It will publish to a SWF13 file.
As you are not using Flex to compile, you can skip all of the following sections regarding Flex. Simple as it can be!
Time for action - upgrading Flex
If you are going to use pure AS3 (by using FlashDevelop or Flash Builder), or even basic Flex without any IDE, then you need to compile your source code with a newer version of Flex that can handle Stage3D.
At the time of writing, the best version to use is build 19786. You can download it from the following URL:
http://opensource.ad...nload+Flex+Hero
Remember to change your IDE's compilation settings to use the new version of Flex you just downloaded.
For example, if you are using Flash Builder as part of the Abode Flex SDK, create a new ActionScript project: File | New | ActionScript project. Open the project Properties panel (right-click and select Properties). Select ActionScript Compiler from the list on the left. Use the Configure Flex SDK's option in the upper-right hand corner to point the project to Flex build 19786 and then click on OK.
Alternately, if you are using FlashDevelop, you need to instruct it to use this new version of Flex by going into Tools | Program Settings | AS3 Context | Flex SDK Location and browsing to your new Flex installation folder.
Time for action - upgrading the Flex playerglobal.swc
If you use FlashDevelop, Flash Builder, or another tool such as FDT, all ActionScript compiling is done by Flex. In order to instruct Flex about the Stage3D-specific code, you need a small file that contains definitions of all the new AS3 that is available to you.
It will eventually come with the latest version of these tools and you won't need to manually install it as described in the following section. During the Flash 11 beta period, you can download the Stage3D-enabled playerglobal.swc file from the following URL:
http://download.macromedia.com/pub/labs/flashplatformruntimes/flashplayer11/flashplayer11_b1_playerglobal_071311.swc
Rename this file to playerglobal.swc and place it into an appropriate folder. Instruct your compiler to include it in your project. For example, you may wish to copy it to your Flex installation folder, in the flex/frameworks/libs/player/11 folder.
In some code editors, there is no option to target Flash 11 (yet). By the time you read this book, upgrades may have enabled it. However, at the time of writing, the only way to get FlashDevelop to use the SWC is to copy it over the top of the one in the flex/frameworks/libs/player/10.1 folder and target this new "fake" Flash 10.1 version.
Once you have unzipped Flex to your preferred location and copied playerglobal.swc to the preceding folder, fire up your code editor. Target Flash 11 in your IDE--or whatever version number that is associated with the folder, which you used as the location for playerglobal.swc. Be sure that your IDE will compile this particular SWC along with your source code.
In order to do so in Flash Builder, for example, simply select "Flash Player 11" in the Publish Settings. If you use FlashDevelop, then open a new project and go into the Project--->Properties--->Output Platform Target drop-down list.
Time for action - using SWF Version 13 when compiling in Flex
Finally, Stage3D is considered part of the future "Version 13" of Flash and therefore, you need to set your compiler options to compile for this version. You will need to target SWF Version 13 by passing in an extra compiler argument to the Flex compiler: -swf-version=13.
1. If you are using Adobe Flash CS5, then you already copied an XML file which has all the changes, as outlined below and this is done automatically for you.
2. If you are using Flex on the command line, then simply add the preceding setting to your compilation build script command-line parameters.
3. If you are using Flash Builder to compile Flex, open the project Properties panel (right-click and choose Properties). Select ActionScript Compiler from the list on the left. Add to the Additional compiler arguments input: -swf-version=13. This ensures the outputted SWF targets SWF Version 13. If you compile on the command line and not in Flash Builder, then you need to add the same compiler argument.
4. If you are using FlashDevelop, then click on Project | Properties | Compiler Options | Additional Compiler Options, and add -swf-version=13 in this field.
Time for action - updating your template HTML file
You probably already have a basic HTML template for including Flash SWF files in your web pages. You need to make one tiny change to enable hardware 3D.
Flash will not use hardware 3D acceleration if you don't update your HTML file to instruct it to do so. All you need to do is to always remember to set wmode=direct in your HTML parameters.
For example, if you use JavaScript to inject Flash into your HTML (such as SWFObject.js), then just remember to add this parameter in your source. Alternately, if you include SWFs using basic HTML object and embed tags, your HTML will look similar to the following:
width="640" height="480">


wmode="direct">
The only really important parameter is wmode=direct (and the name of your swf file)-- everything else about how you put Flash into your HTML pages remains the same.
In the future, if you are running 3D demos and the frame rate seems really choppy, you might not be using hardware 3D acceleration. Be sure to view-source of the HTML file that contains your SWF and check that all mentions of the wmode parameter are set to direct.
Stage3D is now set up!
That is it! You have officially gone to the weapons store and equipped yourself with everything you require to explore the depths of Flash 11 3D graphics. That was the hard part. Now we can dive in and get to some coding, which turns out to be the easy part.
Step 2: Start coding
In Step 1, you downloaded and installed everything you need to get the Stage3D source code to compile. Whether you use Adobe CS5, Flash Builder, FlashDevelop, or you compile Flex from the command line, the actual AS3 source code required to get Stage3D working is exactly the same.
This is the demo that you will program in this article:
http://www.mcfunkypa...chapter_3_demo/
If you are the impatient type, then you can download the final source code project that you would create if you followed the steps below from the following URL:
http://www.packtpub.com/adobe-flash11-stage3d-molehill-game-programming-beginners-guide/book
For the sake of learning, however, why not go through the following steps, so that you actually understand what each line does? It is a poor warrior who expects to hone their skills without training.
Time for action - creating an empty project
Your next quest is simply to prepare an empty project in whatever tool-set you like.
For the sake of matching the following source code, create a class named Stage3dGame that extends Sprite, which is defined in an as3 file named Stage3dGame.as.
How you do so depends on your tool of choice.
Flash veterans and artists often prefer to work within the comfortable Adobe Flash IDE environment, surrounded by their old friends, the timeline, and the library palette. Create a brand new .FLA file, and prepare your project and stage as you see fit. Don't use any built-in Flash MovieClips for now. Simply create an empty .FLA that links to an external .AS3 file, as shown in the following screenshot:

Some game developers prefer to stick with pure AS3 projects, free of any bloat related to the Flash IDE or Flex that uses MXML files. This technique results in the smallest source files, and typically involves use of open source (free) code editors such as FlashDevelop. If this is your weapon of choice, then all you need to do is set up a blank project with a basic as3 file that is set to compile by default.
No matter what tool you are using, once you have set up a blank project, your ultra-simplistic as3 source code should look something like the following:
package

{


  [SWF(width="640", height="480", frameRate="60", backgroundColor="#FFFFFF")]


  public class Stage3dGame extends Sprite

  {

  }


}
What just happened?
As you might imagine, the preceding source code does almost nothing. It is simply a good start, an empty class, ready for you to fill in with all sorts of 3D game goodness. Once you have a "blank" Flash file that uses the preceding class and compiles without any errors, you are ready to begin adding the Stage3D API to it.
Time for action - importing Stage3D-specific classes
In order to use vertex and fragment programs (shaders), you will need some source code from Adobe. The files AGALMiniAssembler.as and PerspectiveMatrix3D.as are included in the project source code that comes with this book. They belong in your project's source code folder in the subdirectory com/adobe/utils/, so they can be included in your project.
Once you have these new .as files in your source code folder, add the following lines of code which import various handy functions immediately before the line that reads "public class Stage3dGame extends Sprite".
import com.adobe.utils.*;

import flash.display.*;

import flash.display3D.*;

import flash.display3D.textures.*;

import flash.events.*;

import flash.geom.*;

import flash.utils.*;
What just happened?
In the lines of the preceding code, you instruct Flash to import various utility classes and functions that you will be using shortly. They include 3D vector math, Stage3D initializations, and the assembler used to compile fragment and vertex programs used by shaders.
Try to compile the source. If you get all sorts of errors that mention unknown Molehill-related classes (such as display3D), then your compiler is most likely not set up to include the playerglobal.swc we downloaded earlier. You will need to check your compiler settings or Flex installation to ensure that the brand new Stage3D-capable playerglobal.swc is being used as opposed to an older version.
If you get errors complaining about missing com.adobe.utils, then you may not have unzipped the AGALMiniAssembler.as andPerspectiveMatrix3D.as code into the correct location. Ensure these files are in a subfolder of your source directory called com/adobe/utils/.
If your code compiles without errors, you are ready to move on.
Time for action - initializing Molehill
The next step is to actually get the Stage3D API up and running. Add the following lines of code to your project inside the empty class you created by updating the empty Stage3dGame function and adding the init function below it as follows:
public function Stage3dGame()

{

  if (stage != null)

	init();

  else

	addEventListener(Event.ADDED_TO_STAGE, init)

}


private function init(e:Event = null):void


{


  if (hasEventListener(Event.ADDED_TO_STAGE))


  removeEventListener(Event.ADDED_TO_STAGE, init);


  // class constructor - sets up the stage


  stage.scaleMode = StageScaleMode.NO_SCALE;

  stage.align = StageAlign.TOP_LEFT;


  // and request a context3D from Stage3d


  stage.stage3Ds[0].addEventListener(

  Event.CONTEXT3D_CREATE, onContext3DCreate);

  stage.stage3Ds[0].requestContext3D();

}
What just happened?
This is the constructor for your Stage3dGame class, followed by a simple init function that is run once the game has been added to the stage.
The init function instructs Flash how to handle the stage size and then requests a Context3D to be created. As this can take a moment, an event is set up to instruct your program when Flash has finished setting up your 3D graphics.
Time for action - defining some variables
Next, your demo is going to need to store a few variables. Therefore, we will define these at the very top of your class definition, above any of the functions, as follows:
// constants used during inits


private const swfWidth:int = 640;

private const swfHeight:int = 480;

private const textureSize:int = 512;


// the 3d graphics window on the stage


private var context3D:Context3D;


// the compiled shader used to render our mesh


private var shaderProgram:Program3D;


// the uploaded vertexes used by our mesh


private var vertexBuffer:VertexBuffer3D;


// the uploaded indexes of each vertex of the mesh


private var indexBuffer:IndexBuffer3D;


// the data that defines our 3d mesh model


private var meshVertexData:Vector.;


// the indexes that define what data is used by each vertex


private var meshIndexData:Vector.;


// matrices that affect the mesh location and camera angles


private var projectionMatrix:PerspectiveMatrix3D =new PerspectiveMatrix3D();

private var modelMatrix:Matrix3D = new Matrix3D();

private var viewMatrix:Matrix3D = new Matrix3D();

private var modelViewProjection:Matrix3D = new Matrix3D();


// a simple frame counter used for animation


private var t:Number = 0;
What just happened?
The demo you are writing needs to store things such as the current camera angle, the vertex, and fragment programs that we are about to create, and more. By defining them here, each of the functions we are about to write can access them.
Time for action - embedding a texture
Before we start creating the functions that perform all the work, let's also define a texture. Copy any 512x512 jpeg image into your source folder where you are putting all the files for this demo.
If you are using Flex or a pure AS3 programming environment such as Flash Builder or FlashDevelop, then you don't need to do anything further. If you are using Adobe Flash CS5, then you will need to open the Library palette (F11) and drag-and-drop the jpg file, so that the image is part of your .FLA file's library, as shown in the following screenshot:

Once this texture is in the library, right-click on it and open properties. Click on the Advanced button to view more options and turn on the check mark that enables Export for ActionScript and give the new class the name myTextureBitmapData. This will be used below.
If you are using Flash CS5, then add the following code just after the other variables you recently defined:
private var myBitmapDataObject:myTextureBitmapData = new myTextureBitmapData(texture_size, texture_size);

private var myTextureData:Bitmap = new Bitmap(myBitmapDataObject);


// The Molehill Texture that uses the above myTextureData

private var myTexture:Texture;
If you are using Flex or a pure AS3 environment, you do not have a "library" and instead, can embed assets using a line of code. Instead of the preceding code, define your texture in the following way:
[Embed (source = "texture.jpg")] private var myTextureBitmap:Class;

private var myTextureData:Bitmap = new myTextureBitmap();


// The Molehill Texture that uses the above myTextureData

private var myTexture:Texture;
What just happened?
The code you just entered embeds the JPG image you selected for use as a texture. This texture will eventually be drawn on the mesh we are about to define.
Time for action - defining the geometry of your 3D mesh
For the purposes of this simple demo, all we need to define is a "quad" (a square). We will define it now as follows:
private function initData():void

{


  // Defines which vertex is used for each polygon

  // In this example a square is made from two triangles


  meshIndexData = Vector.

  ([

	0, 1, 2, 0, 2, 3,

  ]);


  // Raw data used for each of the 4 vertexes


  // Position XYZ, texture coordinate UV, normal XYZ


  meshVertexData = Vector.

  ( [

	  //X, Y, Z, U, V, nX, nY, nZ

	 -1, -1, 1, 0, 0, 0, 0, 1,

	  1, -1, 1, 1, 0, 0, 0, 1,

	  1, 1, 1, 1, 1, 0, 0, 1,

	 -1, 1, 1, 0, 1, 0, 0, 1

  ]);


}
What just happened?
The preceding function fills a couple of variables with numerical data. This data is eventually sent to the video card and is used to define the locations of each vertex in your 3D mesh. For now, all we have defined is a simple square, which is made up of two triangles that use a total of four vertexes. Eventually, your models will be complex sculptures, made up of thousands of polies.
Anything from a sword to an entire city can be constructed by listing the x,y,z locations in space for each of a mesh's vertexes. For now, a simple square will be proof-of-concept. Once we can get a square spinning around in 3D, adding more detail is a trivial process.
Time for action - starting your engines
Recall that the init() function requests a Context3D object. An event handler was set up that Flash will run when your video card has prepared itself and is ready to receive data. Let's define this event handler.
The perfect place for this new snippet of code is just below the init() function:
private function onContext3DCreate(event:Event):void

{

  // in case it is not the first time this event fired


  removeEventListener(Event.ENTER_FRAME,enterFrame);


  // Obtain the current context


  var t:Stage3D = event.target as Stage3D;

  context3D = t.context3D;


  if (context3D == null)

  {

	// Currently no 3d context is available (error!)


	return;

  }


  // Disabling error checking will drastically improve performance.


  // If set to true, Flash will send helpful error messages regarding


  // AGAL compilation errors, uninitialized program constants, etc.


  context3D.enableErrorChecking = true;


  // Initialize our mesh data


  initData();
What just happened?
Inside the onContext3DCreate event handler, all your Stage3D inits are performed. This is the proper moment for your game to upload all the graphics that will be used during play.
The reasons you cannot upload data during the constructor you already wrote are:
? It can take a fraction of a second before your device drivers, 3D card, operating system, and Flash have prepared themselves for action.
? Occasionally, in the middle of your game, the Context3D can become invalidated.
? This can happen, for example, if the user's computer goes to "sleep", or if they hit Ctrl-Alt-Delete. For this reason, it is entirely possible that during the play, the mesh and texture data will need to be re-sent to your video RAM. As it can happen more than once, this event handler will take care of everything whenever it is needed.
If you read the comments, you will be able to follow along. Firstly, as the event might fire more than once, any animation is turned off until all data has been re-sent to the video card. A Context3D object is obtained and so we remember it by assigning it to one of the variables we defined earlier. We turn on error checking, which is handy during development. Once we are finished with our our game, we will turn this off in order to get a better frame rate.
Time for action - adding to the onContext3DCreate function
The next thing we need to do in our onContext3DCreate function is to define the size of the area we want to draw to and create a simple shader that instructs Stage3D how to draw our mesh. Continue adding to the function as follows:
// The 3d back buffer size is in pixels


context3D.configureBackBuffer(swfWidth, swfHeight, 0, true);


// A simple vertex shader which does a 3D transformation


var vertexShaderAssembler:AGALMiniAssembler = new AGALMiniAssembler();


vertexShaderAssembler.assemble

(

  Context3DProgramType.VERTEX,


  // 4x4 matrix multiply to get camera angle


  "m44 op, va0, vc0\n" +


  // tell fragment shader about XYZ


  "mov v0, va0\n" +


  // tell fragment shader about UV

  "mov v1, va1\n"

);


// A simple fragment shader which will use

// the vertex position as a color


var fragmentShaderAssembler:AGALMiniAssembler = new AGALMiniAssembler();


fragmentShaderAssembler.assemble

(

  Context3DProgramType.FRAGMENT,

  // grab the texture color from texture fs0

  // using the UV coordinates stored in v1

  "tex ft0, v1, fs0 <2d,repeat,miplinear>\n" +

  // move this value to the output color

  "mov oc, ft0\n"

);


// combine shaders into a program which we then upload to the GPU

shaderProgram = context3D.createProgram();


shaderProgram.upload(vertexShaderAssembler.agalcode,

  fragmentShaderAssembler.agalcode);
What just happened?
A back-buffer is set up, which is a temporary bitmap in the video RAM where all the drawing takes place. As each polygon is rendered, this back-buffer slowly becomes the entire scene, which when completed is presented to the user.
Two AGALMiniAssembler objects are created and a string containing AGAL (Adobe Graphics Assembly Language) is turned into compiled byte code. Don't worry too much about the specific AGAL code for now, we will dive into fragment and vertex programs later. Essentially, these AGAL commands instruct your video card exactly how to draw your mesh.
We will continue working with the Context3DCreate function.
Time for action - uploading our data
In order to render the mesh, Stage3D needs to upload the mesh and texture data straight to your video card. This way, they can be accessed repeatedly by your 3D hardware without having to make Flash do any of the "heavy lifting".
// upload the mesh indexes


indexBuffer = context3D.createIndexBuffer(meshIndexData.length);

indexBuffer.uploadFromVector(meshIndexData, 0, meshIndexData.length);


// upload the mesh vertex data

// since our particular data is

// x, y, z, u, v, nx, ny, nz

// each vertex uses 8 array elements


vertexBuffer = context3D.createVertexBuffer(

meshVertexData.length/8, 8);


vertexBuffer.uploadFromVector(meshVertexData, 0,

meshVertexData.length/8);


// Generate mipmaps


myTexture = context3D.createTexture(textureSize, textureSize,

  Context3DTextureFormat.BGRA, false);


var ws:int = myTextureData.bitmapData.width;

var hs:int = myTextureData.bitmapData.height;

var level:int = 0; var tmp:BitmapData;

var transform:Matrix = new Matrix();

tmp = new BitmapData(ws, hs, true, 0x00000000);


while ( ws >= 1 && hs >= 1 ) {


  tmp.draw(myTextureData.bitmapData, transform, null, null,

	null, true);


  myTexture.uploadFromBitmapData(tmp, level);

  transform.scale(0.5, 0.5); level++; ws >>= 1; hs >>= 1;


  if (hs && ws) {


	tmp.dispose();

	tmp = new BitmapData(ws, hs, true, 0x00000000);


  }

}


tmp.dispose();
What just happened?
In the preceding code, our mesh data is uploaded to the video card. A vertex buffer and an index buffer are sent, followed by your texture data. There is a short loop that creates similar, but smaller versions of your texture and uploads for each one. This technique is called MIP mapping. By uploading a 512x512 image, followed by the one that is 256x256, then 128x128, and so on down to 1x1, the video card has a set of textures that can be used depending on how far away or acutely angled the texture is to the camera. MIP mapping ensures that you don't get any "jaggies" or "moiree patterns" and increases the quality of the visuals.
Time for action - setting up the camera
There is one final bit of code to add in our onContext3DCreate() function. We simply need to set up the camera angle and instruct Flash to start the animation. We do this as follows:
// create projection matrix for our 3D scene

projectionMatrix.identity();


// 45 degrees FOV, 640/480 aspect ratio, 0.1=near, 100=far

projectionMatrix.perspectiveFieldOfViewRH(

45.0, swfWidth / swfHeight, 0.01, 100.0);


// create a matrix that defines the camera location

viewMatrix.identity();


// move the camera back a little so we can see the mesh

viewMatrix.appendTranslation(0,0,-4);


// start animating

addEventListener(Event.ENTER_FRAME,enterFrame);


}
What just happened?
A set of matrices are defined that are used by your shader to calculate the proper viewing angle of your mesh, as well as the specifics related to the camera, such as the field of a view (how zoomed in the camera is) and the aspect ratio of the scene.
Last but not the least; now that everything is set up, an event listener is created that runs the enterFrame function every single frame. This is where our animation will take place.
That is it for the Stage3D setup. We are done programming the onContext3DCreate function.
Time for action - let's animate
The enterFrame function is run every frame, over and over, during the course of your game. This is the perfect place to change the location of your meshes, trigger sounds, and perform all game logic.
private function enterFrame(e:Event):void

{

  // clear scene before rendering is mandatory


  context3D.clear(0,0,0);

  context3D.setProgram ( shaderProgram );


  // create the various transformation matrices


  modelMatrix.identity();

  modelMatrix.appendRotation(t*0.7, Vector3D.Y_AXIS);

  modelMatrix.appendRotation(t*0.6, Vector3D.X_AXIS);

  modelMatrix.appendRotation(t*1.0, Vector3D.Y_AXIS);

  modelMatrix.appendTranslation(0.0, 0.0, 0.0);

  modelMatrix.appendRotation(90.0, Vector3D.X_AXIS);


  // rotate more next frame


  t += 2.0;


  // clear the matrix and append new angles


  modelViewProjection.identity();

  modelViewProjection.append(modelMatrix);

  modelViewProjection.append(viewMatrix);

  modelViewProjection.append(projectionMatrix);


  // pass our matrix data to the shader program


  context3D.setProgramConstantsFromMatrix(

  Context3DProgramType.VERTEX,

	0, modelViewProjection, true );
What just happened?
In the preceding code, we first clear the previous frame from the screen. We then select the shader (program) that we defined in the previous function, and set up a new modelMatrix. The modelMatrix defines the location in our scene of the mesh. By changing the position (using the appendTranslation function), as well as the rotation, we can move our mesh around and spin it to our heart's content.
Time for action - setting the render state and drawing the mesh
Continue adding to the enterFrame() function by instructing Stage3D which mesh we want to work with and which texture to use.
// associate the vertex data with current shader program

// position


context3D.setVertexBufferAt(0, vertexBuffer, 0,

Context3DVertexBufferFormat.FLOAT_3);


// tex coord


context3D.setVertexBufferAt(1, vertexBuffer, 3,

Context3DVertexBufferFormat.FLOAT_3);


// which texture should we use?


context3D.setTextureAt(0, myTexture);


// finally draw the triangles


context3D.drawTriangles(indexBuffer, 0, meshIndexData.length/3);


// present/flip back buffer


context3D.present();


}
What just happened?
Once you have moved objects around and prepared everything for the next frame (by instructing Stage3D which vertex buffer to draw and what texture to use), the new scene is rendered by calling drawTriangles and is finally presented on the screen.
In the future, when we have a more complex game, there will be more than one mesh, with multiple calls to drawTriangles and with many different textures being used. For now, in this simple demo, all we do each frame is spin the mesh around a little and then draw it.
Quest complete - time to reap the rewards
Now that the entire source code is complete, publish your .SWF file. Use your web browser to view the published HTML file. You should see something similar to the following:
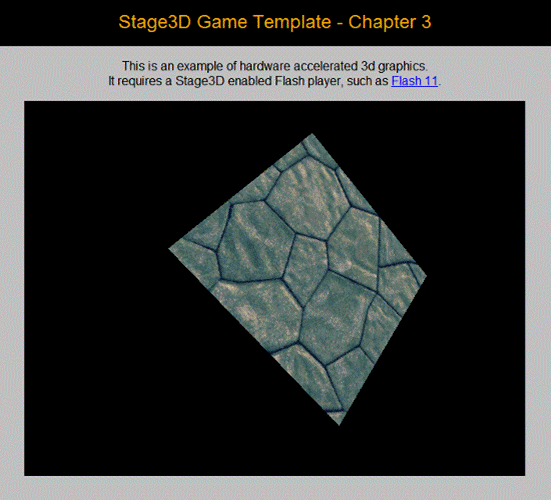
If you see nothing on the screen when you view the HTML file that contains your new SWF, then your Flash incubator plugin is probably not being used. With fingers crossed, you will see a fully 3D textured square spinning around in space. Not much to look at yet, but it proves that you are running in the hardware accelerated 3D mode.
Congratulations!
You have just programmed your first Flash 11 Stage3D (Molehill) demo! It does not do much, but already you can see the vast possibilities that lay ahead of you. Instead of a simple square spinning around, you could be rendering castles, monsters, racing cars, or spaceships, along with all the particle systems, eye-candy, and special effects you could imagine.
For now, be very proud that you have overcome the hardest part--getting a working 3D demo that compiles. Many before you have tried and failed, either because they did not have the proper version of Flash, or did not have the correct tools setup, or finally could not handle the complex AS3 source code required.
The fact that you made it this far is a testament to your skill and coding prowess. You deserve a break for now. Rest easy in the satisfaction, as you just reached a major milestone toward the goal of creating an amazing 3D game.
The entire source code
All the code that you entered earlier should go in a file named Stage3dGame.as alongside your other project files. For reference, or to save typing, all source and support files are available at the following URL:
http://www.mcfunkypa...source_code.zip
The final demo can be run from the following URL:
http://www.packtpub.com/adobe-flash11-stage3d-molehill-gameprogramming-beginners-guide/book
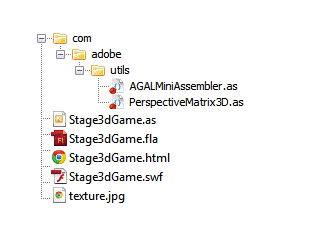
Your folder structure should look similar to the one shown in the following screenshot. You might have used different file names for your html files or texture, but this screenshot may be helpful to ensure you are on the right track:
Have a go hero - a fun side quest
In order to really hone your skills, it can be a good idea to challenge yourself for some extra experience.There is a side quest with which you can experiment. It is completely optional. Just like grinding in an RPG game, challenges such as these are designed to make you stronger, so that when you forge ahead, you are more than ready for the next step in your main quest.
Your side quest this time is to experiment with the mesh data. Doing so will help you understand what each number stored in the meshVertexData variable (which is defined in the initData function) means.
Play with all these numbers. Notice that each line of eight numbers is the data used for one vertex. See what happens if you give them crazy values.
For example, if you change the first vertex position to -3, your square will change shape and will become lopsided with one corner sticking out:
meshVertexData = Vector.

  ( [


		//X, Y, Z, U, V, nX, nY, nZ

	   -3, -1, 1, 0, 0, 0, 0, 1,

		1, -1, 1, 1, 0, 0, 0, 1,

		1, 1, 1, 1, 1, 0, 0, 1,

		-1, 1, 1, 0, 1, 0, 0, 1


  ]);
If you tweak the U or V texture coordinates, then you can make the rock texture more zoomed in or tiled multiple times. If you change the vertex normals (the last three numbers of each line above), then nothing will happen. Why? The reason is that the ultra-simplistic shader that we are using does not use normal data.
If all this seems a bit low level, then do not worry. Eventually, you won't be defining mesh data by hand using lists of numbers entered in the code: in the near future, we will upgrade our game engine to parse the model data that we can export from a 3D art program, such as 3D Studio Max, Maya, or Blender.
For now, however, this simple "side quest" is a great way to start becoming familiar with what a vertex buffer really is.
Summary
We were victorious in our first "boss battle" along the way to the creation of our own 3D video game in Flash. It was tricky, but somehow we managed to achieve the following milestones: we learned how to obtain Flash 11 for our browser, we got all the tools ready to compile Stage3D games, we learned how to initialize the Stage3D API, how to upload mesh and texture data to the video card, and how to animate a simple 3D scene.
Now that we have created a simple template 3D demo, we are ready to add more complexity to our project. What was merely a tech demo will soon grow into a fully-fledged video game.


Your website is very nice. I visit all the time. You been sharing useful information.
Sesli Chat ne-nerede nenerede bonibonWe are familiar with in your way.
How much do my very good the sulfur, the sulfur I do not know how to thank you. Thank you so much
Getting useful information for my website
speakychat sesliduy sesliduy sesliduy sesliduy seslichat seslichat seslichat sesli sohbet seslisohbet seslichat seslisayfam seslisayfam seslisayfam seslisayfam seslisayfam seslicevher seslisayfam seslicevher seslicevher sesli dunya seslidunya sesli dünya seslipop seslipop seslipop kral tv sesli 18 web tasarim video klip videoklip faceebook kürtce chatSchlüsselnotdienst Hamburg Schlüsseldienst Hamburg Schlüsseldienst Hamburg