04APR1998
[size="3"]Introduction
Hi! Welcome back to Iso/Hex maps. In this tutorial, we will be discussing how to place objects (creatures, items, whatever) onto a Iso/Hex map. There won't be too much code in this tutorial, because most of it deals with the actual blitting of the images, and I'm trying to make these tutorials essentially language independent.
Again, I will be using 40x40 pixel bitmaps.
Also, I will explain by using Bitmasks. However, it has been brought to my attention that transparency bitmaps and RLE bitmaps will also work (and really, this only makes sense, because RLEs and Transparency were created as shortcuts to using bitmasks).
[size="3"]Z Order
The first topic that we need to discuss is that of Z Ordering, or Map Layering.
Here is my schematic for Z Ordering:
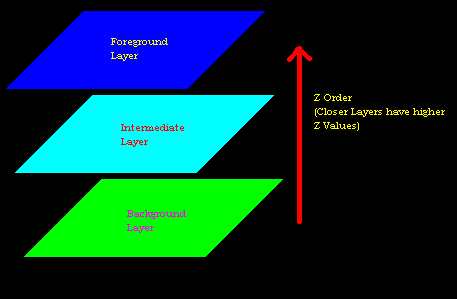
I've only put three layers into my example... you may require more for your game.
An explanation of the layers, and what goes into them:
Background: This layer consists of the tiles themselves, and any image that will always be BEHIND anything else.
Intermediate: This layer consists of the objects in the game... creatures, items, etc. Sometimes, it is a good idea to split this layer into two: an Item Layer, and a Creature Layer, with items below the creatures.
Foreground: This layer consists of the foreground images (walls, trees, etc). Sometimes, I split this layer into two: foreground obstacles (trees, pillars), and foreground walls.
The way that Z Ordered Iso/Hex tiles get blitted is as follows:
- Bitmask for Background Layer is ANDed to the screen.
- Bitmap for Background Layer is XORed to the screen.
- Bitmask for Intermediate Layer is ANDed to the screen.
- Bitmap for Intermediate Layer is XORed to the screen.
- Bitmask for Foreground Layer is ANDed to the screen.
- Bitmap for Foreground Layer is XORed to the screen.
[size="3"]Objects That Go Out of a Tile's Bounds
This problem is more prevalent in Iso Maps than it is in Hex Maps, due to the uses of the two different types. Hex Maps are usually for top-down views, and Iso Maps are usually used for 3/4 views.
So, how to we get our "Dude":

Onto our Iso tile:

So that he looks like THIS:

(See. He sticks out the top of the tile.)
Before we get to that, we need to set down a guideline, so that we don't draw funky maps.
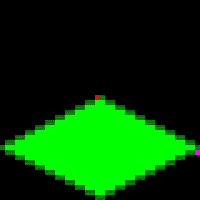
Isometric Forbidden Zones:

Hexagonal Forbidden Zones:

The white zones in these pictures are the Iso/Hex tiles themselves, and are ALWAYS okay to blit onto (in fact, if your images stay within the white--usually the case when Hex maps are used--then you can blit entire layers instead of each tile's layers separately).
The green zones can have image information in them, but you will have to Z Order by tile, not by layer.
The red zones can never have image information in them; if they do, they will either screw up your map, or never be seen.
Background images should take up at least all of the white region, and may spill into the green region. All other layers may take up as much or as little of the white and green regions as you wish.
Back to blitting our "Dude":
First, we blit the bitmask
 and the bitmap of our tile onto our map.
So that we have:
.Now, we AND the bitmask
 of the dude onto the tile:
  .
.Finally, we XOR the bitmap
of the dude onto the tile: .And then we repeat these steps for each of the tiles in the map. (Additional Layers are blitted in the same way our dude was). The process is the same for Hexagonal Maps, but Dude doesn't stick out.
[size="3"]The Need for Speed
Okay, so you DON'T want to be blitting the entire map each game cycle. That would be too SLOW.
BUT! If you just re-blit the tiles in your map that change, your picture gets screwed up.
The solution is this: You update the tile in question, and a few surrounding tiles. While this is a little more work done to update the picture, at least your map will look right, and it beats the hell out of reblitting the ENTIRE map.
Here is my Update Map (for demonstrating methods of quick updating):
Iso:

Hex:

The white zone represents the tile that we are updating. The other colored zones represent the tiles close enough to be affected by our tile.
So, we take a space on our double buffer (or hidden bitmap that we use for updating) that is 40x40, and to it we do the following:
Iso Maps:
This is the order in which we blit the tiles:
[color="#FF0000"]Red[/color], [color="#FFFF00"]Yellow[/color], [color="#00FF00"]Green[/color], [color="#00FFFF"]Cyan[/color], [color="#0000FF"]Blue[/color], White, [color="#FF00FF"]Magenta[/color], [color="#C0C0C0"]Grey[/color].
Here is how to find WHICH tiles these are (the X,Y locations), based off of the white tile.
(unfortunately, this depends on whether or not the white tile has an odd or even Y value)
ColorDX(Y is Even)DX(Y is Odd)DYRed-10-3Yellow01-3Green00-2Cyan-10-1Blue01-1White000Magenta-101Grey011
Then, you plot them on your buffer with the following X Offsets, and Y Offsets:
ColorX OffsetY OffsetRed-20-33Yellow20-33Green0-22Cyan-20-11Blue20-11White00Magenta-20+11Grey20+11
Here's the X Offset/Y Offset values for Hex maps (Hex maps use the same DX/DY values as Iso maps):
ColorX OffsetY OffsetCyan-20-30Blue20-30White00Magenta-20+30Grey20+30
For each of the tiles in the Update Map, each layer (for added speed, you may want to clip the images that you are blitting onto the buffer).
Once you have blitted all of the necessary tiles onto the buffer, you can blit the buffered image onto the map using MOV (also called Copy).
There you go. You get better speed, and your picture doesn't get messed up.
(P.S. If you are using Visual Basic, I would like to suggest that you use the API function BitBlt rather than VB's PaintPicture Method. It's SOOOO much faster.)
[size="3"]Resolving Confusion from Part I
Somebody sent me some E-Mail saying that I should explain how I arrived at the Y Offsets for my Iso/Hex tiles, because not all of you are going to be using 40x40 bitmaps. (although I know for sure that at least ONE of you has switched to using them).
So, here is the method I used to figure out the Y Offsets for my Iso and Hex maps:
(To more easily show this, I have blown up my Iso and Hex tiles)
Iso:
The determining factors for figuring out the X and Y offsets for a rhombus or a hex start with picking any point and figuring out where it will be when on an adjacent tile. In the above picture, the red dot corresponds to the Magenta dot on another tile. The coordinates of the red dot are (19,19), and the magenta dot is at (39,30). From this, calculating the X Offset and Y Offset are easy:
X Offset=39-19=20


Y Offset=30-19=11
Hex: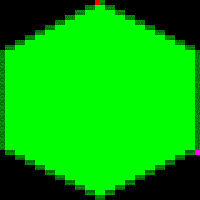
In this case, the red dot is at (19,0), and the magenta dot is at (39,30).
X Offset=39-19=20


Y Offset=30-0=30

<table border="1" cellpadding="7" cellspacing="1"><tbody><tr valign="top" bgcolor="#666699"><td width="25%"><font color="white"><b>Color</b></font></td><td width="25%" align="center"><font color="white"><b>DX(Y is Even)</b></font></td><td width="25%" align="center"><font color="white"><b>DX(Y is Odd)</b></font></td><td width="25%" align="center"><font color="white"><b>DY</b></font></td></tr><tr valign="top"><td><font color="#FF0000"><b>Red</b></font></td><td align="center" bgcolor="#CCCCDD"><b>-1</b></td><td align="center" bgcolor="#CCCCDD"><b>0</b></td><td align="center" bgcolor="#CCCCDD"><b>-3</b></td></tr><tr valign="top"><td><font color="#ffff00"><b>Yellow</b></font></td><td align="center" bgcolor="#CCCCDD"><b>0</b></td><td align="center" bgcolor="#CCCCDD"><b>1</b></td><td align="center" bgcolor="#CCCCDD"><b>-3</b></td></tr><tr valign="top"><td><font color="#00ff00"><b>Green</b></font></td><td align="center" bgcolor="#CCCCDD"><b>0</b></td><td align="center" bgcolor="#CCCCDD"><b>0</b></td><td align="center" bgcolor="#CCCCDD"><b>-2</b></td></tr><tr valign="top"><td><font color="#00ffff"><b>Cyan</b></font></td><td align="center" bgcolor="#CCCCDD"><b>-1</b></td><td align="center" bgcolor="#CCCCDD"><b>0</b></td><td align="center" bgcolor="#CCCCDD"><b>-1</b></td></tr><tr valign="top"><td><font color="#0000ff"><b>Blue</b></font></td><td align="center" bgcolor="#CCCCDD"><b>0</b></td><td align="center" bgcolor="#CCCCDD"><b>1</b></td><td align="center" bgcolor="#CCCCDD"><b>-1</b></td></tr><tr valign="top"><td><font color="#000000"><b>White</b></font></td><td align="center" bgcolor="#CCCCDD"><b>0</b></td><td align="center" bgcolor="#CCCCDD"><b>0</b></td><td align="center" bgcolor="#CCCCDD"><b>0</b></td></tr><tr valign="top"><td><font color="#ff00ff"><b>Magenta</b></font></td><td align="center" bgcolor="#CCCCDD"><b>-1</b></td><td align="center" bgcolor="#CCCCDD"><b>0</b></td><td align="center" bgcolor="#CCCCDD"><b>1</b></td></tr><tr valign="top"><td><font color="#808080"><b>Grey</b></font></td><td align="center" bgcolor="#CCCCDD"><b>0</b></td><td align="center" bgcolor="#CCCCDD"><b>1</b></td><td align="center" bgcolor="#CCCCDD"><b>1</b></td></tr></tbody></table>
<table border="1" cellpadding="7" cellspacing="1"><tbody><tr valign="top" bgcolor="#666699"><td width="33%"><font color="white"><b>Color</b></font></td><td width="33%" align="center"><font color="white"><b>X Offset</b></font></td><td width="33%" align="center"><font color="white"><b>Y Offset</b></font></td></tr><tr valign="top"><td><font color="#ff0000"><b>Red</b></font></td><td align="center" bgcolor="#CCCCDD"><b>-20</b></td><td align="center" bgcolor="#CCCCDD"><b>-33</b></td></tr><tr valign="top"><td><font color="#ffff00"><b>Yellow</b></font></td><td align="center" bgcolor="#CCCCDD"><b>20</b></td><td align="center" bgcolor="#CCCCDD"><b>-33</b></td></tr><tr valign="top"><td><font color="#00ff00"><b>Green</b></font></td><td align="center" bgcolor="#CCCCDD"><b>0</b></td><td align="center" bgcolor="#CCCCDD"><b>-22</b></td></tr><tr valign="top"><td><font color="#00ffff"><b>Cyan</b></font></td><td align="center" bgcolor="#CCCCDD"><b>-20</b></td><td align="center" bgcolor="#CCCCDD"><b>-11</b></td></tr><tr valign="top"><td><font color="#0000ff"><b>Blue</b></font></td><td align="center" bgcolor="#CCCCDD"><b>20</b></td><td align="center" bgcolor="#CCCCDD"><b>-11</b></td></tr><tr valign="top"><td><font color="#000000"><b>White</b></font></td><td align="center" bgcolor="#CCCCDD"><b>0</b></td><td align="center" bgcolor="#CCCCDD"><b>0</b></td></tr><tr valign="top"><td><font color="#ff00ff"><b>Magenta</b></font></td><td align="center" bgcolor="#CCCCDD"><b>-20</b></td><td align="center" bgcolor="#CCCCDD"><b>+11</b></td></tr><tr valign="top"><td><font color="#808080"><b>Grey</b></font></td><td align="center" bgcolor="#CCCCDD"><b>20</b></td><td align="center" bgcolor="#CCCCDD"><b>+11</b></td></tr></tbody></table>
<table width="638" border="1" cellpadding="7" cellspacing="1"><tbody><tr valign="top"><td width="33%" bgcolor="#666699"><font color="white"><b>Color</b></font></td><td width="33%" align="center" bgcolor="#666699"><font color="white"><b>X Offset</b></font></td><td width="33%" align="center" bgcolor="#666699"><font color="white"><b>Y Offset</b></font></td></tr><tr valign="top"><td><font color="#00ffff"><b>Cyan</b></font></td><td align="center" bgcolor="#CCCCDD"><b>-20</b></td><td align="center" bgcolor="#CCCCDD"><b>-30</b></td></tr><tr valign="top"><td><font color="#0000ff"><b>Blue</b></font></td><td align="center" bgcolor="#CCCCDD"><b>20</b></td><td align="center" bgcolor="#CCCCDD"><b>-30</b></td></tr><tr valign="top"><td><font color="#000000"><b>White</b></font></td><td align="center" bgcolor="#CCCCDD"><b>0</b></td><td align="center" bgcolor="#CCCCDD"><b>0</b></td></tr><tr valign="top"><td><font color="#ff00ff"><b>Magenta</b></font></td><td align="center"bgcolor="#CCCCDD"><b>-20</b></td><td align="center" bgcolor="#CCCCDD"><b>+30</b></td></tr><tr valign="top"><td><font color="#808080"><b>Grey</b></font></td><td align="center" bgcolor="#CCCCDD"><b>20</b></td><td align="center" bgcolor="#CCCCDD"><b>+30</b></td></tr></tbody></table>