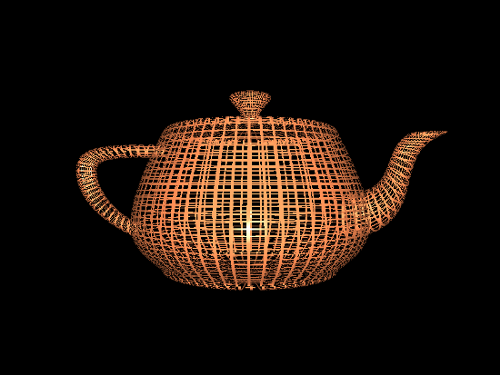
The result will look like the following image:
Getting ready
The vertex position, normal, and texture coordinates must be provided to the vertex shader from the OpenGL application. The position should be provided at location 0, the normal at location 1, and the texture coordinates at location 2. As in previous examples, the lighting parameters must be set from the OpenGL application via the appropriate uniform variables.
How to do it...
To create a shader program that discards fragments based on a square lattice (as in the preceding image), use the following code:
Use the following code for the vertex shader:
#version 400


layout (location = 0) in vec3 VertexPosition;

layout (location = 1) in vec3 VertexNormal;

layout (location = 2) in vec2 VertexTexCoord;


out vec3 FrontColor;

out vec3 BackColor;

out vec2 TexCoord;


struct LightInfo {

  vec4 Position; // Light position in eye coords.

  vec3 La; // Ambient light intensity

  vec3 Ld; // Diffuse light intensity

  vec3 Ls; // Specular light intensity

};

uniform LightInfo Light;


struct MaterialInfo {

  vec3 Ka; // Ambient reflectivity

  vec3 Kd; // Diffuse reflectivity

  vec3 Ks; // Specular reflectivity

  float Shininess; // Specular shininess factor

};

uniform MaterialInfo Material;


uniform mat4 ModelViewMatrix;

uniform mat3 NormalMatrix;

uniform mat4 ProjectionMatrix;

uniform mat4 MVP;


void getEyeSpace( out vec3 norm, out vec4 position )

{

  norm = normalize( NormalMatrix * VertexNormal);

  position = ModelViewMatrix * vec4(VertexPosition,1.0);

}


vec3 phongModel( vec4 position, vec3 norm )

{

  // The ADS shading calculations go here (see: "Using

  // functions in shaders," and "Implementing

  // per-vertex ambient, diffuse and specular (ADS) shading")

  ...

}


void main()

{

  vec3 eyeNorm;

  vec4 eyePosition;


  TexCoord = VertexTexCoord;


  // Get the position and normal in eye space

  getEyeSpace(eyeNorm, eyePosition);


  FrontColor = phongModel( eyePosition, eyeNorm );

  BackColor = phongModel( eyePosition, -eyeNorm );


  gl_Position = MVP * vec4(VertexPosition,1.0);

}
Use the following code for the fragment shader:
#version 400


in vec3 FrontColor;

in vec3 BackColor;

in vec2 TexCoord;


layout( location = 0 ) out vec4 FragColor;


void main() {

  const float scale = 15.0;

  bvec2 toDiscard = greaterThan( fract(TexCoord * scale),

								 vec2(0.2,0.2) );


if( all(toDiscard) )

	discard;


if( gl_FrontFacing )

	FragColor = vec4(FrontColor, 1.0);

else

	FragColor = vec4(BackColor, 1.0);

}
Compile and link both shaders within the OpenGL application, and install the shader program prior to rendering.
How it works...
Since we will be discarding some parts of the teapot, we will be able to see through the teapot to the other side. This will cause the back sides of some polygons to become visible. Therefore, we need to compute the lighting equation appropriately for both sides of each face. We'll use the same technique presented earlier in the two-sided shading recipe.
The vertex shader is essentially the same as in the two-sided shading recipe, with the main difference being the addition of the texture coordinate. The differences are highlighted in the above listing. To manage the texture coordinate, we have an additional input variable, VertexTexCoord, that corresponds to attribute location 2. The value of this input variable is passed directly on to the fragment shader unchanged via the output variable TexCoord. The ADS shading model is calculated twice, once using the given normal vector, storing the result in FrontColor, and again using the reversed normal, storing that result in BackColor.
In the fragment shader, we calculate whether or not the fragment should be discarded based on a simple technique designed to produce the lattice-like pattern shown in the preceding image. We first scale the texture coordinate by the arbitrary scaling factor scale. This corresponds to the number of lattice rectangles per unit (scaled) texture coordinate. We then compute the fractional part of each component of the scaled texture coordinate using the built-in function fract. Each component is compared to 0.2 using the built-in function greaterThan, and the result is stored in the bool vector toDiscard. The greaterThan function compares the two vectors component-wise, and stores the Boolean results in the corresponding components of the return value.
If both components of the vector toDiscard are true, then the fragment lies within the inside of each lattice frame, and therefore we wish to discard this fragment. We can use the built-in function all to help with this check. The function all will return true if all of the components of the parameter vector are true. If the function returns true, we execute the discard statement to reject the fragment.
In the else branch, we color the fragment based on the orientation of the polygon, as in the two-sided shading recipe presented earlier.
Summary
This recipe showed us how to use the discard keyword to "throw away" fragments and create a perforated look.

