Volume Rendering
When I say volume rendering, what I am referring to is a small scale ray tracing through a volume data structure. More specifically, since I am using Direct3D 11, I trace rays through a Texture3D resource on the GPU via the Pixel Shader. The basic setup is as follows:
- Load the desired volume data into a 3D Texture.
- Render triangle geometry to cover the area that the volume should appear in.
- In the pixel shader, use the view position to trace through the 3D texture until your ray intersects something.
- Shade that pixel according to the properties you find at that instersection.
In general, this concept is very reminiscent of one of the first complex rendering operations I can remember investigating - Parallax Occlusion Mapping. The difference here is that POM uses a 2D texture that is mapped to the surface of a primitive, while true volume rendering uses a 3D texture that is mapped to the 3D space occupied by the surface primitives. So in many ways the volume rendering is a simpler concept, since you don't have to do a basis calculation at every vertex - but of course at the expense of exponentially more memory consumption.
As with all things in life, the choice of 2D or 3D is a matter of tradeoff...
Implicit Surfaces
There are lots of variants to this algorithm, and you can pretty much tailor it to your specific needs. For example, the volume representation in your 3D texture can be customized to provide a unique data representation. For the algorithm that I am working on, I needed to be able to visualize an implicit surface. If you haven't had the pleasure of working with these yet, the basic concept is that each data point within the 3D texture is assigned a floating point value. These values can range from positive to negative, and the implicit 'surface' of the object is defined as the point where the interpolated values cross the '0' boundary.
In traditional CPU algorithms, this surface is usually extracted using marching cubes or something similar. But in the GPU, we don't want to get a mesh based representation - we just want to determine where each pixel view ray intersects the surface, and then shade it accordingly. This let's us have a constant volume representation, and we only query the data based on our current view. It works out pretty nice, and is surprisingly easy to get working right.
Texture Space
One small complication is that the ray tracing has to be done in a common 'space' as the volume data. This means we either need to convert the volume data from texture space to world space (or even view space), or we could convert the view position to texture space. Since the latter can easily be carried out with a single matrix transformation on the CPU and applied as a constant in the pixel shader, I decided to go with converting to texture space.
As I alluded to earlier, working with 3D data is simpler than a quasi-2D solution like POM. You can use regular transforms to convert your world space view position first to object space (with the inverse of the world transform) and then to texture space. That conversion to texture space will vary depending on how you map your vertices with texture coordinates, but if you choose them appropriately then you may not even need to apply a transform here (i.e. texture space can be equivalent to object space...).
Shading the Surface
After converting the view position to texture space, it is pretty simple to step through the volume and check for a transition. This is basically done by looking for any values that are greater than '0', as shown here (note: snippet is simplified for clarity!):
float3 direction = normalize( input.tex - CameraPositionTS.xyz );

// Perform the sampling along the view vector until you max out the number of iterations
// or you hit the surface.

float stepLength = 1.0f/80.0f;
float3 stepSize = direction * stepLength;
float3 location = input.tex;
float surfaceHit = 0.0f;
float currTSDF = 0.0f;
float prevTSDF = 0.0f;
float3 surfacePosition = input.tex;

for ( int i = 0; i < 80; i++ ) {

    prevTSDF = currTSDF;
    currTSDF = VolumeTexture.SampleGrad( LinearSampler, location, 1.0f, 1.0f ).x;
    if ( currTSDF > 0.0f ) {
	    float TSDFdelta = currTSDF - prevTSDF;
	    float TSDFintersect = currTSDF / TSDFdelta;
	    surfacePosition = location - stepSize * TSDFintersect;

	    surfaceHit = 1.0f;
	    break;
    }
    location = location + stepSize;
}
Once the intersection point is found, we have to calculate a normal vector to use in the lighting calculations. One might think that we could just store a normal vector in the 3D texture, but if you do the math on how much memory it takes to store 4 values in a 3D texture you will quickly want a way to calculate the normal vector

Fortunately, this isn't too hard to do. Since we are already working in texture space, we can very easily calculate the gradient of our 3D texture value by sampling in each of the dimensional directions (+/- X, Y, and Z), and finding the delta along each axis. If we then normalize the resulting values as a vector, we get a pretty good representation of the surface normal vector. Here is the code that I used, which worked quite well:
// Calculate the gradient based normal vector using central differences
float right = VolumeTexture.SampleGrad( LinearSampler, surfacePosition + float3(  1.0f,  0.0f,  0.0f ) * stepLength, 1.0f, 1.0f ).x;
float left  = VolumeTexture.SampleGrad( LinearSampler, surfacePosition + float3( -1.0f,  0.0f,  0.0f ) * stepLength, 1.0f, 1.0f ).x;
float up	= VolumeTexture.SampleGrad( LinearSampler, surfacePosition + float3(  0.0f,  1.0f,  0.0f ) * stepLength, 1.0f, 1.0f ).x;
float down  = VolumeTexture.SampleGrad( LinearSampler, surfacePosition + float3(  0.0f, -1.0f,  0.0f ) * stepLength, 1.0f, 1.0f ).x;
float front = VolumeTexture.SampleGrad( LinearSampler, surfacePosition + float3(  0.0f,  0.0f,  1.0f ) * stepLength, 1.0f, 1.0f ).x;
float back  = VolumeTexture.SampleGrad( LinearSampler, surfacePosition + float3(  0.0f,  0.0f, -1.0f ) * stepLength, 1.0f, 1.0f ).x;

float3 surfaceNormal = normalize( float3( left-right, down-up, back-front ) );
Once the surface normal is available, you can apply your favorite shading model as needed. I chose to use a simple Phong lighting model, similar to what I was using for my immediate mode geometry rendering.
Some Visual Results
After getting the initial algorithm hammered out with simple squares in my volume, I decided that I wanted to really see how the volume looked with a complex shape inside. Instead of using a modelling tool, and trying to import a pre-crafted volume model, I decided to go back to one of my favorites - Perlin noise. For generating something interesting in 3D, there is not many more useful algorithms than Perlin noise, and I haven't used it in a while either so it was a natural choice. I generated the 3D texture to have values ranging from -1 to +1, and then produced the following images which show two cubes rendering volumes:
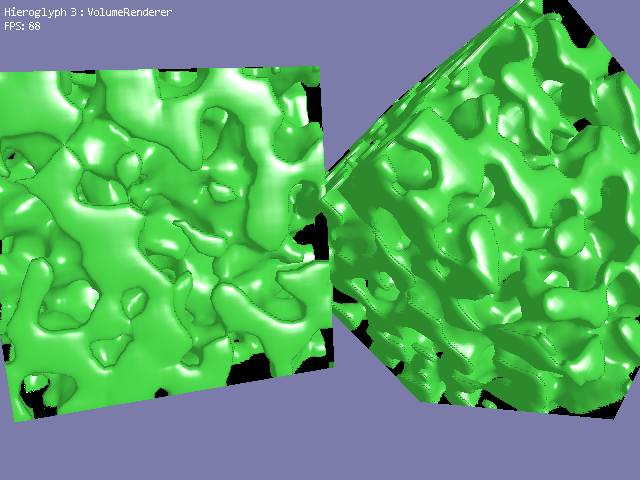
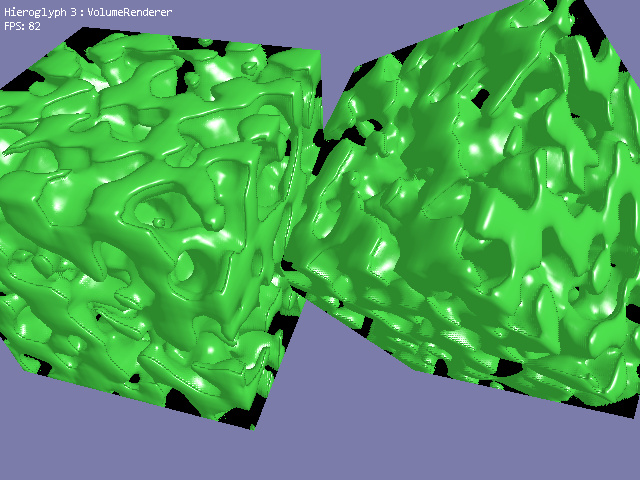
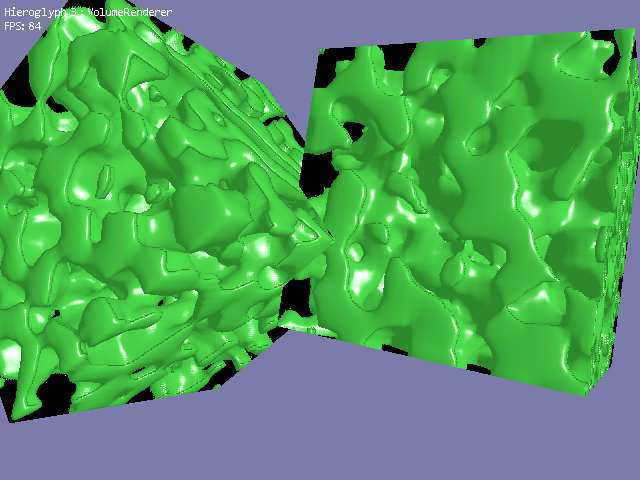
I am quite happy with how it turned out, and if you are interested to see the whole implementation, then head over the Hieroglyph 3 Codeplex site and grab the latest trunk!


For me I'm most interested in the port to VS2012. I notice you said "expanding it to multiple platforms as well (i.e. Win7 desktop, Win8 desktop, Windows Store Apps, etc...)".
Is there a difference between Win7 Desktop and Win8 Desktop? Especially since they've just announced that most of the DirectX 11.1 functionality is now included in the latest SP for Win7: [url="http://blogs.msdn.com/b/chuckw/archive/2012/11/14/directx-11-1-and-windows-7.aspx"]http://blogs.msdn.com/b/chuckw/archive/2012/11/14/directx-11-1-and-windows-7.aspx[/url]
Obviously there's a big difference between Desktop and Windows store Apps.
Keep up the great work.
Thanks
Ben