As another part of my Godot explorations, I’ve learned how to generate meshes. My goal was essentially to port over my dungeon generation code from Unity, what I explained in detail in this tutorial I wrote years ago. Now I’ll explain how to do the same thing in Godot!

I didn’t replicate that entire tutorial yet (and I’m not sure I’ll bother to) but I’ve ported over the hardest part: generating quads for walls, floor, and ceiling. So before I can explain the GDScript code in detail, here’s the finished script:
extends Node3D

@export var wallMaterial: Material
@export var floorMaterial: Material

var obj :MeshInstance3D


# Called when the node enters the scene tree for the first time.
func _ready() -> void:
	print("generating mesh...")

	var floor_surface := []
	floor_surface.resize(Mesh.ARRAY_MAX)

	var floor_verts := PackedVector3Array()
	var floor_uvs := PackedVector2Array()
	var floor_normals := PackedVector3Array()
	var floor_triangles := PackedInt32Array()

	floor_surface[Mesh.ARRAY_VERTEX] = floor_verts
	floor_surface[Mesh.ARRAY_TEX_UV] = floor_uvs
	floor_surface[Mesh.ARRAY_NORMAL] = floor_normals
	floor_surface[Mesh.ARRAY_INDEX] = floor_triangles

	var wall_surface := []
	wall_surface.resize(Mesh.ARRAY_MAX)

	var wall_verts := PackedVector3Array()
	var wall_uvs := PackedVector2Array()
	var wall_normals := PackedVector3Array()
	var wall_triangles := PackedInt32Array()

	wall_surface[Mesh.ARRAY_VERTEX] = wall_verts
	wall_surface[Mesh.ARRAY_TEX_UV] = wall_uvs
	wall_surface[Mesh.ARRAY_NORMAL] = wall_normals
	wall_surface[Mesh.ARRAY_INDEX] = wall_triangles

	# floor
	_add_quad(Transform3D(
		Basis.looking_at(Vector3.UP, Vector3.BACK) * 2,
		Vector3(0, 0, 0)
	), floor_verts, floor_uvs, floor_normals, floor_triangles)

	# ceiling
	_add_quad(Transform3D(
		Basis.looking_at(Vector3.DOWN, Vector3.BACK) * 2,
		Vector3(0, 2, 0)
	), floor_verts, floor_uvs, floor_normals, floor_triangles)

	# walls on sides next to blocked grid cells
	_add_quad(Transform3D(
		Basis.looking_at(Vector3.FORWARD) * 2,
		Vector3(0, 1, 1)
	), wall_verts, wall_uvs, wall_normals, wall_triangles)

	_add_quad(Transform3D(
		Basis.looking_at(Vector3.LEFT) * 2,
		Vector3(1, 1, 0)
	), wall_verts, wall_uvs, wall_normals, wall_triangles)

	var mesh := ArrayMesh.new()
	mesh.add_surface_from_arrays(Mesh.PRIMITIVE_TRIANGLES, floor_surface)
	mesh.add_surface_from_arrays(Mesh.PRIMITIVE_TRIANGLES, wall_surface)

	obj = MeshInstance3D.new()
	obj.mesh = mesh
	obj.set_surface_override_material(0, floorMaterial)
	obj.set_surface_override_material(1, wallMaterial)

	get_tree().current_scene.add_child(obj)


# Called every frame. 'delta' is the elapsed time since the previous frame.
func _process(delta:float) -> void:
	obj.rotate_y(delta)

func _add_quad(xform:Transform3D, verts:PackedVector3Array, uvs:PackedVector2Array, normals:PackedVector3Array, triangles:PackedInt32Array) -> void:
	var index := verts.size()

	# corners before transforming
	var vert1 := Vector3(-.5, -.5, 0)
	var vert2 := Vector3(-.5, .5, 0)
	var vert3 := Vector3(.5, .5, 0)
	var vert4 := Vector3(.5, -.5, 0)

	verts.append(xform * vert1)
	verts.append(xform * vert2)
	verts.append(xform * vert3)
	verts.append(xform * vert4)

	uvs.append(Vector2(1, 0))
	uvs.append(Vector2(1, 1))
	uvs.append(Vector2(0, 1))
	uvs.append(Vector2(0, 0))

	var normal := xform * Vector3.FORWARD;
	normals.append(normal)
	normals.append(normal)
	normals.append(normal)
	normals.append(normal)

	triangles.append(index+2)
	triangles.append(index+1)
	triangles.append(index)

	triangles.append(index+3)
	triangles.append(index+2)
	triangles.append(index)
Starting from the top, first the script defines the kind of node it’ll attach to, as well as declaring a few variables it needs (incidentally, I used GDScript’s optional static typing). The obj variable will store the object we generate, while the @export annotations are used to expose those variables in Godot’s editor (a process described at the end of this post).
Next you get to the _ready() function. Godot actually provides multiple ways to create geometry in code, but I used the ArrayMesh approach. Most Godot tutorials seem to use SurfaceTool actually, but personally I like the API in ArrayMesh better. Maybe other people want a layer of abstraction over the raw vertex arrays, but I feel like if I’m generating a procedural mesh then I want to manipulate those arrays directly; if I didn’t want to do that, then I wouldn’t be writing procedural generation code in the first place.
There’s a bunch of boilerplate array declarations, and then a series of calls to _add_quad(). I’ll go over the function declaration later, but (as the name implies) it adds the data for a new quad into the mesh arrays. The first parameter to the function is a Transform3D object that defines the position, scale, and rotation of the new quad. The remaining parameters are the various arrays that get appended to in this function.
_ready() finishes up by actually instantiating a new mesh from the filled in arrays. A new 3D node is created with that mesh, and the floor and wall materials get applied to that object. Finally, the new 3D object is instantiated into the scene tree.
Next up is the _process() function. Very little happens here actually; the generated object just rotates around so that you can see the generated mesh from all angles.
Finally you get to the _add_quad() function. If you removed “xform * ” when appending each vertex, what this function does is create an upright default 1×1 quad centered at the origin. Multiplying each vertex by the transform will cause the generated quad to take on the position, scale, and rotation of the transform. Similarly, the normal direction must also be multiplied by the transform, so that the default forward direction rotates along with the quad. The UVs simply stretch over the entire 0-1 space, and the triangle indices make two triangles (ie. a quad).
And that’s all the code!
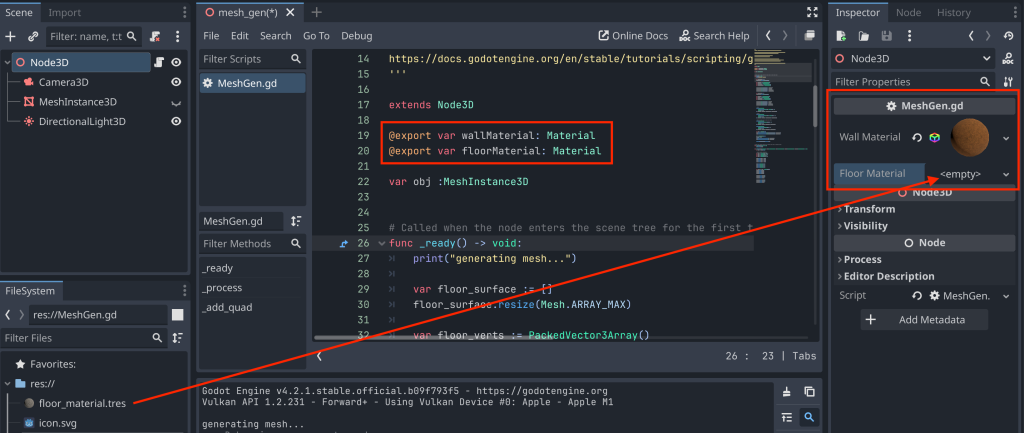
Actually using this script involves one slightly tricky thing if you are new to Godot. After assigning this script to a node, you need to link in the two materials. The @export bits in the code make those variables appear in the Godot editor. Then you can drag stuff into those variable slots, like so: