Welcome back ! Last week, I talked about the background of why I am creating a custom assembly-generator. This week, I'll go more into details about the framework I wrote, that allowed me both to disassemble as well as assemble code.
Getting started
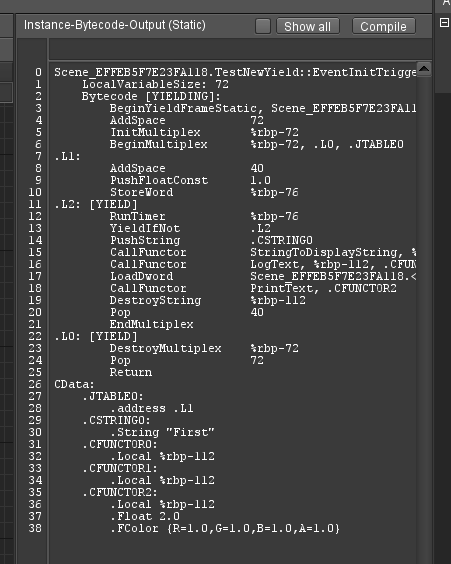
Now previously, I mentioned how my own assembler was a bit bare-bones, as my understanding of ASM at that point was very rudimentary. Especially when dealing with how instructions are encoded. I cannot just write asm("mov rax,0") or something, I need to actually create that myself. Making any changes such a fragile system, as it used to be, is not easy, but one flaw made it almost impossible: I had no way to inspect the code I generated. Well, technically I could run it in Visual Studio and step into it inside the disassembler-window, but that's really backwards, especially when trying to inspect one specific function (as I cannot set any break-points). The bytecode didn't have that problem, as I implemented an editor-window to show the code long ago:
Fact of the matter, I wanted something like that for the binary code as well. At first, I thought I'd use some library, but then I remembered that I hated to work with libraries (can't help it), and that it would be a good learning experience, for understanding ASM, if I was forced to implement the disassembler myself. Now, I won't get into all the nitty gritty details about asm here, as in, I'm not going to teach you ASM - if I did, we'd be here all year. Instead, I'll just focus on the library I wrote, and how it helped me improve my code-gen dramatically.
Design goals
So, one goal for the disassembler was to learn, but what else? I wanted to use this as a basis for writing a better assembler. So, the goal was to create a representation of an instruction, that could both be formatted (disassembly) as well as put into binary form (assembly). This proved instantly valuable, as it allowed me to assess the correctness of what I'm doing. I could just load in some code I generated before, that I know was working, and run my disassembler over it. Then, I'd just re-output the code in binary form again, from the disassembled instructions, and compare the results, on an per-instruction basis. This allowed me not only to spot errors very soon, but also exactly where they'd happen.
Implementation
I won't go into all the detail here, but let me just say that doing this was a very daunting task, to say the least. It took me 3 entire rewrites to come up with a form that worked. I won't bore you with the failed attempts, let's just say, if you like gigantic nested switch statements, that would be the code for you. The final result used an opcode-table, where a handler-function could be installed. Basically, you start decoding assembly by looking at each 8-bit (byte) symbol one by one. So I'd have a stream of code, and the disassembler would have a 256-entry long array of callbacks:
using OpcodeHandler = InstructionHolder(*)(BaseParseArgs args);
using OpcodeHandlerTable = std::array<OpcodeHandler, 256>;

static OpcodeHandlerTable s_vOpcodeHandler;
So for the first symbol in the stream, I'd just call the associated callback from the s_vOpcodeHandler-table. Let's look at a very basic example of a 1-byte instruction: ret.
Simple case
ret is a very simple instruction: It just returns from the currently called procedure, to whatever called it - ignoring the technical details for now. But how'd you know what it exactly does and how it looks like? My first go-to resource is https://www.felixcloutier.com/x86/ret. They have a full list of all available instructions, and a lot of explanation. That will all not help very much at the start, as it's all sounding a bit gibberish, but after a while, it starts to make sense. Especially since there are often multiple variants of the same instruction, even if it doesn't have any parameters like ret. So, a quick rundown of the ret-instruction based on that documentation:
Description
We'll start with the description, as it specifies what we want to do. So “Near return to calling procedure.” is what we are looking for, as we mainly return to something inside our own code segment (as explained below, but we'll just take that for granted for now)
64-Bit Mode/Compat/Leg Mode
This describes in what type of program the instruction can be used in. As I'm generating x64-code, I mainly care about 64-bit mode being “valid”, which all return-instructions are.
Op/Enc
Specifies what type of encoding the instruction uses. Tell you the truth, I never really bothered with learning what this field means. It will make more sense just to look at the opcode+instruction-table field.
Opcode/Instruction
Now those are the fields that going to explain how we have to decode this. In our case, this is:
Opcode        Instruction
C3            RET
So the instructions mnemonic is “ret”, and it's opcode is “C3”. So that's what we are looking for. As mentioned, the same instruction can have multiple meanings and interpretations. CB would still be RET, but with a far-call. But we don't care about this right now.
Now for the framework
So how do we put this into the code? Obviously, the opcode-handler table needs to get an entry at 0xC3, that returns as “RetNearInstruction”, of some sort. Now if you know me, you know I like modern C++, and reducing the amount of work I'll have to do. So I made heavy use of templates, to reduce the amount of logic that I'd have to write. Effectively, expressing our RetNearInstruction in this system goes as follows:
struct RetNearInstruction final :
public FixedInstruction<RetInstruction, NoArgumentT>
{
	static constexpr uint8_t OPCODE = 0xC3;
	static constexpr sys::StringView OPCODE_NAME = L"ret";

	using FixedInstruction::FixedInstruction;
};
Let's break it down.
We have a “FixedInstruction”-base class, which describes an instruction with just one opcode (later, we'll see examples of instructions where this is not the case). This opcode is given in the OPCODE-field, and accessed in FixedInstruction via CRTP (that's why it's the first argument of the FixedInstruction<>-template. The second argument is an argument-struct, which for now is just set to indicate that no argument is present (NoArgumentT). Obviously, we give the instruction an name as well (OPCODE_NAME), and we inherit the FixedInstruction-ctor (so we don't have to type out another constructor here - FixedInstruction defines what arguments we can take).
So why are those attributes defined as static constexpr members, and not via virtual methods? Well for once, it's less to type, but importantly, for filling our opcode-handler table, we can automate that process:
storeEncodedInstruction<RetNearInstruction>(); // (0xC3) retThis is how we tell the disassembler about any available instruction. There will not be any instance yet, as those are only created afterwards, but since all the data is available as static fields, it can easily be read here to put the correct handler into the right table-slot:
template<typename InstructionT>
inline void storeEncodedInstruction(void)
{
    s_vOpcodeHandler[InstructionT::OPCODE] = &handleInstruction<InstructionT>;
}
There's more boilerplate involved, mainly for multi-byte instructions, but that's what it boils down for now. The handler will then spit out an IInstruction-interface, that allows us to output to eigther a human readable disassembler, or binary assembler-stream:
class IInstruction
{
public:
	virtual ~IInstruction(void) noexcept = 0;

	virtual void Output(DisassemblerOutputStream& stream) const = 0;
	virtual void Output(AssemblerStream& stream) const = 0;
};
Small tidbit, since the instructions disassembled are polymorphic, they cannot be returned by value. But they are not stored for much longer than the enclosing function call. So I ended up writing an “ObjectHolder”-wrapper, than can do this without heap allocation:
using InstructionHolder = sys::ObjectHolder<IInstruction, 64>;You have to specify the maximum possible size (which you have to find out yourself), but returning a larger instruction won't compile (so it's still quite save). The difference in performance is very noticable, and if you every had to work with the MSVC disassembler, well, performance is a mattter here.
A slightly more complex example
Boy, this did get into more detail than expected. I'll wrap it up soon, I'll just show a slightly more complex instruction, to show the scalabilty of the framework, and how it makes even more complex instructions easy to deal with. So let's go over “conditional jump” aka “jcc”.
So in order to execute a branch (if), we need an instruction to jmp over, or to, some code. jcc does quite that. The “cc” stands for a condition-code. If we look at the documentation-page, things get a bit funny: https://www.felixcloutier.com/x86/jcc
That's a lot of fi… instructions. In very broad terms, there exists only one form of comparison on the CPU, which will subtract two values from another, and set a number of flags depending on the result (which includes both of them being zero, etc…). There are then 16 CC-codes, to jump depending on that result. So to test if a pointer is null, you'd do
test	rax,rax
je		7h
call 	rax // call ptr if valid
So “jcc” is actually kind of one instruction, but it has this CC-code encoded in it, thus all the different mnemonics. Let's just look at how we express this in our code, to get a better picutre:
struct JCCShortInstruction final :
	public EncodedCCInstruction<JCCShortInstruction, InstructionArgumentRel8>
{
	static constexpr uint8_t ENCODED_HEADER = 0b0111;
	static constexpr sys::StringView CC_PREFIX = L"j"; // name depends on value of CC

	using EncodedCCInstruction::EncodedCCInstruction;
};
So this is JCCShort, the variant that takes an “imm8” (so a 1-byte value, allowing it to jump -128 to +127 bytes in length). We have a separate base-class, EncodedCCInstruction, which is setup similar to FixedInstruction, but is for instructions that encode a cc-code (of which there are several). Instead of giving it an OPCODE, you specify an ENCODED_HEADER, which is the binary representation of the base-opcode, minus the last 4 bits, which are then set to the value of the CC-code. So 0x70 (JO) would be the first possible variant of the instruction, thus 0x0111(0000).
So obviously, the instruction takes up more than one slot in the opcode-table, but we can just specify it the same:
storeEncodedInstruction<JCCShortInstruction>(); // (0x70+) jcc rel8Internally, we have a specialized variant of the implementation of that function, that uses EncodedCC-instructions data, to calculate all possible opcodes:
template<typename InstructionT> requires HasOpcodeType<InstructionT, EncodedInstructionByteCC>
inline void storeEncodedInstruction(void)
{
	static constexpr auto BASE_OPCODE = std::bit_cast<uint8_t>(EncodedInstructionByteCC{ CCCode(0), InstructionT::ENCODED_HEADER });

	for (const auto opcode : sys::iterateRange<uint8_t>(BASE_OPCODE, BASE_OPCODE + 16))
	{
		storeInstructionHandler<InstructionT>(opcode);
	}
}
There are a lot of variants here, but using C++20s concepts really cuts down on the amount of boilerplate needed to be written (as we can now constrain function-templates, which we could previously not). Anyway, to whom templates are unreadable - this will calculate the BASE_OPCODE (0x70 in our case), and add the next 16 numbers (one for each cc-code) to the table.
One more thing, now that this instruction has an argument, it needs to specify it. InstructionargumentRel8 is a wrapper around an int8_t, that is being specified as “rel8” in the documentation. There are a lot of different argument-types, but by using a set of different base-classes for the instructions, with different argument-structs, we can easily compose any possible instruction. Interaction between them is done via set of functions to match up the data that the instruction prodives and expects, with the information that the argument can handle. But that's probably getting into too much detail.
Wrapping it up
What's important here is that we can add new instructions very easily. The x64-instruction set is immense, and having to only specify our configuration, instead of writing code, for each individual instruction is a huge gain. We obviously have to define all the different building blocks, but almost any of them is reused multiple times. The disassembler-logic itself is also pretty simple, it comes down to:
while (const auto symbol = input.TryReadSymbol())
{
	if (const auto instruction = parseOpcode({ *symbol, input})
		instruction->Output(output);
	else
	{
		// unhandled instruction
		break;
	}
}
Next time, I'll show the assembler-side of things, to see how the framework fares when going into the opposite direction. We'll see some more of what ASM has to offer (like registers and memory), so stay tuned 😉
EDIT: Oh, I totally forgot to show a picture of the result. This is how the disassembler looks like:
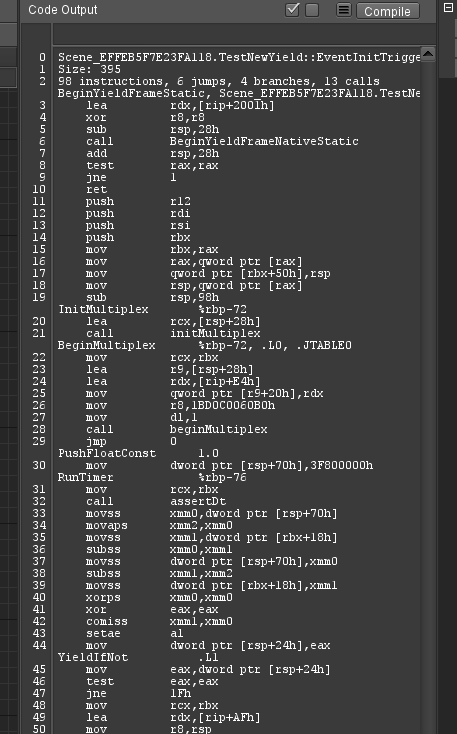
Added benefits compared over doing it in Visual Studio is that it's actually able to match up the IL-source lines, as well as resolve symbols from my own code (both of which VS cannot do). That increases the ability to read the code and makes finding issues or potential improvements soo much easier.