I recently decided to play through the All-Stars version of SMB 3 without using any Warp Whistles.
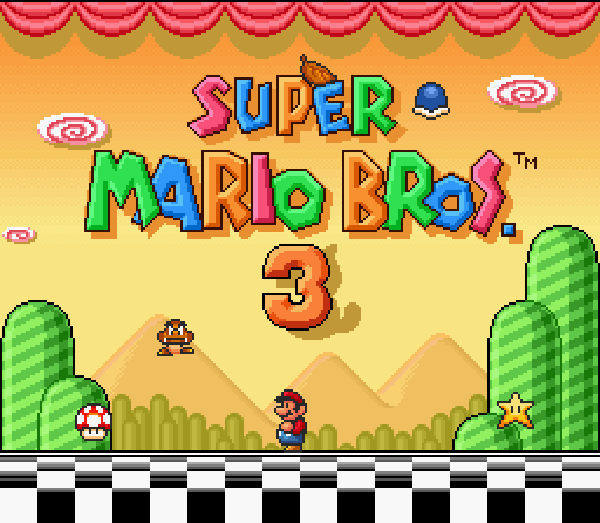
SMB 3's playful title screen has Mario & Luigi messing around with a bunch of enemies and powerups.
The sequence is fun to watch, but it also serves as a great preview of numerous game mechanics.
I suspect that the majority of people who replay the game are familiar with the secret and use it to skip to the last world. This also means zooming past a plethora of well-designed levels. It’s been my habit as well, but this time I resolved to experience SMB 3 in its entirety.
A lot of small, geometric stages later, here’s an overview of what I found to be the most notable points in the first world:
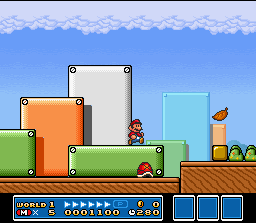
1) World 1-1
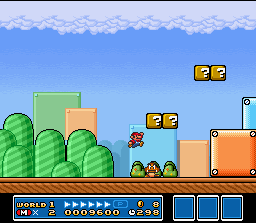
As with the original Super Mario Bros., the “?” Blocks are encountered as soon as the game begins. Since they utilize a fairly universal symbol for a question, they inherently invite the player to investigate.
In addition to being positioned over Mario’s head, a slowly approaching Goomba encourages the player to jump up and discover that hitting the blocks from below can yield rewards (in this case, some Coins and a Super Mushroom).
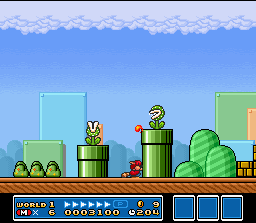
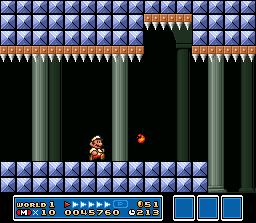
The red Venus Fire Trap is also introduced here and — in typical Mario fashion — doesn’t respawn if killed and only comes out if Mario isn’t standing next to its pipe (or on top of it). Although the player can’t go down this particular pipe, the fact that an enemy emerges from it hints at the possibility of Mario being able to do the same.
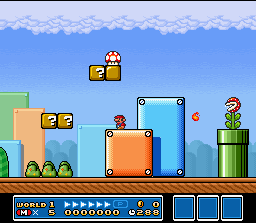
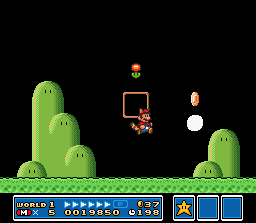
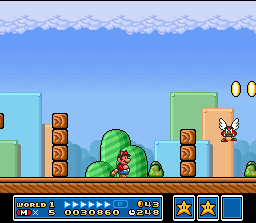
2) World 1-1
Immediately after collecting the mushroom powerup, the player is presented with a red Koopa Troopa, an enemy that hides in its shell after a successful jump attack.
If the Koopa Troopa is touched while in this state, it quickly slides away from Mario. Although the big white block is a bit in the way, the player can still accomplish this feat fairly easily. If he does, he’ll learn that shells can be used to activate “?” blocks (which is the only way to do it in this case as the block cannot be hit from below) while discovering the game’s new powerup: the Super Leaf.
Immediately to the right, a strip of flat land with three enemies — one of them a red Paragoomba — lets the player experiment with Raccoon Mario’s glide and spin-attack mechanics.
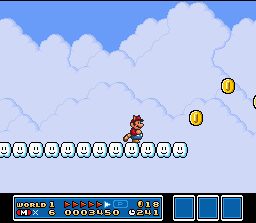
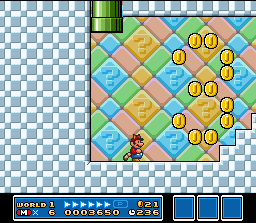
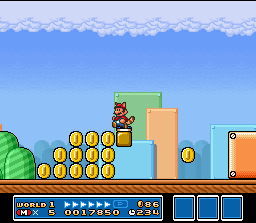
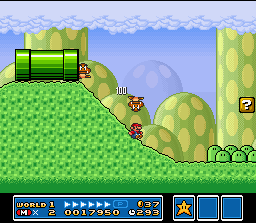
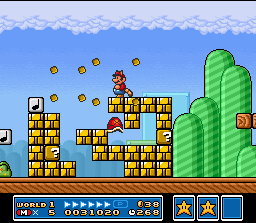
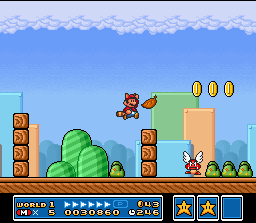
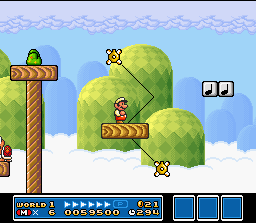
3) World 1-1
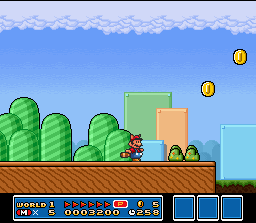
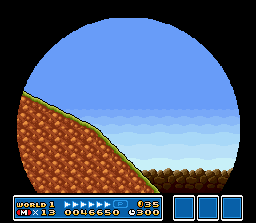
Following the three Goombas (which don’t respawn if killed, leaving the strip clean of enemies), a diagonal trail of coins leads up into the sky. The player must jump over a bottomless pit at the end of this runway and is encouraged to collect the coins, so it makes sense for him to get a running start and jump as high and far as possible.
When the player starts running, a HUD meter fills up, the running animation changes, and an urgent sound effect begins looping in the background. All these events signify that something important is happening, and when the player jumps and soars into the sky, the screen — for the first time in a Mario game — begins to scroll horizontally and vertically at the same time.
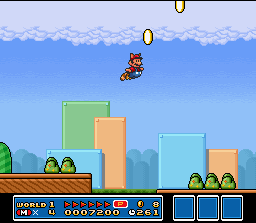
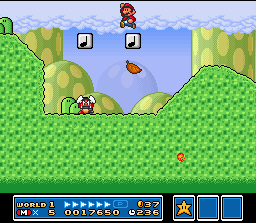
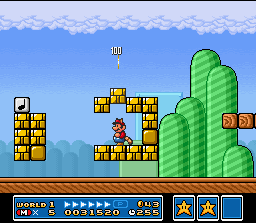
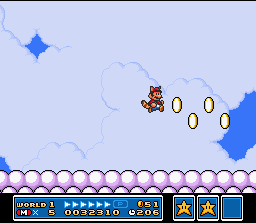
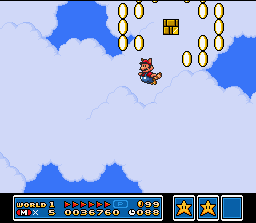
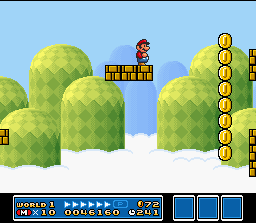
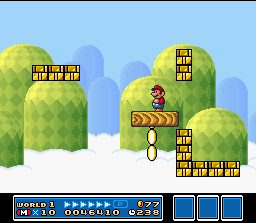
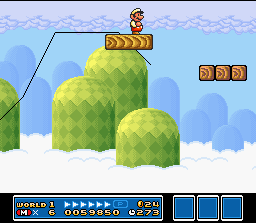
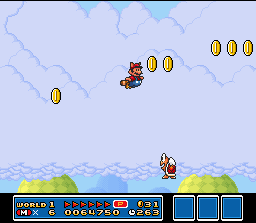
4) World 1-1
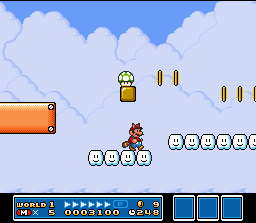
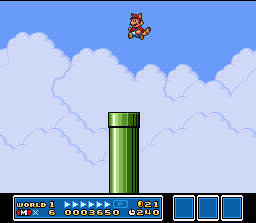
As soon as Mario lands on a series of clouds, he finds an isolated Brick Block that floats in the air much like the “?” blocks. This similarity encourages the player to interact with it in much the same way, i.e., by hitting it, which yields the first 1-Up Mushroom.
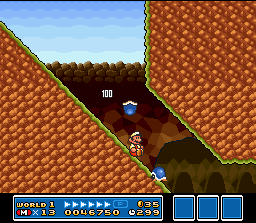
The clouds continue to the right creating another clear runway that ends with a trail of coins. In a dare of sorts, the coins ask the player to throw caution to the wind and make a blind leap into the unknown. The newly acquired flying ability is quite thrilling and liberating, and having just earned an extra life, it stands to reason that most players would want to pursue the extra treasure. Doing so takes Mario off-screen and gradually lowers him by a tall pipe.
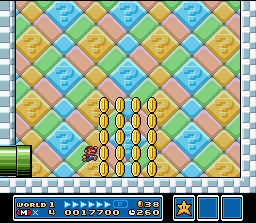
With no other obvious place to go, the game stresses the significance of the pipe. If the player figures out how to enter it, its path leads him to a neat little Easter Egg: a room filled with coins that are arranged to form the number 3.
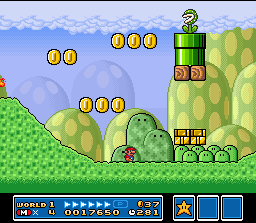
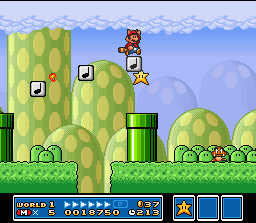
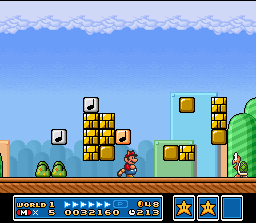
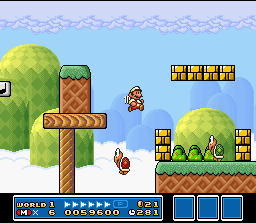
5) World 1-1
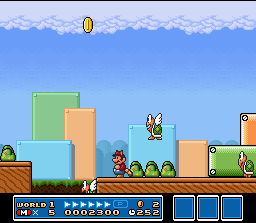
If the player misses the opportunity to fly up to the cloud passage, the next two sections serve to introduce some new enemies. The first contains a green Koopa Troopa and three green Koopa Paratroopas that drop from the sky (hinting that there’s something up above). The Paratroopas demonstrate their ability to jump onto and fall down from platforms, while the two pits to the sides serve as an opening to show that enemies can also fall to their deaths.
The second area contains a Piranha Plant and a green Venus Fire Trap. Their proximity makes it more likely that the player will have to stop by one of them on his route to the level’s end. If he does, he’ll have another opportunity to discover that the plants can’t come out of pipes if Mario is standing near them. The immobile version of Super Mario will also encourage the discovery of crouching in order to dodge the fireballs, and a Raccoon Mario will get a chance to dispatch the plants with his spin-attack.
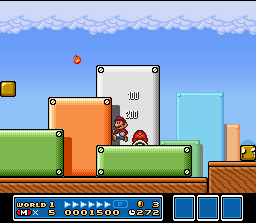
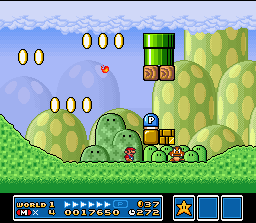
6) World 1-1
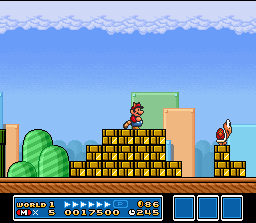
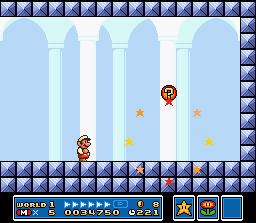
Right before the level’s end, the player encounters two grounded piles of Brick Blocks. Since the player had two previous chances to pick up a Super Leaf, he’s likely to try the spin-attack on these glowing objects as there’s no way to hit them from below.
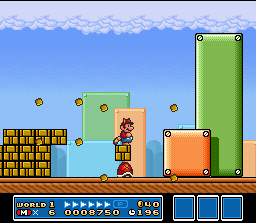
In addition to this lesson, there’s also a solitary red Koopa Troopa pacing atop the second group of blocks. Since the player already had a few chances to learn that Koopa Troopa shells can take out other enemies and activate powerups, he might try to do the same here. If he does, the shell will break through a bunch of Brick Blocks and leave one of them unobstructed. If Mario hits this block from below (or spin-attacks it from the side), it will reveal a P-Switch.
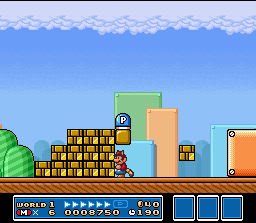
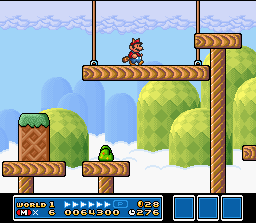
The P-Switch functionality immediately turns all the remaining bricks into coins and plays a jaunty countdown theme. When the countdown ends, the remaining coins turn back into Brick Blocks, teaching the player that the transformation is only temporary. The music change is important as there are no other visual cues to indicate if and when the blocks will return to their original form.
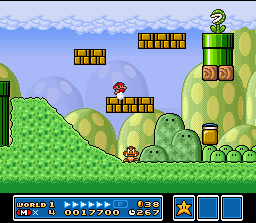
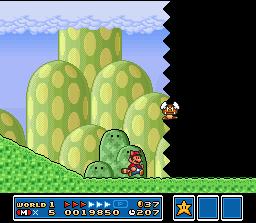
7) World 1-1
The final part of the stage is segmented by a jagged black line that spans the height of the map. This clearly denotes the end of the level while keeping with Super Mario Bros. 3’s stage motif — crossing this boundary is almost like stepping behind a curtain.
The only object in this area is an animating Goal Panel that instantly draws the player’s attention and ends the stage when touched. Since the floor leading up to it is flat, it encourages the player to run in at full speed and jump into the panel. More often than not, this rewards the player with a star, the best possible Goal Panel prize.
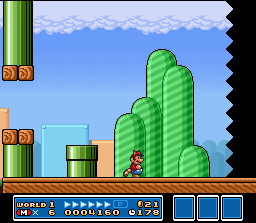
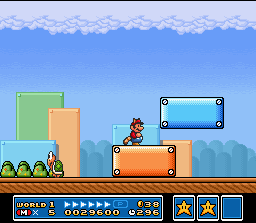
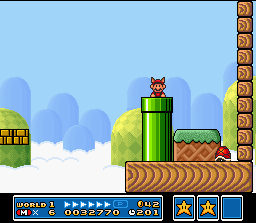
8) World 1-2
As soon as the second level begins, the player is introduced to slopes and gets to experiment with how they affect Mario’s movement. Once Mario reaches the first peak, he can also dispatch a Goomba with the slide-attack while being pursued by more Goombas spawning out of a horizontal pipe.
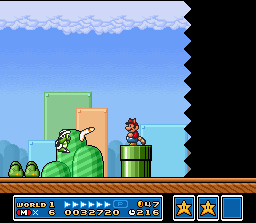
9) World 1-2
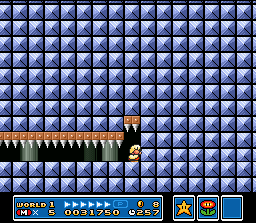
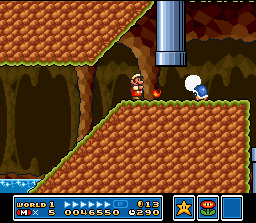
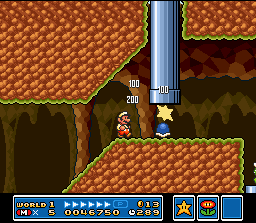
The second major area in the level shows an almost unreachable series of coins, a floating pipe with a Venus Fire Trap, and some Brick Blocks located just above the ground. The player is likely to collect most of the coins and then attempt to break through the Brick Blocks, and perhaps learn the run-then-duck-to-slide maneuver.
If the first block is hit, it reveals a P-Switch. Unlike the P-Switch in the first level, this one turns coins into other Brick Blocks. This results in the coins (or at least what’s left of them) being transformed into a path that leads up to the pipe. This clearly labels the pipe as a destination and allows Mario to use it to get to another bonus room.
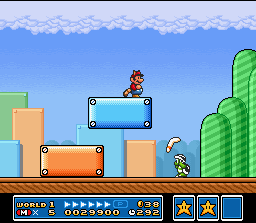
10) World 1-2
The final new object introduced in level 2 is the Jump Block. Much like the other types of blocks, it’s uniquely (if a bit abstractly) decorated, naturally drawing the player’s attention.
The first two Jump Blocks are spotted in a valley with a Paragoomba, increasing the chance that the player will bump into them while dodging/attacking the enemy. The bouncincess of the blocks is quite intuitive as it’s reminiscent of a trampoline — or a really springy bed, which most anyone will immediately understand — encouraging the player to jump off of them as they dip to their lowest point.
The second block also spits out a powerup, and it’s possible to initiate this by bumping it from below or landing on top of it. In case the player misses this point, the next area contains a pit and a stairway of Jump Blocks. In order to safely traverse the pit, the player is likely to use the Jump Blocks above it (instead of risking bumping into them from below), the last of which drops a Starman.
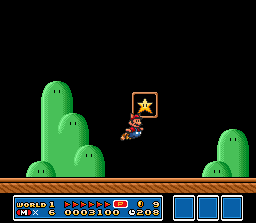
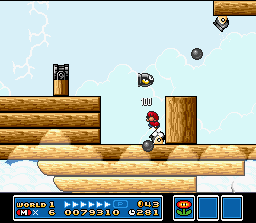
11) World 1-2
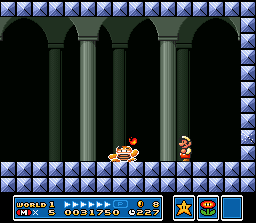
The level end introduces a new enemy, a flying Paragoomba that bombards Mario with Micro-Goombas. Since there are no other enemies or obstacles in sight, it’s a safe place to demonstrate the mechanic of Micro-Goombas slowing down Mario if they attach themselves to him.
If the player lets the Paragoomba follow Mario, he might also learn that any enemies on screen will instantly perish when Mario touches the Goal Panel.
12) World 1-3
As the third level begins, the player is greeted with a few large blocks and a Koopa Troopa. Both of these elements seem to be an aid in dispatching the Boomerang Bro. that stands behind ’em, i.e., the Koopa Troopa’s shell can be rocketed into him, while the higher vantage points makes it easier to dodge his boomerangs and squash him from above.
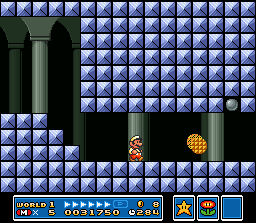
13) World 1-3
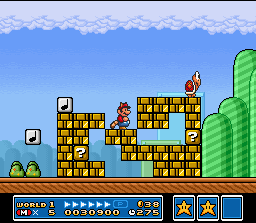
Following the Boomerang Bro., another Brick Block pile is presented where a red Koopa Troopa can be used to set off a chain reaction that destroys many of the bricks. This time around the pinballing turtle shell shows how Jump Blocks react to its touch (simply deflect it like other blocks) while rewarding the player with some extra coins.
When the turtle shell leaves the screen, the player is encouraged to jump down into the cavity it created and investigate the leftover blocks. One of them yields a powerup , while another proves to be a Coin Block . The newly formed brick configuration leads the player to jump back out once he’s done, at which point he has a chance to encounter an invisible Jump Block. This pink block can only be hit from below, and when activated, it sends Mario into the Coin Heaven bonus section.
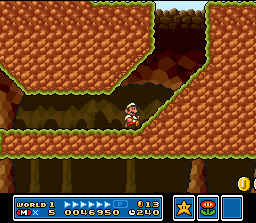
14) World 1-3
Although Level 3 is mostly flat, it doesn’t hold any rewards up in the sky. The Cloud Heaven, though, contains a bunch of extra coins and a 1-Up if the player uses it as a runway.
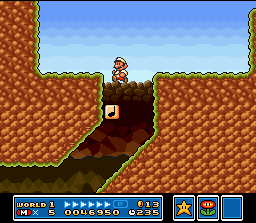
15) World 1-3
Past the pile of Brick Blocks, the player encounters a series of stacked Wooden Blocks. The reason they’re grouped this way is to encourage the player to press against them as he jumps forward, giving him a chance to discover that Wooden Blocks can yield powerups if hit from the side.
16) World 1-4
Although level 4 is not incredibly challenging, it’s much more difficult than the previous three stages. It’s almost completely devoid of solid ground, and its auto-scrolling nature makes it a much more intense experience. This is perhaps the reason why it’s skipable on the overworld map.
In addition to the automatic scrolling that can push Mario to his death, the stage also introduces moving platforms. The platforms only move horizontally, and drop as soon as Mario lands on them. This is a pretty intuitive mechanic as it’s easy to imagine Mario’s weight overpowering the ethereal strings that hold up the platforms.
Once the player learns this, he can use it to his advantage in an area where a vertical stack of coins is positioned next to a wall. With some quick thinking, the player can figure out that if he jumps on the incoming platform, it’ll drop and he’ll collect all the coins, and then still be able to jump off of it and through a gap in the wall. This is a great example of rewarding the player for proper environmental analysis and making him feel like he’s mastering its traversal.
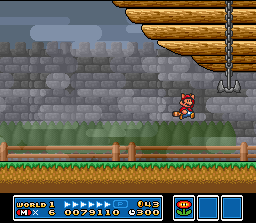
17) World 1-4
Unlike the previous stages, level 4’s main area ends with a solid wall and a pipe. Since there’s nowhere else to go, the player — for the first time — must learn to travel through a pipe in order to finish the level. On the other side, he’ll be ambushed by a Boomerang Bro. and find the standard Goal Panel.
Somewhat emphasizing the level’s optional-challenge nature, if the player collects all the coins in the map, Toad’s Blue House will also open up in the overworld area.
18) World 1 Fortress
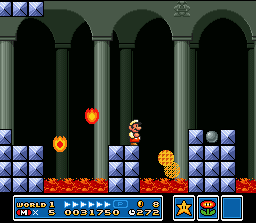
Podoboos and Roto-Discs are first introduced in spaces where it’s easy to avoid them. Once the player gets used to their functionality, the difficulty is ramped up: multiple Podoboos emerge from lava (with different timing), while Roto-Discs occupy platforms that Mario must jump on in order to proceed through the level.
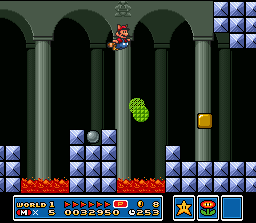
19) World 1 Fortress

The Fortress marks the first in-level appearance of the Fire Flower. This is significant as there are no regular enemies in the Fortress that can be defeated with Fire Mario’s fireballs. This is a tactic that’s used multiple times in the game, but because powerups carry over from level to level and it’s always adventagous to be in “big” Mario mode, it never feels like a handicap.
20) World 1 Fortress
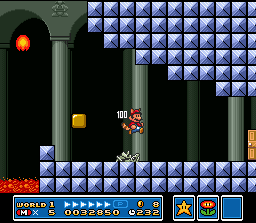
If the player chooses to trade in the Fire Flower for a Super Leaf, he can discover another secret in the sky. This is hinted at by the open ceiling and — if the Dry Bones is temporarily dispatched with a stomp — a runway right next to it. This particular secret leads to a Warp Whistle, and is much more intuitive than the obscure duck-on-a-white-block-for-an-extended-period-of-time maneuver required to get the first whistle.
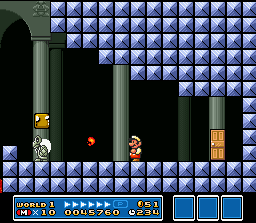
21) World 1 Fortress
The first door the player encounters leads him to a room with a spiked ceiling. The ceiling starts to descend as soon as the player enters the area, but he is also shown a gap that might keep Mario safe. With no other options in sight, it’s natural for most players to strive to reach it before the ceiling crushes them.
When the ceiling drops down all the way, it begins to recede and Mario is forced to jump over a bottomless pit. There is no second hiding spot in sight, so the player has to trust the game to provide one for him. This creates tension and forces the player to perform a leap-of-faith, but he’s ultimately saved by a final tiny gap (much smaller in width and height than the first one) at the end of the area. The gap is located next to a wall so it’s fairly easy to get into it, but its small size makes the whole sequence feel like a nail-biting escape.
22) World 1 Fortress
The Fotress level ends with a boss battle against Boom Boom, an enemy that needs to be stomped three times before being defeated. If the player still possesses the Fire Flower, he can also dispatch him with its fireballs.
When Boom Boom perishes, he drops a “?” Ball that ends the level when touched, adding to the “specialness” of the Fortress level.
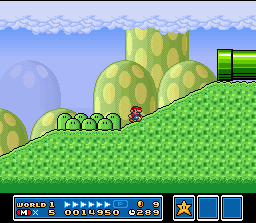
23) World 1-5
In case the player never discovered that he could slide down slopes to take out enemies back in World 1-2, this level does it for him.
Unlike all the other stages, it begins with Mario on a slope already in a butt-scoop position. He then proceeds to barrel through some Buzzy Beetles that just happen to be climbing up the hill.
This not only shows the mechanic, but also displays its usefulness. In addition, sliding is pretty much a universally fun activity, and its presence is another incentive for the player to experiment with the moveset.
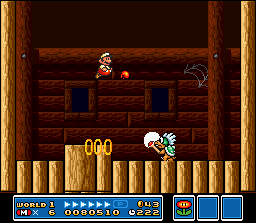
24) World 1-5
The level contains another Fire Flower that allows the player to test out the enemies, but it’s only accessible after the section pictured above. This is notable due to the pipe that hosts a Piranha Plant located close to the ground, making it likely that the player will stop and wait for the plant to recede. During this interval, an approaching Buzzy Beetle will prevent Mario from running through the opening.
When the Buzzy Bettle finally reaches Mario, the player will likely jump on top of it, learning that the beetles’ shells act much like those of the turtles. At this point, the careening shell will have a high chance of taking out the Piranha Plant as it comes out of the pipe, teaching the player another useful combat mechanic.
25) World 1-5
And in case the player missed the pink Jump Block in World 1-3, he gets another chance to discover it here.
Walking up slopes is never fun so the player is encouraged to jump through the area, and in the process possibly bump into the invisible Jump Block. As usual, the pink Jump Block leads to a Coin Heaven area where — once again — he can discover extra coins and a 1-Up if he uses it as a runway.
26) World 1-6
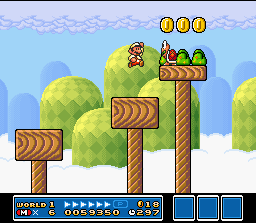
Although this level is not autoscrolling like World 1-4, it’s similarly devoid of a floor. This creates some interesting airborne hijinks with the red Koopa Troopas that do not walk off of platforms by themselves.
As shown in the above example, it’s very easy to start off the level by stomping a Koopa Troopa and sending its shell flying to the right. In turn, the shell will fall off the platform, travel through empty space, land on another platform, and eventually take out another Koopa Troopa that patrols it.
27) World 1-6
Unlike the floating platforms in World 1-4, these ones are attached to a thin path and are buffeted by end pieces. This allows the player to easily guage the platform’s movement and plan his jumps accordingly.
The first platform is introduced with no enemies in sight, but the second one runs head-first into a Koopa Paratroopa. Also, its path doesn’t contain an end piece, forcing it to eventually fall off the path itself. This in turn forces the player to quickly jump to a nearby platform.
28) World 1-6

More opportunities for mid-air stunts are presented via the flying red Koopa Paratroopas. By the time the player encounters them, he’s more than familiar with the mechanic of clipping the wings of enemies and sending them plummeting to the ground.
Since there’s never any solid ground below these turtles, the stomped Koopa Paratroopas simply fall to their deaths. This creates some rather satisfying scenarios where the player can kill two birds with one stone: dispatch an enemy and make a piggy-back jump onto a new platform.
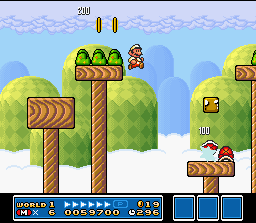
29) World 1-6


The area above is a runway, but it’s punctuated by a single gap that slightly drains the run meter. If the player jumps onto it while running from a previous platform, though, he retains part of the run-charge and is able to take off into the air.
A path of coins beyond the platform shadows Mario’s flight arch, and when he finally floats down, he’s safely deposited on a moving platform.
30) World 1 Airship
The airship levels start off with a short cutscene of Toad pleading for help and Mario heroically leaping onto a moving airship in pursuit of Bowser’s minions.
Like all “artillery” stages, the level auto-scrolls and is filled with unique enemies such as Cannonballs and Bullet Bills. This approach makes it feel almost like a shmup as the player is forced to concentrate on avoiding multiple projectiles while waiting for the end-segment to scroll into view.
However, unlike most shmups, Mario has to deal with gravity, the movement of the ship, and the cramped architecture. This makes avoiding bullets much harder, but also steers the player into making another discovery: not only can Mario kill the projectiles by jumping on them, they can also perish if they touch his feet (even while he’s standing still). A single Fire Flower stresses this point as all the enemies in the level are invulnerable to its fireballs.
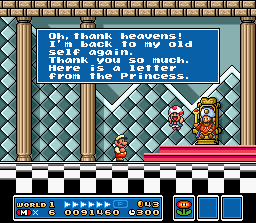
When the end-boss is defeated, the significance of the level is further accentuated by a series of events: Mario grabs the stolen Magic Scepter , jumps down to the ground, cures the king, receives a congratulatory message, and finally reads a letter from Princess Peach that comes packaged with a powerup.
Super Mario Bros. 3 contains many obvious design lessons that are also present in other games, e.g., the gradual layering of complexity that allows players to master a specific mechanic. What surprised me during my playthrough, though, was how some of these lessons were completely optional.
For example, it’s possible to send a turtle shell skittering in the opposite direction of destructible bricks, or to take the cloud-route and skip certain powerups and interactive objects. Of course these same lessons are repeated multiple times, but they’re not always as heavily hinted.
Personally, this hits a sweet spot for me. The game doesn’t have any forced hand-holding, and it isn’t afraid of the player simply exploring it at his own pace (even if it means circumventing chunks of the experience). This approach also serves to encourage multiple replays, and — back during SMB 3’s initial release — it probably sparked many playground discussions.
Note: This article was originally published on the author's blog, and is reproduced here with kind permission. Check out his work at Incubator Games.
Full Series:
Super Mario Bros Level Design Lessons, Part 1
Super Mario Bros Level Design Lessons, Part 2
Super Mario Bros Level Design Lessons, Part 3


I love this game, and I will be looking forward for the part 2. This was a great analysis.