Sounds
Updated for 2021 and to support version 1.12 of Orx.
This is our final part, 5 of a series on creating a game with the Orx Portable Game Engine. Part 1 is here, and part 4 is here.
It's great that collecting the pickups work, but a silent game is pretty bland. It would be great to have a sound play whenever a pickup is collected.
Start by configuring a sound:
[PickupSound]
Sound       = pickup.ogg
KeepInCache = true
Then as part of the collision detection in the PhysicsEventHandler function, we change the code to be:
if (orxString_SearchString(recipientName, "PickupObject") != orxNULL) {
	orxObject_SetLifeTime(pstRecipientObject, 0);
	orxObject_AddSound(pstSenderObject, "PickupSound");
}

if (orxString_SearchString(senderName, "PickupObject") != orxNULL) {
	orxObject_SetLifeTime(pstSenderObject, 0);
	orxObject_AddSound(pstRecipientObject, "PickupSound");
}
In code above, if the recipient is a pickup object, then use the orxObject_AddSound function to place our sound on the sender object. There's little point adding a sound to an object that is about to be deleted.
And of course, if the pickup object is the sender, we add the sound to the recipient object. Also, the PickupSound that is added to the object, is the config section name we just defined in the config.
Compile and run.
Hit the pickups and a sound will play.
You can also use sounds without code. There is an Sound section already available in the config.
We can use this sound on the ufo when it first appears in the game.
This is as simple as adding a SoundList property to the ufo:
[UfoObject]
Graphic         = UfoGraphic
Position        = (0, 0, -0.1)
Body            = UfoBody
AngularVelocity = 200
SoundList       = Sound
Re-run and a nice sound plays at the start of the game.
Adding a score
What's a game without a score? We need to earn points for every pickup that is collected.
The great thing about Orx objects is that they don't have to contain a texture as a graphic. They can contain a font and text rendered to a graphic instead. This is perfect for making a score object.
Start by adding some config for the ScoreObject:
[ScoreObject]
Graphic  = ScoreTextGraphic
Position = (-380, -280, 0)
Next, to add the ScoreTextGraphic section, which will not be a texture, but text instead:
[ScoreTextGraphic]
Text = ScoreText
Now to define the ScoreText which is the section that contains the text information:
[ScoreText]
String = 10000
The String property contains the actual text characters. This will be the default text when a ScoreObject instance is created in code.
Let's now create an instance of the ScoreObject in the Init() function:
orxObject_CreateFromConfig("ScoreObject");
So far, the Init() function should look like this:
orxSTATUS orxFASTCALL Init()
{
	orxVIEWPORT *viewport = orxViewport_CreateFromConfig("MainViewport");
	camera = orxViewport_GetCamera(viewport);

	orxObject_CreateFromConfig("BackgroundObject");

	ufo = orxObject_CreateFromConfig("UfoObject");
	orxCamera_SetParent(camera, ufo);

	orxObject_CreateFromConfig("PickupObjects");
	orxObject_CreateFromConfig("ScoreObject");

	orxClock_Register(orxClock_Get(orxCLOCK_KZ_CORE), Update, orxNULL, orxMODULE_ID_MAIN, orxCLOCK_PRIORITY_NORMAL);

	orxEvent_AddHandler(orxEVENT_TYPE_PHYSICS, PhysicsEventHandler);

	return orxSTATUS_SUCCESS;
}
Compile and run.
There should be a score object in the top left hand corner displaying: 10000
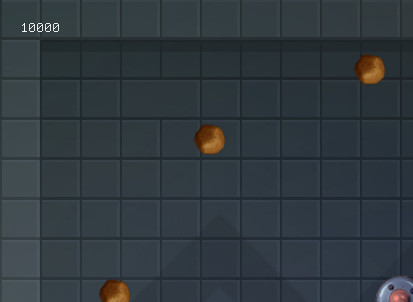
The score is pretty small. And it's fixed into the top left corner of the playfield. That's not really what we want.
A score is an example of a User Interface (UI) element. It should be fixed in the same place on the screen. Not move around when the screen scrolls.
The score should in fact, be fixed as a child to the Camera. Wherever the Camera goes, the score object should go with it.
This can be achieved with the ParentCamera property, and then setting the position of the score relative to the camera's centre position:
[ScoreObject]
Graphic        = ScoreTextGraphic
Position       = (-380, -280, 0)
ParentCamera   = Camera
UseParentSpace = false
With these changes, we've stated that we want the Camera to be the parent of the ScoreObject. In other words, we want the ScoreObject to travel with the Camera and appear to be fixed on the screen.
By saying that we don't want to UseParentSpace means that we want specify relative world coordinates from the centre of the camera. If we said yes, we'd have to specify coordinates in another system.
And Position, of course, is the position relative to the center of the camera. In our case, moved to the top left corner position.
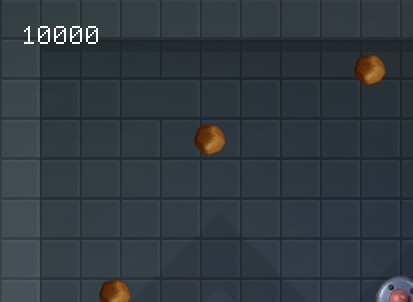
Re-run and you'll see the score in much the same position as before, but when you move the ufo around, and the screen scrolls, the score object remains fixed in the same place.
The only thing, it's still a little small. We can double its size using Scale:
[ScoreObject]
Graphic        = ScoreTextGraphic
Position       = (-380, -280, 0)
ParentCamera   = Camera
UseParentSpace = false
Scale          = 2.0
Smoothing      = false
Smoothing has been set to false so that when the text is scaled up, it will be sharp and pixellated rather than smoothed up which looks odd.
All objects in our project are smooth be default due to:
[Display]
Smoothing = true:
So we need to explicitly set the score to not smooth.
Re-run. That looks a lot better.
To actually make use of the score object, we will need a variable in code of type int to keep track of the score.
Every clock cycle, we'll take that value and change the text on the ScoreObject.
That is another cool feature of Orx text objects: the text can be changed any time, and the object will re-render.
Finally, when the ufo collides with the pickup, and the pickup is destroyed, the score variable will be increased. The clock will pick up the variable value and set the score object.
Begin by creating a score variable at the very top of the code:
#include "orx.h"
orxOBJECT *ufo;
orxCAMERA *camera;
int score = 0;
Change the comparison code inside the PhysicsEventHandler function to increase the score by 150 points every time a pickup is collected:
if (orxString_SearchString(recipientName, "PickupObject") != orxNULL) {
  orxObject_SetLifeTime(pstRecipientObject, 0);
  orxObject_AddSound(pstSenderObject, "PickupSound");
  score += 150;
}

if (orxString_SearchString(senderName, "PickupObject") != orxNULL) {
  orxObject_SetLifeTime(pstSenderObject, 0);
  orxObject_AddSound(pstRecipientObject, "PickupSound");
  score += 150;
}
Now we need a way to change the text of the score object. We declared the score object in the Init() function as:
orxObject_CreateFromConfig("ScoreObject");
But we really need to create it using an orxOBJECT variable:
scoreObject = orxObject_CreateFromConfig("ScoreObject");
And then declare the scoreObject at the top of the file:
#include "orx.h"
orxOBJECT *ufo;
orxCAMERA *camera;
orxOBJECT *scoreObject;
int score = 0;
Now it is possible to update the scoreObject using our score variable. At the bottom of the Update() function, add the following code:
if (scoreObject) {
  orxCHAR formattedScore[5];
  orxString_Print(formattedScore, "%d", score);

  orxObject_SetTextString(scoreObject, formattedScore);
}
First, the block will only execute if there is a valid scoreObject.
If so, then create a 5 character string. Then print into the string with the score value, effectively converting an int into a string.
Finally set the score text to the scoreObject using the orxObject_SetTextString function.
Compile and Run.
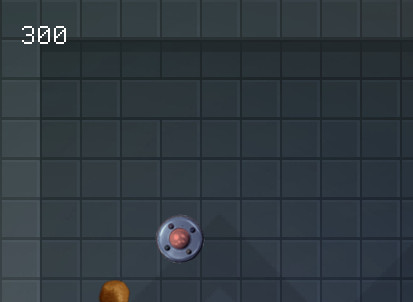
Move the ufo around and collect the pickups to increase the score 150 points at a time.
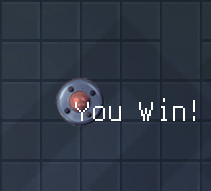
Winning the game
1200 is the maximum amount of points that can be awarded, and that will mean we've won the game.
If we do win, we want a text label to appear above the ufo, saying “You win!”.
Like the score object, we need to define a YouWinObject:
[YouWinObject]
Graphic   = YouWinTextGraphic
Position  = (0, -60, 0.0)
Scale     = 2.0
Smoothing = false
Just like the camera, the YouWinObject is going to be parented to the ufo too. This will give the appearance that the YouWinObject is part of the ufo.
The Scale is set to x2.
The Position is set offset up in the y axis so that it appears above the ufo.
Next, the actual YouWinTextGraphic:
[YouWinTextGraphic]
Text  = YouWinText
Pivot = center
And the text to render into the YouWinTextGraphic:
[YouWinText]
String = You Win!
We'll test it by creating an instance of the YouWinObject, putting it into a variable, and then parent it to the ufo in the Init() function:
orxObject_CreateFromConfig("PickupObjects");
scoreObject = orxObject_CreateFromConfig("ScoreObject");

ufoYouWinTextObject = orxObject_CreateFromConfig("YouWinObject");
orxObject_SetParent(ufoYouWinTextObject, ufo);
Then the variable:
#include "orx.h"
orxOBJECT *ufo;
orxCAMERA *camera;
orxOBJECT *ufoYouWinTextObject;
orxOBJECT *scoreObject;
int score = 0;
Compile and Run.
The “You win” text should appear above the ufo. Not bad, but the text is rotating with the ufo much like the camera was before.
We can ignore the rotation from the parent on this object too:
[YouWinObject]
Graphic	         = YouWinTextGraphic
Position         = (0, -60, 0.0)
Scale	         = 2.0
Smoothing        = false
IgnoreFromParent = rotation
Re-run. Interesting. It certainly isn't rotating with the ufo, but its position is still being taken from the ufo's rotation.
We need to ignore this as well:
[YouWinObject]
Graphic          = YouWinTextGraphic
Position         = (0, -60, 0.0)
Scale            = 2.0
Smoothing        = false
IgnoreFromParent = position.rotation rotation
Good that's working right.

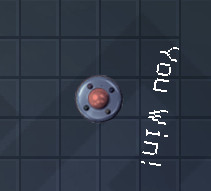
We want the “You Win!” to appear once all pickups are collected.
The YouWinObject object on created on the screen when the game starts. But we don't want it to appear yet. Only when we win. Therefore, we need to disable the object immediately after it is created using the orxObject_Enable function:
ufoYouWinTextObject = orxObject_CreateFromConfig("YouWinObject");
orxObject_SetParent(ufoYouWinTextObject, ufo);
orxObject_Enable(ufoYouWinTextObject, orxFALSE);
Finally, all that is left to do is add a small check in the PhysicsEventHandler function to test the current score after each pickup collision:
if (orxString_SearchString(recipientName, "PickupObject") != orxNULL) {
  orxObject_SetLifeTime(pstRecipientObject, 0);
  orxObject_AddSound(pstSenderObject, "PickupSound");
  score += 150;
}

if (orxString_SearchString(senderName, "PickupObject") != orxNULL) {
  orxObject_SetLifeTime(pstSenderObject, 0);
  orxObject_AddSound(pstRecipientObject, "PickupSound");
  score += 150;
}

if (orxObject_IsEnabled(ufoYouWinTextObject) == orxFALSE && score == 1200) {
  orxObject_Enable(ufoYouWinTextObject, orxTRUE);
}
We are checking two things: that the ufoYouWinTextObject is not yet enabled using the orxObject_IsEnabled function, and if the score is 1200.
If both conditions are met, enable the ufoYouWinTextObject.
Compile and run.
Move the ufo around and collect all the pickups. When all are picked up and 1200 is reached, the “You Win!” text should appear above the ufo signifying that the game is over and we have won.

And that brings us to the end! We have created a simple and complete game with some configuration and minimal code.
Congratulations!
I hope you enjoyed working through making the ufo game using the Orx Portable Game Engine. Of course, there are many little extras you can add to give your game that little extra polish. So, for just a bit more eye candy, there a couple more sections that you can follow along with if you wish.
Shadows
There are many ways to do shadows. One method is to use shaders… though this method is a little beyond this simple guide.
Another method, when making your graphics, would be to add an alpha shadow underneath. This is a good method if your object does not need to rotate or flip.
The method I will show you in this chapter is to have a separate shadow object as a child of an object. And in order to remain independent of rotations, the children will ignore rotations from the parent.
First a shadow graphic for the ufo, and one for the pickups:


These both should already be in the data/texture folder from Part 1.
Then create config for the ufo shadow:
[UfoShadowGraphic]
Texture = ufo-shadow.png
Alpha   = 0.3
Pivot   = center
The only interesting part is the Alpha property. 0.1 would be almost completely see-through (or transparent), and 1.0 is not see-through at all, which is the regular default value for a graphic. 0.3 is fairly see-through.
[UfoShadowObject]
Graphic  = UfoShadowGraphic
Position = (-20, 20, 0.05)
Set the Position a bit to the left, and downwards.
Next, add the UfoShadowObject as a child of the UfoObject:
[UfoObject]
Graphic         = UfoGraphic
Position        = (0,0, -0.1)
Body            = UfoBody
AngularVelocity = 200
UseParentSpace  = position
SoundList       = Sound
ChildList       = UfoShadowObject
Run the project.
The shadow child is sitting properly behind the ufo but it rotates around the ufo which is not correct.
We'll need to ignore the rotation from the parent:
[UfoShadowObject]
Graphic          = UfoShadowGraphic
Position         = (-20, 20, 0.05)
IgnoreFromParent = position.rotation rotation
Not only do we need to ignore the rotation of ufo, we also need to ignore the rotation position of the ufo.
Re-run and the shadow sits nice and stable to the bottom left of the ufo.
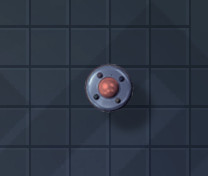
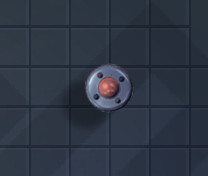
Now to do the same with the pickup shadow:
[PickupShadowGraphic]
Texture = pickup-shadow.png
Alpha   = 0.3
Pivot   = center

[PickupShadowObject]
Graphic          = PickupShadowGraphic
Position         = (-20, 20, 0.05)
IgnoreFromParent = position.rotation
The only difference between this object and the ufo shadow, is that we want the pickup shadow to take the rotation value from the parent. But we do not want to take the position rotation.
That way, the pickup shadow will remain in the bottom left of the pickup, but will rotate nicely in place.
Now attach as a child to the pickup object:
[PickupObject]
Graphic   = PickupGraphic
FXList    = RotateFX
Body      = PickupBody
ChildList = PickupShadowObject
Re-run, and the shadows should all be working correctly.
And that really is it this time. I hope you made it this far and that you enjoyed this series of articles on the Orx Portable Game Engine.
If you like what you see and would like to try out a few more things with Orx, head over our learning wiki where you can follow more beginner guides, tutorials and examples.
You can always get the latest news on Orx at the official website.
If you need any help, you can get in touch with the community on discord, or at the forum. They're a friendly helpful bunch over there, always ready to welcome newcomers and assist with any questions.

Updated for 2021 and to support version 1.12 of Orx.