Creating Pickup Objects
Updated for 2021 and to support version 1.12 of Orx.
This is part 4 of a series on creating a game with the Orx Portable Game Engine. Part 1 is here, and part 3 is here.
In our game, the player will be required to collect objects scattered around the playfield with the ufo.
When the ufo collides with one, the object will disappear, giving the impression that it has been picked up.
Begin by creating a config section for the graphic, and then the pickup object:
[PickupGraphic]
Texture = pickup.png
Pivot   = center

[PickupObject]
Graphic = PickupGraphic
The graphic will use the image pickup.png which is located in the project's data/object folder.
It will also be pivoted in the center which will be handy for a rotation effect later.
Finally, the pickup object uses the pickup graphic. Nice and easy.
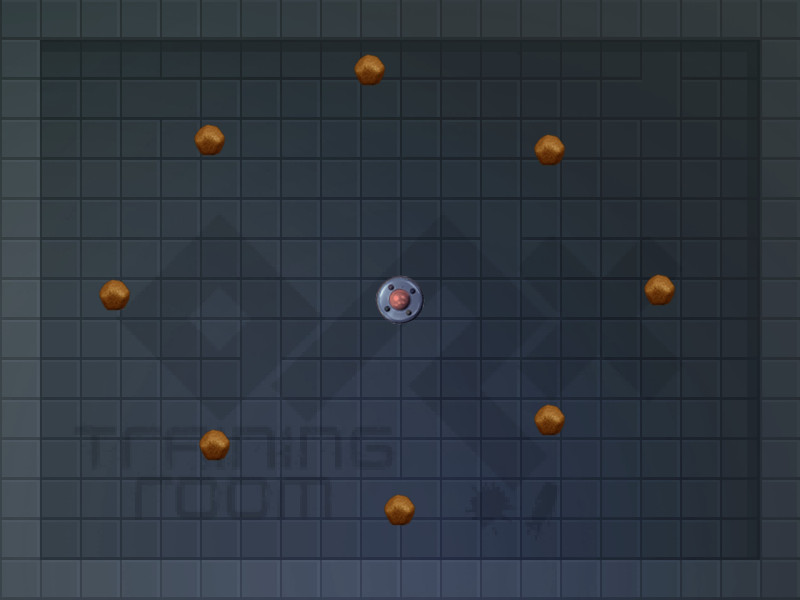
Our game will have eight pickup objects. We need a simple way to have eight of these objects in various places.
We will employ a nice trick to handle this. We will make an empty object, called PickupObjects which will hold eight copies of the pickup object as child objects.
That way, wherever the parent is moved, the children move with it.
Add that now:
[PickupObjects]
ChildList = PickupObject1 # PickupObject2 # PickupObject3 # PickupObject4 # PickupObject5 # PickupObject6 # PickupObject7 # PickupObject8
Position  = (-400, -300, -0.1)
This object will have no graphic. That's ok. It can still act like any other object.
Notice the position. It is being positioned in the top left hand corner of the screen. All of the child objects PickupObject1 to PickupObject8 will be positioned relative to the parent in the top left corner.
Now to create the actual children. We'll use the inheritance trick again, and just use PickupObject as a template:
[PickupObject1@PickupObject]
Position = (370, 70, -0.1)

[PickupObject2@PickupObject]
Position = (210, 140, -0.1)

[PickupObject3@PickupObject]
Position = (115, 295, -0.1)

[PickupObject4@PickupObject]
Position = (215, 445, -0.1)

[PickupObject5@PickupObject]
Position = (400, 510, -0.1)

[PickupObject6@PickupObject]
Position = (550, 420, -0.1)

[PickupObject7@PickupObject]
Position = (660, 290, -0.1)

[PickupObject8@PickupObject]
Position = (550, 150, -0.1)
Each of the PickupObject* objects uses the properties defined in PickupObject. And the only difference between them are their Position properties.
The last thing to do is to create an instance of PickupObjects in code in the Init() function:
orxObject_CreateFromConfig("PickupObjects");
Compile and Run.
Eight pickup objects should appear on screen. Looking good.
It would look good if the pickups rotated slowly on screen, just to make them more interesting. This is very easy to achieve in Orx using FX.
FX can also be defined in config.
FX allows you to affect an object's position, colour, rotation, scaling, etc, even sound can be affected by FX.
Change the PickupObject by adding a FXList property:
[PickupObject]
Graphic = PickupGraphic
FXList  = SlowRotateFX
Clearly being an FXList you can have many types of FX placed on an object at the same time. We will only have one.
An FX is a collection of FX Slots. FX Slots are the actual effects themselves. Confused? Let's work through it. First, the FX:
[SlowRotateFX]
SlotList = SlowRotateFXSlot
Loop     = true
This simply means, use some effect called SlowRotateFXSlot, and when it is done, do it again in a loop.
Next the slot (or effect):
[SlowRotateFXSlot]
Type       = rotation
StartTime  = 0
EndTime    = 10
Curve      = linear
StartValue = 0
EndValue   = 360
That's a few properties. First, the Type, which is a rotation FX.
The total time for the FX is 10 seconds, which comes from the StartTime and EndTime properties.
The Curve type is linear so that the values changes are done so in a strict and even manner.
And the values which the curve uses over the 10 second period starts from 0 and climbs to 360.
Re-run and notice the pickups now turning slowly for 10 seconds and then repeating.
Picking up the collectable objects
Time to make the ufo collide with the pickups. In order for this to work (just like for the walls) the pickups need a body.
And the body needs to be set to collide with a ufo and vice versa.
First a body for the pickup template:
[PickupObject]
Graphic   = PickupGraphic
FXList    = SlowRotateFX
Body      = PickupBody
Then the body section itself:
[PickupBody]
Dynamic  = false
PartList = PickupPart
Just like the wall, the pickups are not dynamic. We don't want them bouncing and traveling around as a result of being hit by the ufo. They are static and need to stay in place if they are hit.
Next to define the PickupPart:
[PickupPart]
Type      = sphere
Solid     = false
SelfFlags = pickup
CheckMask = ufo
The pickup is sort of roundish, so we're going with a spherical type.
It is not solid. We want the ufo to able to pass through it when it collides. It should not influence the ufo's travel at all.
The pickup is given a label of pickup and will only collide with an object with a label of ufo.
The ufo must reciprocate this arrangement (just like a good date) by adding pickup to its list of bodypart check masks:
[UfoBodyPart]
Type      = sphere
Solid     = true
SelfFlags = ufo
Friction  = 1.2
CheckMask = wall # pickup
This is a static bodypart, and we have specified collision actions to occur if the ufo collides with a pickup. But it's a little difficult to test this right now. However you can turn on the debug again to check the body parts:
[Physics]
Gravity   = (0, 0, 0)
ShowDebug = true
Re-run to see the body parts.
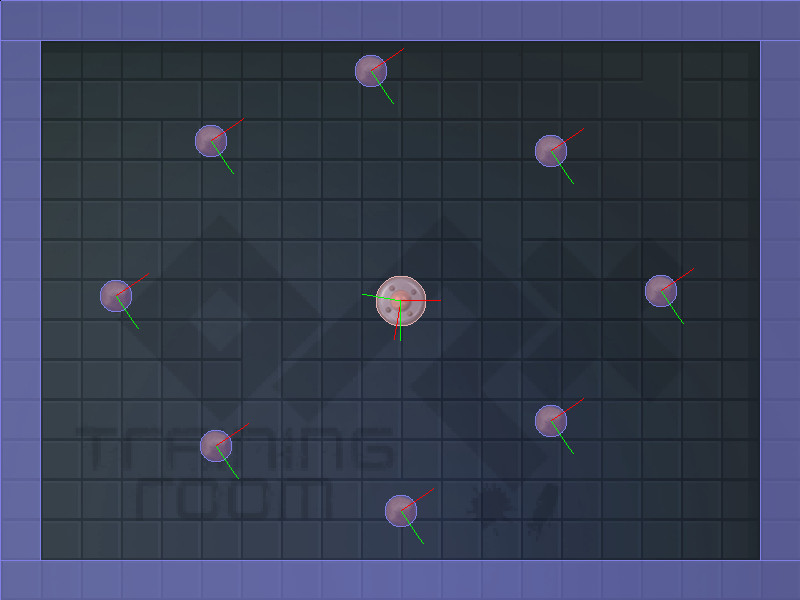
Switch off again:
[Physics]
Gravity   = (0, 0, 0)
ShowDebug = false
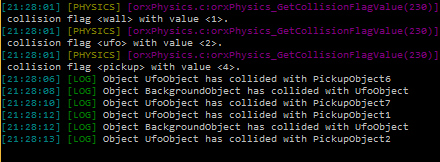
To cause a code event to occur when the ufo hits a pickup, we need something new: a physics hander. The hander will run a function of our choosing whenever two objects collide.
We can test for these two objects to see if they are the ones we are interested in, and run some code if they are.
First, add the physics hander to the end of the Init() function (but before the return statement:
orxEvent_AddHandler(orxEVENT_TYPE_PHYSICS, PhysicsEventHandler);
This will create a physics handler, and should any physics event occur, (like two objects colliding) then a function called PhysicsEventHandler will be executed.
Our new function will start as:
orxSTATUS orxFASTCALL PhysicsEventHandler(const orxEVENT *_pstEvent)
{

  if (_pstEvent->eID == orxPHYSICS_EVENT_CONTACT_ADD) {
    orxOBJECT *pstRecipientObject, *pstSenderObject;

    /* Gets colliding objects */
    pstRecipientObject = orxOBJECT(_pstEvent->hRecipient);
    pstSenderObject = orxOBJECT(_pstEvent->hSender);

    const orxSTRING recipientName = orxObject_GetName(pstRecipientObject);
    const orxSTRING senderName = orxObject_GetName(pstSenderObject);

    orxLOG("Object %s has collided with %s", senderName, recipientName);

    return orxSTATUS_SUCCESS;
  }
}
Every handler function passes an orxEVENT object in. This structure contains a lot of information about the event.
The eID is tested to ensure that the type of physics event that has occurred is a orxPHYSICS_EVENT_CONTACT_ADD which indicates when objects collide.
If true, then two orxOBJECT variables are declared, then set from the orxEVENT structure. They are passed in as the hSender and hRecipient objects.
Next, two orxSTRINGs are declared and are set by getting the names of the objects using the orxObject_GetName function. The name that is returned is the section name from the config.
Potential candidates are: UfoObject, BackgroundObject, and PickupObject1 to PickupObject8.
The names are then sent to the console.
Finally, the function returns orxSTATUS_SUCCESS which is required by an event function.
Compile and run.
If you drive the ufo into a pickup or the edge of the playfield, a message will display on the console. So we know that all is working.
Next is to add code to remove a pickup from the playfield if the ufo collides with it. Usually we could compare the name of one object to another and perform the action.
In this case, however, the pickups are named different things: PickupObject1, PickupObject2, PickupObject3… up to PickupObject8.
So we will need to actually just check if the name contains “PickupObject” which will match well for any of them.
In fact, we don't need to test for the “other” object in the pair of colliding objects. Ufo is a dynamic object and everything else on screen is static. So if anything collides with PickupObject*, it has to be the ufo. Therefore, we won't need to test for that.
First, remove the orxLOG line. We don't need that anymore.
Change the function to become:
orxSTATUS orxFASTCALL PhysicsEventHandler(const orxEVENT *_pstEvent)
{

  if (_pstEvent->eID == orxPHYSICS_EVENT_CONTACT_ADD) {
    orxOBJECT *pstRecipientObject, *pstSenderObject;

    /* Gets colliding objects */
    pstRecipientObject = orxOBJECT(_pstEvent->hRecipient);
    pstSenderObject = orxOBJECT(_pstEvent->hSender);

    const orxSTRING recipientName = orxObject_GetName(pstRecipientObject);
    const orxSTRING senderName = orxObject_GetName(pstSenderObject);

    if (orxString_SearchString(recipientName, "PickupObject") != orxNULL) {
      orxObject_SetLifeTime(pstRecipientObject, 0);
    }

    if (orxString_SearchString(senderName, "PickupObject") != orxNULL) {
      orxObject_SetLifeTime(pstSenderObject, 0);
    }
  }

  return orxSTATUS_SUCCESS;
}
You can see the new code additions after the object names.
If an object name contains the word “PickupObject”, then the ufo must have collided with it. Therefore, we need to kill it off. The safest way to do this is by setting the object's lifetime to 0.
This will ensure the object is removed instantly and deleted by Orx in a safe manner.
Notice that the test is performed twice. Once, if the pickup object is the sender, and again if the object is the recipient.
Therefore we need to check and handle both.
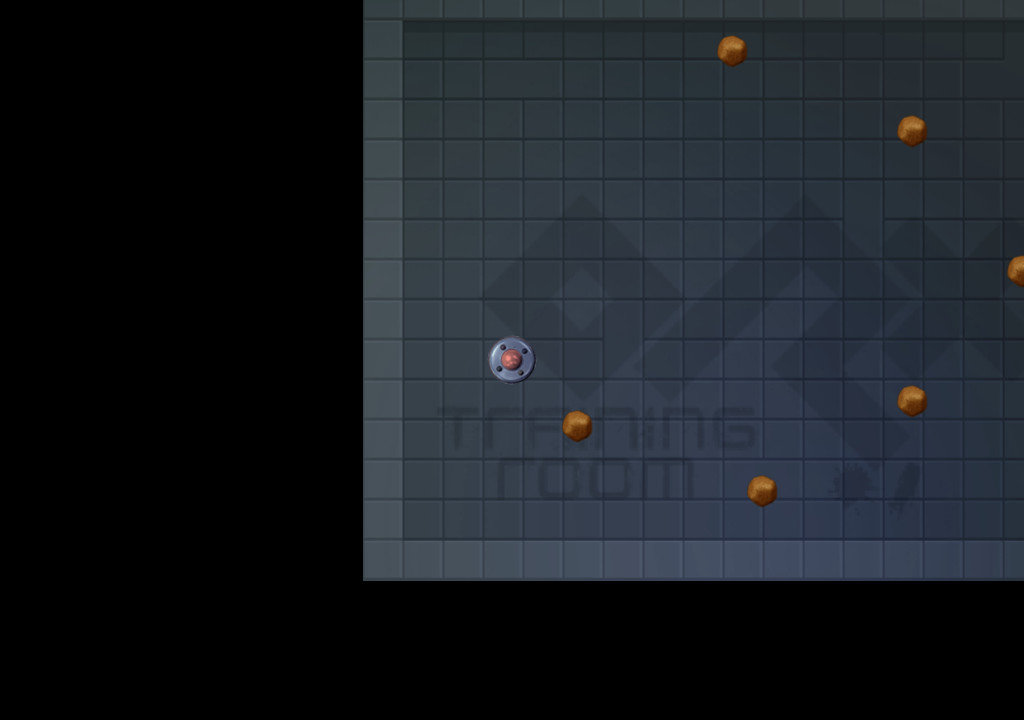
Compile and run.
Move the ufo over the pickups and they should disappear nicely.
We'll leave it there for the moment. In the final, Part 5, we'll cover adding sounds, a score, and winning the game.


Updated for 2021 and to support version 1.12 of Orx.