Why
Everyone loves scorpions. Those petite beady eyes, those adorable claws that simply draw you in for the tail to sting you like an arrow from Cupid. So why even write this demo? It turns out you can make scorpions even more wub-bly using a simple fur shader. There are several excellent fur shader demos out there for DirectX. I will even encourage you to go out there and try them out first. This demo is different because I wanted to play around with the demo and show you some cool things you can do with your own fuzzy wuzzy scorpion.
I've assumed you're familiar with fur shaders and skinned meshes. If you're not, then don't worry because I've included some awesome links in the assumptions for both things. For the most part, I'll just be explaining how this demo works from the top down. This demo does include things such as a simple GUI and even some wind. There's a lot of fun to have, so let's go!
Assumptions
- You have played with a few other fur demos first. I'm not here to explain the basics, but to show you some cool things to do with fur. Here are some awesome links:
https://www.patreon.com/posts/fur-shader-26688516
http://www.xbdev.net/directx3dx/specialX/Fur/index.php
http://www.catalinzima.com/xna/tutorials/fur-rendering/
- I'm building my example based on a previous example I made for skinned meshes. So feel free to read it first if you're unfamiliar with skinned meshes.
- You need Visual Studio 2019 Community edition to compile this project. It's free.
- This code is mostly DirectX 9 specific. It's in the title, but I'm listing it here none-the-less. I pre-installed DirectX SDK version June 2010.
- You have some working knowledge of how DirectX works. There are a lot of books on DirectX. Frank Luna books are my favorite.
- We do need to use a shader to render the skinned mesh, so please be familiar with how DirectX shaders work.
- You'll need to install the Autodesk SDK. I installed Autodesk SDK version "2019.0". Remember to move the 32-bit libfbxsdk.dll to the project folder. Other versions may work too, but the interfaces tend to change a bit between versions of Autodesk.
- You should understand how skinned meshes work with bone influences and the bone matrix vector. If you don't understand this, then it's probably a good idea to read a book or a web page on this topic first.
- I tend to use DirectX terms instead of OpenGL or Autodesk terms.
Limitations
- In order to keep the example direct and simple, I've left off a few standard features you'd expect to see in a rendering example:
- I'm doing some minimal diffuse lighting. Fur is all about movement and light play, but to be honest, I've done just the lighting minimum.
- No lost device support - for some graphics cards, you will lose the device if you move your window from one monitor to a second monitor. Especially if the monitors are driven by different graphic cards. Most of the DirectX examples supplied by Microsoft show you how to handle this quite well.
- Resize the window at your own risk. The controls won't work right if you resize the window.
- This example may not work with any random .fbx mesh. This example assumes the mesh is skinned and has at least one animation. The provided .fbx and .dds files have been tested.
Code Organization - you might want to open the first example and follow along.
main.cpp: This provides a simple scaffolding for rendering our Skinned mesh.
- WinMain(): creates the window, calls init(), and services the windows event queue. While we are looking for windows events, we also call advanceTime on the g_SingleFbxMesh object. I won't be explaining too much about the internals of the g_SingleFbxMesh object since I did this previously in another tutorial. We also call render(). We will continue to loop over the events, advancing time, and rendering until PostQuitMessage() is called.
- init(): creates the DirectX device object and tells the g_SingleFbxMesh to load itself. We will go into the loading of the mesh later.
- render(): First we build up the worldViewProj matrix to send to the fbx mesh as it renders. The calls to the g_pd3dDevice are standard DirectX calls to render a mesh, so I won't discuss them here. I'll discuss the render call to g_SingleFbxMesh later.
- shutdown(): This is called when the escape key, the close box of the window, or the quit button is pressed. It simply cleans up all our allocated objects and shuts down Autodesk and DirectX.
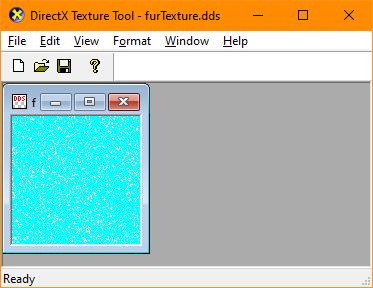
FurTexture.cpp - This is a simple texture that creates the visible hairs of the scorpion. The main workhorse of this object is the generate() method. I'll list out the parameters and discuss each one.
- devicePtr: This is simply the directX9 device pointer.
- minLength: The fur texture starts out all zeros. As we generate the strands of fur as random positions in the texture, we simply place a 255 in the alpha slot of a random texture position. In order to add a bit more realism, we added the ability to set a minLength of fur so that the texture gets punched with numbers less than 255 too. This will give us variable length fur. So, now fur can vary between min length(controlled by you) through the max length(255).
- density: The density is a number between 0.0 to 1.0. So, if you passed in 0.5 then about half the texture slots will have fur. I say about half because it's possible for the random generators to select the same texture slot multiple times. Also, 0.5 is probably too dense. This is why the demo defaults to 0.2. Play with it and see for yourself.
- size: This is the size of the fur texture. It defaults to 128x128 which seems kind of low, but not really. When you have a complicated model that moves with wind blowing around the fur, the last thing on someone's mind is the resolution of your fur texture. Now if you render this over a large plane and at a far distance, then the fur repeats might be noticable.
- seed: This is a prime number for the random seed. Not much to see here.
PerlinNoise.cpp
Perlin Noise is used to produce random like numbers varying between 0.0 to 1.0. That's sort of an abridged description, because Perlin Noise is utterly amazing. If you haven't been exposed to Perlin Noise, I suggest you google it and read the plethora of incredible papers and uses of Perlin Noise. I'm just using it to make wind.
I chose to simulate my wind with the following equations:
x = A + B * sin(C * (t + x));
z = D + E * sin(F * (t + z));
The meat of the code is in SingleFbxMesh::_setWindParameters(). My particular choice isn't special or even realistic, but it looks nice for this demo. It is important that the Perlin noise varies in time, X, and Z. I also added some sin functions since wind seems to waver. The formulas above are actually encoded in the vertex shader.
The constants A, B, C, D, E, F are calculated in SingleFbxMesh::_setWindParameters() and sent to the vertex shader.
SimpleGui.cpp
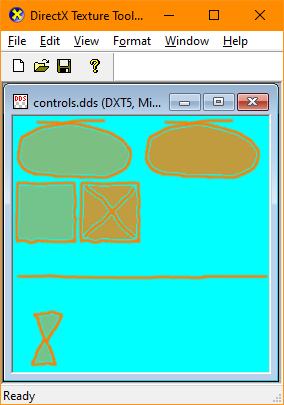
Much to my annoyance, I had to make a simple GUI in order to manipulate the scorpion and its fur. It's mostly contained in SimpleGui.cpp with an implementation of the SimpleGui class in main.cpp(look for the DemoGui class). The GUI is very basic and can't handle the window being resized. If you want to improve it, that's probably the first place to start.
In order to draw the GUI, I did have to make a texture file to describe the elements in their various states. You will be totally surprised to find out I created this myself in half an hour, and I free-handed it to boot.
Basic Functionality
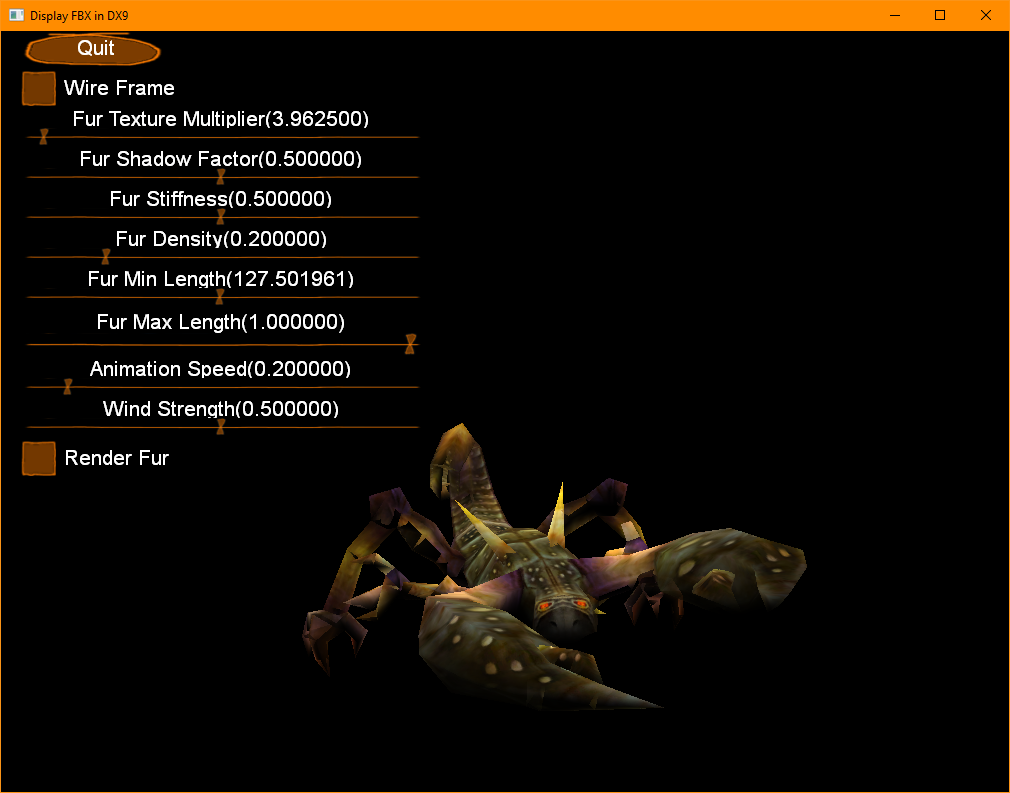
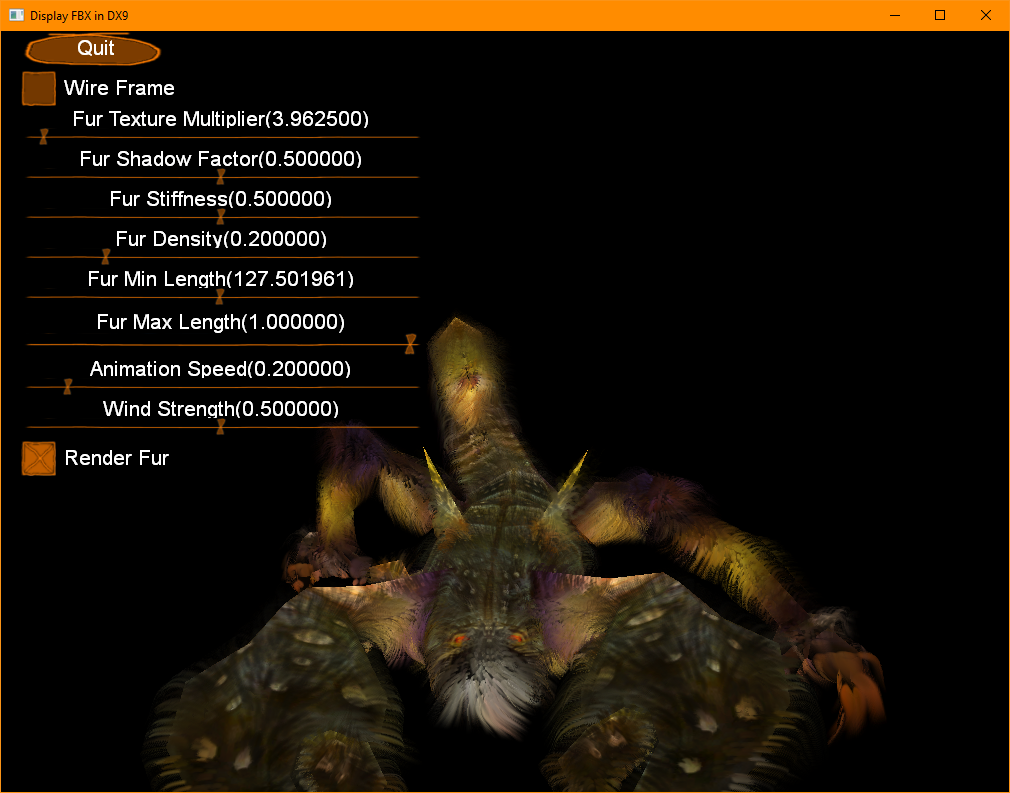
Assuming you have launched the enclosed app "Furry Scorpion.exe", you will see a lot of controls:
- Quit - quits!
- Fur Texture Multiplier - Sets the texture multiplier of the fur texture coordinates from 1.0 to 80.0. This has the effect of making the fur look super clumpy to super fine. If you want to see this multiplier in action, open up skinned.fx, and look for fs.FurScale in the pixel shader. It's a super simple modification, but provides a lot of different looks like bedhead or super cute sheep wool.
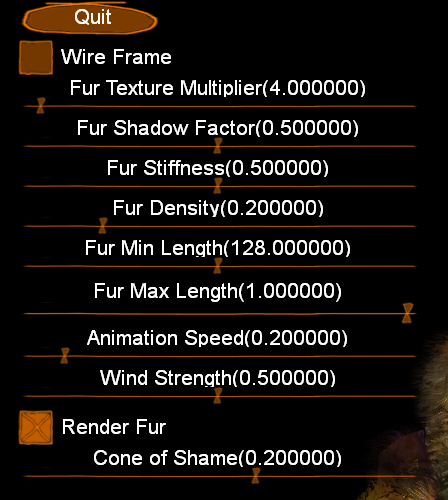
- Fur Shadow Factor - In order to make the fur look more realistic, we want to darken the fur bits closer to the skin. As we render the fur shells from inner to outer, the shadow factor starts at the value specified by the slider control and increases until it is 1.0. If you want to see where it's used, look for fs.ShadowFactor in the pixel shader.
- Fur Stiffness - Not all fur is the same. Some fur is stiff while other fur blows easily in the wind. This slider allows you to determine how stiff the fur is with respect to gravity and wind. We go ahead and calculate the stiffness with gravity in the render code, but the wind stiffness happens in the vertex shader. Look for the fs.Stiffness variable. There is one other thing to consider with fur stiffness. The fur shaft near the skin moves less than the fur shaft near the end of the shaft. This is taken into account in the vertex shader with the equation:
forceVector = correctedForceVector * fs.FurLength;- Fur Density - This changes the fur density parameter for generating the fur texture.
- Fur Min Length - This changes the minimum fur length for the fur texture.
- Fur Max Length - This scales back the number of fur shells we render. Shorter fur means less shells. Longer fur means more shells.
- Animation Speed - This slows down the animation speed of the scorpion. A nice slow animation means we can see the effects of gravity and wind more easily.
- Wind Strength - This slows down the Perlin Noise function so that the wind stops or gets stronger.
- Render Fur - toggles the rendering of fur. It's really a silly control, because why would you not want a furry scorpion!
- Cone of Shame - sets the value of the dot product result used to compare and correct the motion of the fur particles. It keeps the fur from poking into the skin of the scorpion.
Fur Stencil Texture
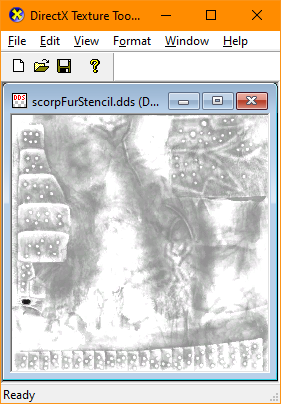
The scorpion may look awesome furry, but its eyes are a big exception. In order to exclude the eyes from being furry, I added a texture to describe which parts should be furry called "scorpFurStencil.dds". In order to make it, I took the original texture, removed all the color, brightened it up a lot, and blacked out the eyes.
The red component of the texture multiplies the other components to make the final fur alpha. If the pixel is black, then the hair will not appear at all. You can find this calculation in the pixel shader. Look for furStencilTexture.r in the shader. Maybe I should have blacked out the claws and stinger?
If you're making a game, its probably a good idea to provide your players different fur stencils/haircuts to choose from a list within the player customization. Also, artists seem to totally love making these.
Windy Fur looks better!
The scorpion may look awesome furry, but adding wind makes the fur come alive and more amazing. It gives you that same inner chill the first time you saw Queen Celestia on My Little Pony. Remember the equations we used to simulate wind force using Perlin Noise?
x = A + B * sin(C * (t + x));
z = D + E * sin(F * (t + z));
We can now just plug these forces into the vertex shader to push around the dots of the fur in each shell. I did set up the wind so that it varies over the entirety of the scorpion model. In reality, that would only happen if the scorpion is huge. It does show how beautiful Perlin Noise is though.
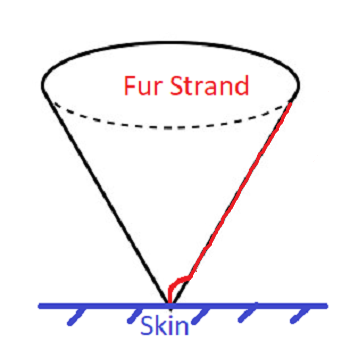
Restricting the Fur (cone of shame)

So now our fur is experiencing forces from gravity and wind, so you may already be thinking of the next problem. What happens if we blow the fur so that it renders inside of the skin? 1) This is awful because we spend so much processing power to render the fur strand, and we can't even see it. 2) It's unrealistic. 3) Just the skin is showing, and it suddenly isn't so cute.
One easy solution is to make the fur more stiff so the force doesn't affect it enough to push it through the skin. This solution is easy, but not all fur is totally stiff. Some fantasy game worlds don't have stiffening hair care products for your monsters and players to apply daily. Between you and me, some players have poor hygiene too.
The work around I came up with is to come up with a cone of shame for each strand of hair as it renders in the vertex shader. Now this photo probably popped in your head when I mentioned "Cone of Shame".

This is mostly correct. Instead of a dog head, we will place the fur strand in the center and restrict it to the edge of the cone if it tries to go outside. Now if the fur strand was going to be in the cone space to begin with, we do nothing, but if it's outside, we correct it.
Figuring out if the fur strand is inside of the cone is pretty easy. We simply take the dot product of the force vector and normal vector. The dot product varies between 1.0 and -1.0. If the dot product is negative, then it's pointing into the skin.
float forceNormalDot = dot(normalizedForceVector, normalW);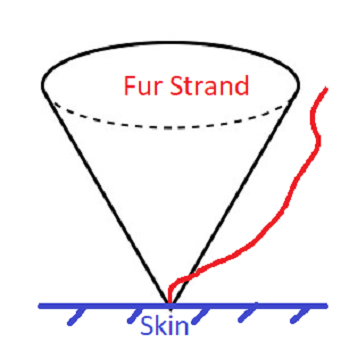
In my demo, I chose to use 0.2 instead of zero If it is less than 0.2, we correct it. Why 0.2, because our skin might be concave. So consider this a fudge factor.
// This is a simple check to see if the hair is going to protrude into the skin.
  if (forceNormalDot < fm.ConeOfShame)
  {
     if (forceNormalDot == -1.0f)
  {
// CORNER CASE!!! We could probably delete this and not care.
// In this case, the force is facing the hair head on, so let the hair be unaffected.
     forceVector = float3(0.0f, 0.0f, 0.0f);
  }
  else
  {
// This needs some splaining. We are lerping/pushing the force vector so that it's dot
// product is abouts 0.2 with the normal vector.  This enforces our cone of shame for
// force vectors. Think of this as Ms. Edmunds School for Wayward Force Vectors.
     float3 correctedForceVector =
  normalize(forceVector + (normalW - forceVector) * ((fm.ConeOfShame - forceNormalDot) * 0.5f));

// The force is scaled by the distance to the end of the hair.
// The shaft parts near the skin don't move as much as the end point.
  forceVector = correctedForceVector * fs.FurLength;
  }
  }
With the corrected force vector, now we know the force vector won't be pushing the fur strand through the skin. You may notice the corner case of the normal and force vectors having a dot product of -1.0. This also means their sum is zero, and would cause math errors in the vertex shaders with a zero square root, so I detect this case and simply zero out the force.
One other thing to consider is that the force vector isn't consistent along the entirety of the fur shaft, so the correct fur shaft above is really an idealization because I only check and correct the individual segments. In any case, the fur shaft should be entirely in the cone. It makes our scorpion look better with beautiful wavy fur all rendering to its maximicity.
Optimizations
Rendering fur shells is super expensive. The triangle count for a model can increase by a factor of 40 in my demo. Decreasing the maximum fur length does decrease the number of triangles because it decreases the number of shells.
My first attempt at optimization was based on decreasing the number of shells. One easy thing to do is to divide the number of fur shells by the distance in meters from the model to the camera.
Distance to Camera    Rendered Shells
                 0                 40
                 1                 40
                 2                 20
                 5                  8
                10                  4
                20                  2
                40                  1
                41                  0
I didn't add this optimization to the demo because the camera and scorpion don't actually move. In my own game, I did add this optimization and it's pretty awesome. If you study the table, handle the special case of the camera being less than 1 unit away from the scorpion by topping off the number of shells to 40.
Another optimization is to use instancing to render the shells. It turns out that only four floats different between shells, so this makes fur shells an ideal candidate for instancing. One flaw is the difficulty of combining the camera distance optimization with instancing. If the distance between model and camera changes so that the number of rendered shells changes, you'll need to re-build the secondary vertex buffer for instancing. Instancing seems to give you a 10-20% increase in speed, so maybe the added complexity isn't worth it? It's your decision in the end.
A crummy optimization (which I did implement) is to turn off fur rendering or to only allow the player to see their own mesh rendered with fur.
Conclusion
It's time for confessions. I'm despise scorpions. I'd think very little about stepping on the little critters -- especially baby scorpions. DEATH TO SCORPIONS!
I just hope you thought for the briefest picosecond that my scorpion looks kind of cute or awesome. Or maybe I've showed you a few new tricks with fur shaders. And maybe you'll even make parts of your next game with fur shaders too.
Credit
Nothing happens without help from others. Here is how I gathered enough info to write this article.
⦁ Ken Wright: I totally stole his example framework he used for a fur shader example. http://www.xbdev.net/directx3dx/specialX/Fur/index.php
⦁ Doug Rogers: I stole some of the loader code from an example he made that also loaded an .fbx mesh. http://dougrogers.blogspot.com/2012/10/fbx-viewer-3.html
⦁ The scorpion model was created by 3DRT (www.3drt.com) They have a lot of great stuff.


