Rendering Pt1: The Boring Bit

Published February 03, 2009
Advertisement
Following on from the "teaser" depth-of-field shot in the last entry, today we'll start to look at how Milkshake evolved from a monolithic single-pass fixed-function render loop, to a modular, multi-language-programmable-shader based architecture. I must admit, hardware shader support is something I've put off for a long time for two very different reasons: one is I wanted to try and make some progress on gameplay first, and secondly (and most importantly) because I didn't really have a clue how to do it. This entry covers phase 1 of the rendering overhaul ... and I'll fully admit this is the boring bit.

Before we get into it - I'll just warn you I was forced to use flickr for the pictures this time as I haven't been able to upload to gamedev for 4 days and counting ... hopefully it works ok.

The best advice I ever heard when tackling a large complicated bit of work is: refactor until it is trivial. The idea being that, instead of fundamentally breaking your code with some wholesale change and then spending months trying to make it work, that you make a series of small cleanups/improvements/extensions to the code, that eventually makes what you're trying to do both very safe and very simple.

In the spirit of that advice, the first step in adding hardware shaders doesn't involve hardware shaders at all! All we're going to do is take the current fixed-function rendering code (which supports material sorting, transparent object sorting, and stencil-buffer shadow volumes) and decompose it (i.e. refactor it) into a series of rendering building blocks which we can then use to build more complicated rendering loops. If we do our job right, the game should look exactly the same before and after ... but obviously under the hood, it should be a little cooler.

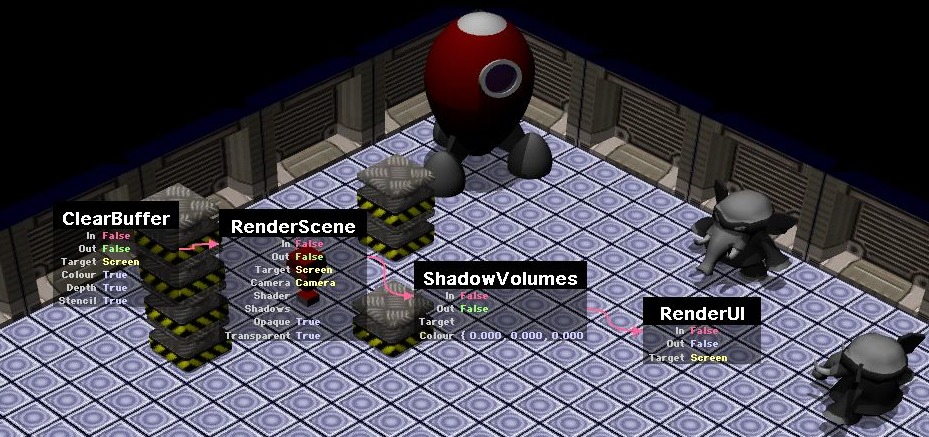
The first step was to turn the old "Renderer" object (which did all the work) into a virtual base class for any object that wants to render objects in the scene. This obviously means we're going to pay a virtual function call overhead that we didn't before (and traverse the scene multiple times for each render pass), but this is just the price of admission for a more flexible renderer. I then moved all the basic scene rendering code into a new RenderScene class, and put all the old UI rendering code into a RenderUI class. Finally, I pulled the buffer clearing out into another object, and gave all the objects In and Out properties that allowed you to assemble them into a sequence.

Disabled

With the basic rendering cleaned up, I then ported the old shadow code onto the new Renderer interface (so it runs as "just another scene rendering pass"), and hooked in into the render loop.

Disabled

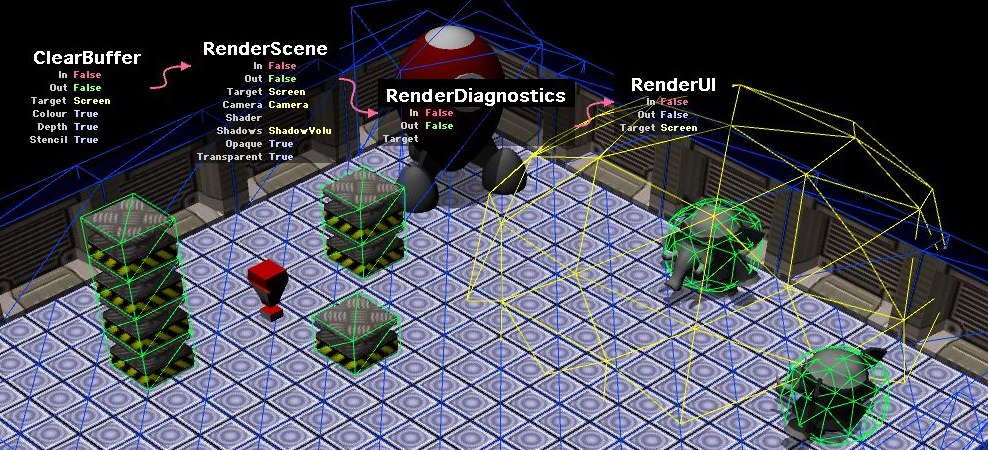
And then I made all the old physics diagnostics part of a new RenderDiagnostics pass. The cool thing here is that the blocks in the render loop could be any object in the game: you could run a script in the middle of the render loop, hide something, move things, change material properties ... anything you want really.

Disabled

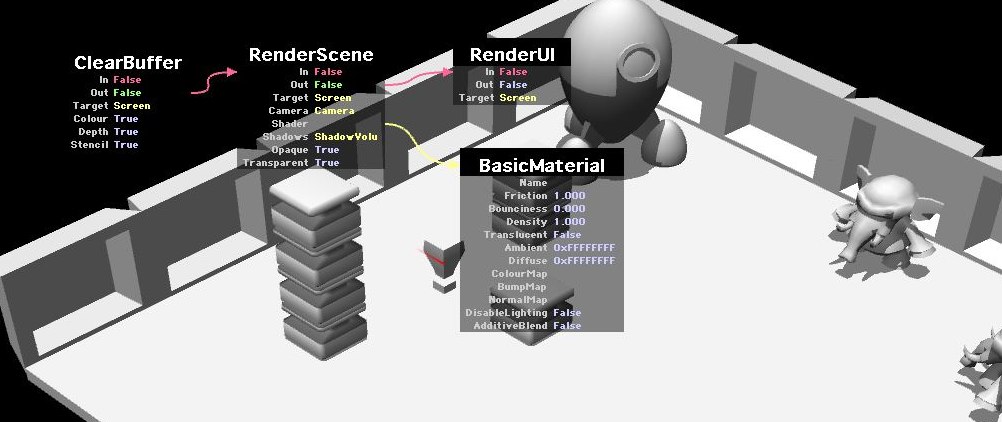
The final step in the fixed-function cleanup was to extend the RenderScene block to let you select the Camera you wanted to use, filter which passes you wanted to draw (opaque/transparent), and override the shader if you wanted. This last one is particularly powerful once we start looking at fullscreen effects (as it allows us to do things like depth passes, normal passes, etc) - but for now, here's a trivial example where we render the whole scene using a while lambert shader:

Disabled

And that brings us to the end of the fixed-function cleanup. There are a couple of tricks we've skipped over for now (the render Target object being the main one), but on the whole, we've now turned our monolithic render into a set of rendering modules we can flexibly assemble into a render loop. And while we haven't got any real eye-candy working just yet, we've got the building blocks we need. All we need now are hardware shaders ...

Cheers!


Previous Entry Hardware Shaders
Next Entry Rendering Pt2
0 likes 4 comments

Comments

Aardvajk
I'm fascinated by the idea of stringing render passes together via input/outputs like that. I'm familiar with the stuff you've done like that in your AI and behaviour, but the idea of using that system to string together stuff that would traditionally just be hardcoded in a procedural way is very interesting.

Do you literally create a linked chain of these render objects that pass control to the object pointed to by their output once they are finished, or is this more a conceptual way of thinking about it?

I can see that chaining objects together like this to perform a sequence of steps would facilitate generating this stuff from scripts or editors. It's a very appealing approach.
February 03, 2009 02:53 PM
Milkshake
Quote:Original post by EasilyConfused
Do you literally create a linked chain of these render objects that pass control to the object pointed to by their output once they are finished, or is this more a conceptual way of thinking about it?


That's exactly what happens. The "In" and "Out" properties look just like any other data properties, but they're actually used to implement flow control. An "In" property is a method property that executes code on the object (so you could have other methods which do different things ... but in practice limiting one object to a specific function seems to be easier to follow). And conversely, an "Out" property represents an exit point from an object. An object could have multiple output points (say if and else). There's nothing rendering specific about the sequence of operations attached to the System's render method. You could just as easily attach some nodes which print "Hello World" to the console ... though you wouldn't be able to see much without any rendering being done.

Quote:Original post by EasilyConfused
I can see that chaining objects together like this to perform a sequence of steps would facilitate generating this stuff from scripts or editors. It's a very appealing approach.


That's actually exactly how I setup the rendering loop today: there's a few lines of script in the init script that creates the rendering operations and links them all together. Change a few lines of script and you can get a totally different effect. In theory, it should be possible to re-wire the rendering loop mid-game (to say, turn on a sepia effect, or add a picture-in-picture, or add motion blur, etc).

I'd usually say it's faster to write these kind of things as dedicated code ... but I have to say, exposing the underlying objects has probably saved me a huge amount of time and code already. It's really worked out well.
February 03, 2009 07:26 PM
cubed2d
Ok, so you chain together these render object with the input and output properties. Are they all set to false on the images by mistake?
February 08, 2009 07:51 PM
Milkshake
Quote:Original post by cubed2d
Ok, so you chain together these render object with the input and output properties. Are they all set to false on the images by mistake?


Not by mistake ... by laziness =)

The editor (which draws the little object editing boxes with the lists of properties) needs to be updated to draw/present method connections (inputs and outputs) nicer. At the minute, it's just falling through to the boolean typed value field, hence the false. But in reality, the "false" has no meaning. Next time I'm in the editor, I really should update it to be a little input or output port on the object (rather than having a value field).


February 09, 2009 07:09 PM
You must log in to join the conversation.
Don't have a GameDev.net account? Sign up!
Profile
Author
Advertisement

Latest Entries

Moose Sighting

1358 views

Constraints

1529 views

Moose

1262 views

Melon Golf

1809 views

Toon

1325 views

Spaceships

1077 views

Rendering Pt2

1170 views

Hardware Shaders

1205 views
Advertisement