Day 2
I started day 2 pleased with that I had a playable game at the end of the first day, but it wasn't finished yet. Cracking on, I set myself some goals for the day. The first three were continuations from the first day.
[indent=1]? Add "game over" detection (no more moves) & message
[indent=1]? Add game reset and "new game" logic
[indent=1]? Add scoring + display of scoring on screen
[indent=1]? Add high score and score load/save
[indent=1]? Add win condition (2048 tile) & message display
[indent=1]? Clean up graphics
[indent=1]? Improve user interface
[indent=1]? Add sounds
[indent=1]? Create Android build (stretch)
Game Over
Implementing this was pretty simple. For the game to be lost, you have to satisfy two conditions.
- There are no empty tiles on the board
- You cannot squash any tiles in any direction
I added this by keeping track of the number of occupied tiles on the board. Whenever one was squashed, it went down and one spawned, it went up. Simple. To check for "no tiles empty", it was a case of providing a property which took the total tile count and subtracted the occupied count. I added some unit tests around this to make sure the counts were ok. I'm glad I did, as I refactored something later and this broke in a subtle way..
The second check for a game over condition is the CanISquash? condition. I implemented this by duplicating the squash routines and made them return true if they would squash. This was a bit of a hack, as I should really have refactored the squashing to take a flag so that I didn't have the copy paste everywhere. I don't like code duplication, and having my unit tests for squashing should let me refactor this pretty quickly.
With the game over recognised, I needed to add the concept of "game state". I added this to my player component, but I could easily have added it to a new component. I had two states at this point.
public enum TileGameState{ Playing, GameOver,}Adding the game over message was also simple to begin with. I created a GuiTextLabel class and a GuiRenderingService which took this label and printed the contents to the screen. I implemented a GuiService (the name sucks) which kept track of the game state and used it to modify the visibility of the text label.
_gameOverLabel.Visible = (_player.State == TileGameState.GameOver);This would be the start of my "battle" with the UI that took up a bunch of unexpected time.
New Game
I added a new state to my game state machine, "NewGame" which leaves us with:
public enum TileGameState{ NewGame, Playing, GameOver,}I hooked up the Spacebar key to be recognised during the game state and reset us to the new game state.
So the state transition of my game looks like.
New Game --> Playing --> Game Over --> New GameStarting a new game currently involves several things:
- Reset the game board to the Empty tile
- Spawn the two initial tiles
- Reset the game state to "playing"
In my NumberGameService update loop, I react to this:
public void Update(GameTime gameTime){ if (_player == null) { return; } var player = _player.GetComponent(); if (player.State == TileGameState.GameOver) { return; } if (player.State == TileGameState.NewGame) { _gameBoardLogic.InitializeBoard(); player.State = TileGameState.Playing; ResetPlayer(player); } // main game update... }Scoring
Scoring is really simple in this game. Whenever you squash two tiles, you score the sum of them - so squashing 4 and 4 together will yield a score of 8 and so on.
To add scoring, I went back to my player component and added "score", created a GuiLabel for the score and added it to my GuiComponent. To update this label I created a ValueFactory property, which was really just a lambda to get the value for the label. I hooked this up to some code which returned the player's score.
To actually increase the score, it meant going back into my squash code and modifying the score. I refactored out my squash code into a single method which did the move and squash for two tiles identified as being squashed.
private void SquashMoveTile(int x, int y, int nx, int ny){ var t = GetBoardTile(x, y); var nextTile = GetBoardTile(nx, ny); if (t != nextTile) { throw new Exception(); } SetBoardTile(x, y, t+1); SetBoardTile(nx, ny, TileType.Empty); _score += ScoreForTile(t + 1); --_occupiedTileCount;}Because you can squash multiple tiles in a single move, I chose to let the squash code modify the player's score directly. I wish I'd not done this as it's pretty ugly - I should have made this method return the score and then kept track of it locally. It's pretty easy to clean up, especially with my tests in place

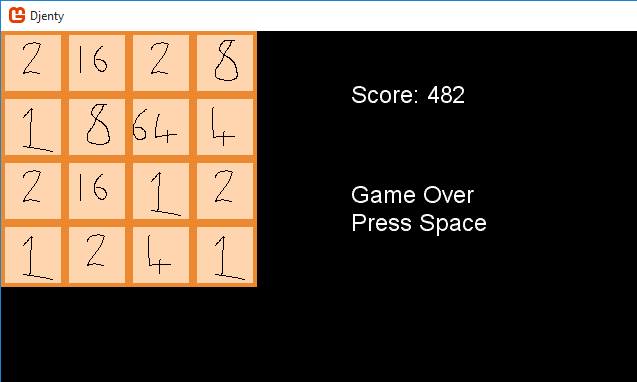
At this point, my game looked like this (yes, it still looks bad).
High Score & Profile Saving
Adding high score was pretty easy. When the game transitions to Game Over, check the current score against a high score and update it if needed. When a high score is detected, then set a flag so that a message can be displayed on the UI. I also needed a new "high score" label too. This lead to code which looked a bit like this:
_playerScoreLabel.Text = string.Format("{0}", _player.Score);_playerHighScoreLabel.Text = string.Format("{0}", _player.HighScore);_gameOverPanel.Visible = (_player.State == TileGameState.GameOver);if (_gameOverPanel.Visible){ _gameOverLabel.Text = "GAME OVER"; _gameOverNewHighScoreLabel.Visible = _player.NewHighScore;}As I was now grouping up labels, I added the concept of a "panel" to my GUI. It basically acts as a container for other elements and becomes their origin point; so.. gameOverPanel contained two elements - gameOverLabel and gameOverNewHighScoreLabel. Both had positions relative to the main gameOverPanel, so I can move this panel and also move the child elements. This is the beginning of an actual UI system, and as I said earlier - the start of some head scratching.
Now I had a high score, I needed to save it and load when the game starts. To do this, I used the XNA StorageDevice subsystem and serialized a "SaveGame" class to json using JSON.Net. Sure, people can cheat and change this - but who cares, right?
Winning
To win in 2048, you must create the 2048 tile. I implemented this by keeping track of the highest tile created when squashing. As soon as that tile hits 2048, the game can transition to Game Over, setting a "won" flag. It's a bit of a hack, but I used this flag to change the game over message to "You Won!" if this flag is set - and that's it.
With this in place, I had a fully playable game. You can win, lose and try and beat your own high score. I actually found myself playing it a lot during dev and it felt pretty close to the 2048 experience.
Graphics
Let's face it - I'm no artist. Making things look nice is hard for me but it's the thing that makes the biggest difference to how people see your work. The first thing to do was to update the tile set. I ended up with this...
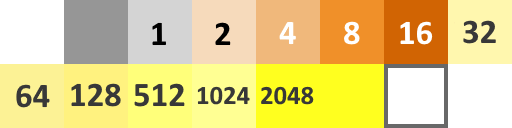
Not perfect, but it does the job.
The next step was to add some UI colors and a "skin".
Putting this together, I ended up with:
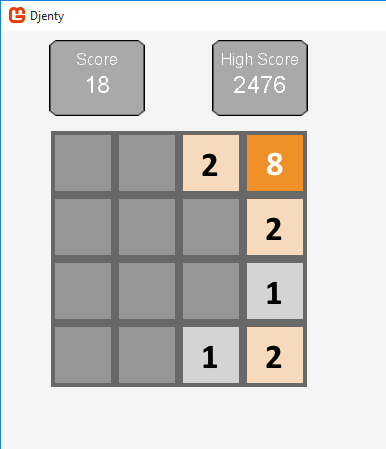
Looks a bit better than the "Mother of God!" original, but still not ideal. But it's the best I could do in the time.
I cheated on the skin; instead of 9-slicing the UI skin and using each element in the correct place on the panel (corners, sides, middle) I cheated and used a panel texture. This creates horrible scaling artefacts for larger panels, as you can see here:
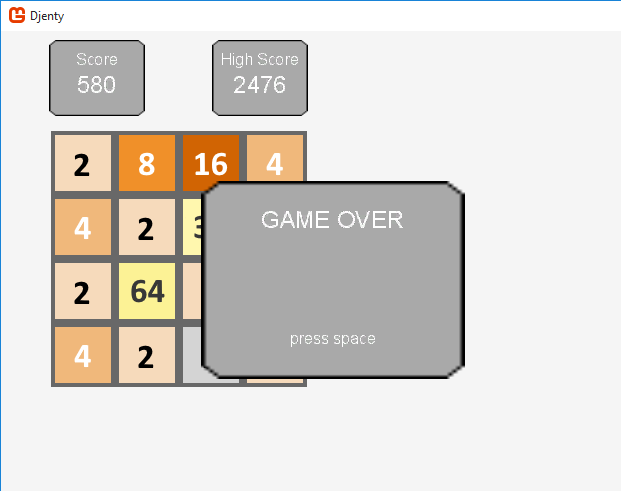
That's probably simple to fix; but I've not done it yet.
User Interface
To this point, the UI is built from 5 primitive classes.
- GuiElement - the base element
- GuiElementContainer - a collection of elements
- GuiCanvas - the main UI parent (it is a container)
- GuiPanel - the sub panels you see, with textures and color
- GuiTextLabel - the text labels
Using these classes, I could compose the UI you saw earlier.
Here I was using absolute positioning for pretty much everything and realised that if I wanted to ship on Android, or even different Windows screen sizes, I'd need to make my UI scale.
So I sat about redesigning it. I had a look around at the various ways other people have done it. Notably:
For this iteration, I settled with something comparable with CEGUI and Urho3D. That is, my co-ordinate system has a dimension which has both Scale and Offset. These dimensions are used for positions and sizes, allowing me to create elements that are 50% of their container size and positioned in the center. Additionally, I can add an offset to this. Part of doing this was to add things like text centering for my labels, which work - but is crude, and doesn't work with multiline at the moment.
Implementing all of this took much longer than I expected and basically chewed up all of my remaining polish time and it's still far from ideal. I didn't get to add sounds, for example, and I have no player feedback systems in place except the basic movement.
Where I am with this right now is that it's functional, but still has a bunch of shortcomings. For starters, I have to code my UI - I don't yet have layout xml files. Also, I don't have basic things such as min/max sizing or margins. I'd like to aspire to implementing something like the new Unity 5 system, which basically allows me to anchor corners to a part of their parent, allowing nice scaling. My UI still doesn't scale very nicely and it needs work before I can even think about letting it loose on a non-fixed screen size that I control.
Retrospective
Even a simple game, such as 2048, can still take a bunch of work when creating it from scratch. The biggest thing I got from this is that I feel like I balanced my goals of the jam with the end result fairly well. I wanted a full functional game and some tech that I could potentially reuse next time. I feel I achieved both of these things. Sure, I could have created this game in 4-6 hours in Unity or Unreal and I wouldn't have had any of the UI issues or anything else that caused me problems, but that wasn't the goal here.
Overall, I was relatively happy with the architecture of my game engine. It was really quick to iterate on and felt comfortable to work with. Sure, the Entity-Component and Service paradigm may have been overkill for 2048, but it ended up working well and leaves me with something to build on next time. I think the only real area that was problematic was that of the UI, but that's something I'll look at again next time around.
I did want to add a game over "screen", as well as other menu screens (see last N game history, etc), and it became apparent that because my systems weren't designed around screens or priorities, I had no clean way of filtering inputs, or pausing the gamestate. This is something I will seek to address for the next game on this codebase.
I was happy with how I structured my process. My goals nicely lead into each other and provided something tangible when they were achieved. Having something on screen with the "Mother of God!" artwork was crude, but it let me accelerate to "playable" very quickly - and I was happy with that. I am also glad I put some unit tests around my code logic; it let me iterate over the rules quickly and with safety, providing me early feedback when I break something.
One small snag was that I was brand new to Pyxel Edit so was learning how it worked as I went on. I have a few niggles with it, so I plan to keep using it after this to get the hang of it.
All in all, I had a bunch of fun doing this. The game may be shitty but it's created from scratch and is as playable as the game it clones. For the first time in years I got into the "flow" with my own projects and went with it for two days.
Take Homes
Here's something that I'm taking with me and could be used as broader advice to people wanting to do something similar (or for total beginners, in fact).
[indent=1]? Know your goals up front
[indent=1]? Make sure your goal is realistic for your ability/knowledge
[indent=1]? Make sure your goal is realistic for your time
[indent=1]? Pick your tools wisely; use things you feel productive in or can learn quickly
[indent=1]? Iterate quickly to playable, with horrid art all the way
[indent=1]? Add tests around critical systems, they will help you later
[indent=1]? Don't underestimate things such as user interfaces; they can become a sinkhole
[indent=1]? Know when something is "good enough" and move on to the next thing, come back to things when you need to
[indent=1]? Have fun!
As a side note, the game 2048 is a great project for a beginner to game development to take on. It covers most things you would need to do in a game and provides a couple of interesting challenges in how you might want to execute (and optimize) the moves.
Next Steps
As this turned out to be pretty successful, I'm planning on looking at making another game. Perhaps a Space Invaders or Galaga clone using bits I can salvage from the codebase (which should be fairly high).
I may also write a follow-up post about the technical design of this codebase.

Very enjoyable to read!