Just a little progress update to show how my little texture tools app is progressing. I actually got waylaid for far too long investigating white balance correction. It is not at all important for this app, and more something I am interested in for correcting photos and video.
White balance correction
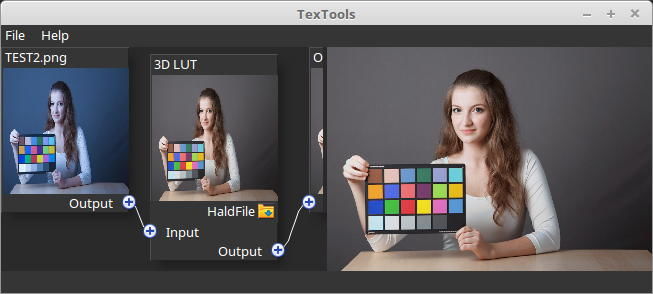
Though my early efforts had involved colour space conversion in the hope of making white balance correction easier, I am now of the opinion that the best way to do it is through 3D colour look up tables (LUTs). I've previously used multiple 1D LUTs many times (in fact they are used extensively in 3D Paint), but not 3D. The advantage of 3D LUTs is as well as independent control of contrast / gamma / balance for R, G and B, you can have complex interaction between the colour channels, allowing changing things like colour saturation etc.
The downside to 3D LUTs is firstly they take more memory, such that it is common to use sizes such as 33x33x33 rather than 256x256x256, and secondly that as a result of the lower resolution you have to implement 3D interpolation. I implemented 3D tetrahedral interpolation based on some slides from nvidia, and I understand it should give better results than simple trilinear interpolation.
For my white balance experiments I was thus trying to create a LUT to go from one image (e.g. with tungsten white balance) to an identical image with correct white balance. I tried a variety of approaches and ended up being most successful with an iterative 'monte carlo' scheme that optimized the LUT values towards the best fit to convert from one image to the other. This did produce nigh on perfect results, however it was quite slow, and I had to use approaches like performing runs on mipmaps of the large image size.
On top of the problem of producing a LUT to convert between the 2 test images, another problem was the LUT had 'blanks' in it. That is, areas of the LUT where there was no data to create a best fit. I ended trying 3d natural neighbour interpolation for this.
However when it came to testing out the LUTs I tried to find an existing graphics editor that would load my created LUTs to test them out. Gimp wouldn't seem to load LUTs, however after some research I found an excellent plugin called G'Mic which would load 'hald' format LUTs. I also discovered that the author had attempted to do exactly the same thing as me (LUT from 2 reference images), and his worked 10x better than mine lol. Firstly it calculated it very quickly, and secondly and more importantly, it managed to guess the 'in between' blanks in the LUT as well as the values that were in the images.
I took this as a sign that I had wasted far too much time researching this, so I resolved to study the G'Mic source code and work out how he did it (for future reference) and abandon my own efforts in this direction. Unfortunately the plugin was written in a somewhat inpenetrable scripting language, but I will try to work it out when I have some spare time (or email the author lol ![]() ).
).
However something I have left in texture tools is a method for loading 3D LUTs and applying them in the pipeline as it could be quite handy for users (there are a number of freely available LUTs around for colour balancing, or getting specific 'looks').
Simple Methods
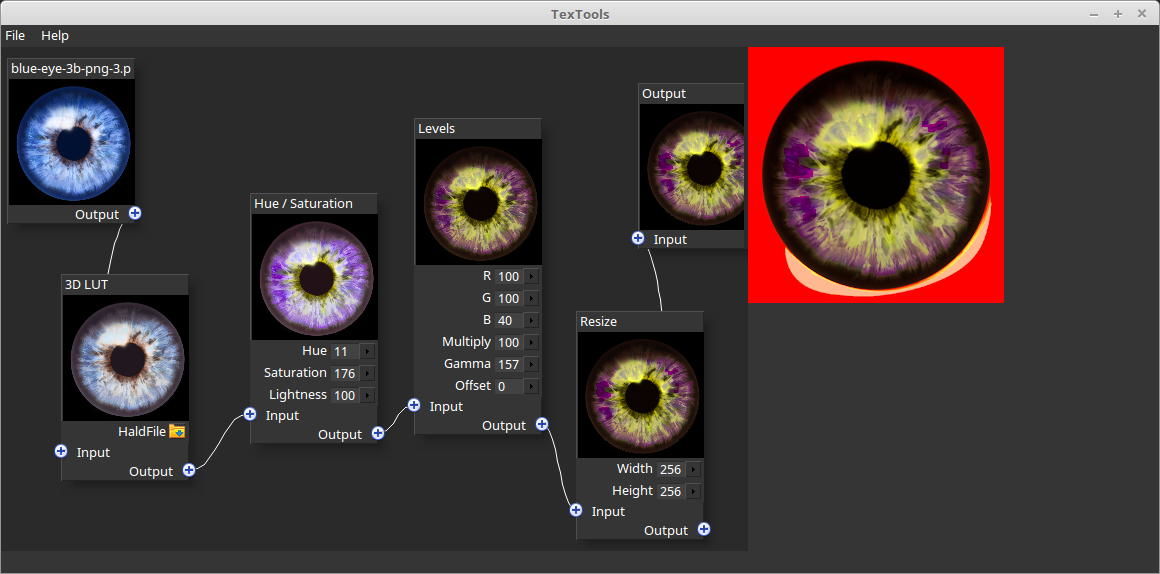
So back to work on the actual app I quickly added a few more basic methods (these are all added as nodes which can be connected up with inputs and outputs). I've put in levels, hue saturation, crop, resize. I then converted my healing code to work with float data, and made a method for simple tiling textures.
Tiling
This 'heal tile' method automates a very common operation in photoshop / gimp. First it offset the x and y by 50%, so the mismatched edges are forming a cross shape central on the image. Next it heals the two borders, using source from the original un-offsetted image. Then it finally offsets by 50% again so the image is in the original position. The percentage of the border that is used for the healing can be changed with a slider.

Synthesizing larger images
So that is the very basic functionality working. My next phase is to look at means of synthesizing larger image from a smaller reference texture. I am not quite sure how to do this yet, JoeJ has suggested a very interesting paper by Eric Heitz and Fabrice Neyret which I have finally vaguely understood (there is no source code), so I may have a go at doing a version of their technique.
I may also try some simpler techniques of splatting areas on top of each other.
One extra feature I just put in today is you can paint an alpha layer on the source images, to mark out where you want to use as source material for these latter techniques (as a photo may contain other junk aside from the texture of interest).

Thanks for sharing.")