Heightmap issue

Started by
15 comments, last by Wrongfire 12 years, 11 months ago

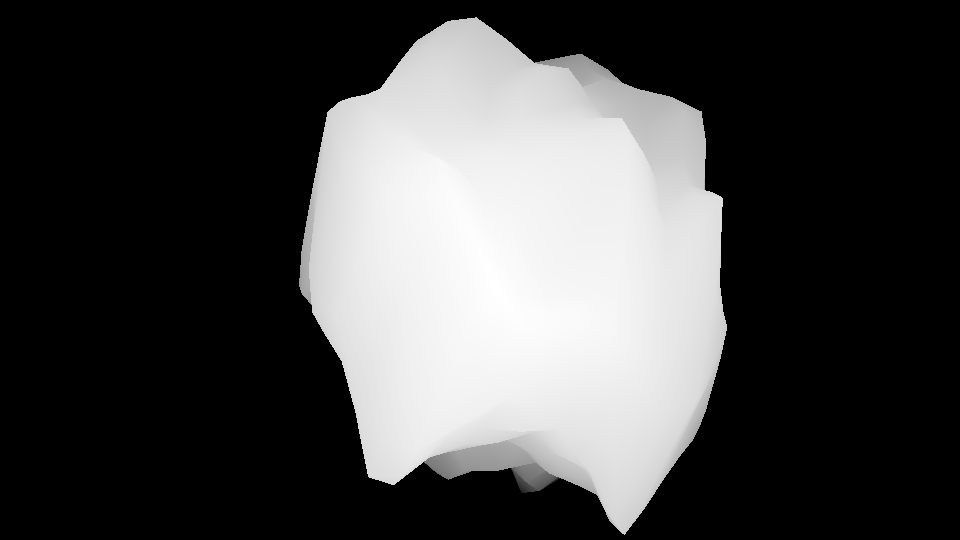
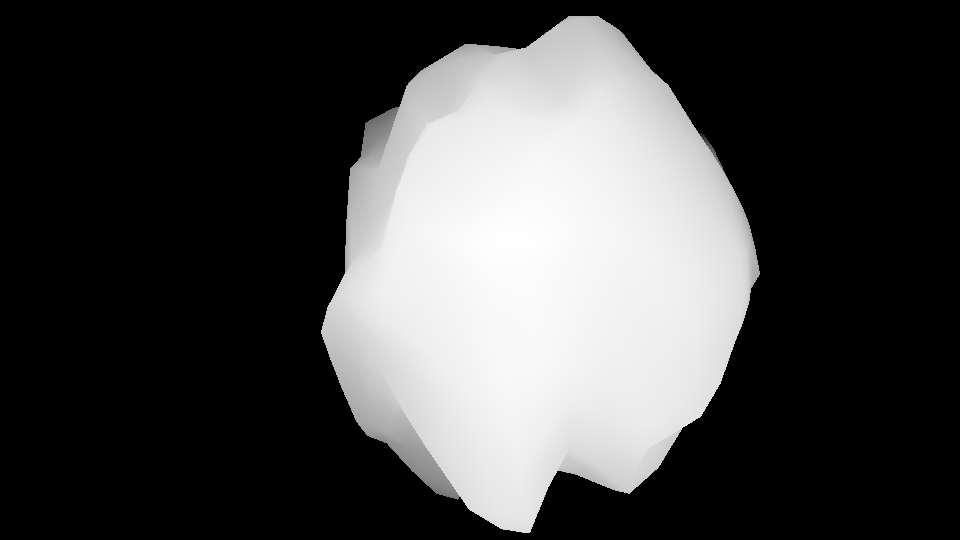
Yes, that depth map is exactly right, just needs to be inverted! how did you do that? And is it possible to get the depth map of the back side of the asteroid with the same size and orientation?
Is blender easier for this stuff then 3ds?

Lastly, I guess it isn't important if the normal map lines up, the height map can be 2 separate images, one of the front, and one of the back, while the normal map uses the UV map, if that makes things easier.


I honestly don't know if Blender is easier than 3DS for this, as I have never so much as started up 3DS. But in Blender, it really is very easy to do this, and you can bake a displacement map onto a texture from any angle. To make the above, I modeled an asteroid then created a new plane and associated a UV texture image with it. I moved the plane to sit close to the asteroid, aligned with the side of the asteroid I wanted to bake. Then, I selected the asteroid first, shift-selected the plane, and under the Render->Bake buttons I selected Displacement and bake from selected object to current object. I did have to play with the distance and bias sliders a bit.

Baking is a common process for extracting details of a higher-resolution object (the asteroid) onto a texture that is applied to a lower resolution object (the plane), and 3DS will most definitely support it, I'm sure. Try googling for displacement map baking in 3DS and see what pops up.
Advertisement
It sounds alot like Real-Time Relief Mapping on Arbitrary Polygonal Surfaces where you can use two depth map, one for the front and one for the back , to produce some nice relief mapping (thought I doubt that the performance-visual effect ratio for lots of astroids which are far away is justified ;) ).

In this case use JTippetts approach, but use two cameras, one mirrored. You just need to switch the active camera and render the image again. If the "back" depth map needed to be inverted, you could either use nodes in blender or use the invert color function in gimp/photoshop.
I cant figure out how to do it in 3ds max. It just says all the rays miss when I try to bake it.
I just got blender, could you go through step by step on how you got your displacement map? I have no clue how to use this program.

I cant figure out how to do it in 3ds max. It just says all the rays miss when I try to bake it.
I just got blender, could you go through step by step on how you got your displacement map? I have no clue how to use this program.


The quick way:

Model your asteroid, set the render sizes to output a texture of the desired size (use the Camera button whose tooltip says Render in the horizontal bank of buttons on the right hand side of the default view, assuming Blender 2.57). Position the camera relative to the object to get the correct view of the asteroid. Select the asteroid and press Numpad-0 to get a camera-view; scale the object appropriately so that it fills the view. If desired, you can switch to an Orthographic perspective; for this, select the camera and go to the Object Data submenu on the right (the icon to get there, with the camera selected, will be a side-view of an old-fashioned projector-style camera). Under the camera Object Data, you can switch to ortho projection and adjust camera settings. Obtain a view of the asteroid that fills as much of the camera viewport as you can.

In the lower-left corner of the default 3D view is a button to switch views. Select it and go to Node Editor view. Along the bottom of this view are 3 picture icons; a black and yellow circle (material nodes), a red/white checker icon (texture nodes) and an icon that looks like two images stacked on top of each other (compositing nodes). Select the compositing nodes, then check the box that says Use Nodes. When checked, two default nodes will appear; the larger will be labeled Render Layer, and there will be some lines connecting them. Disconnect the lines by dragging the endpoints of the lines away from the smaller box so that the nodes are completely disconnected.

Next, at the bottom of the view you see a menu bar that has submenus for View, Select, Add and Node. Click Add, go to the Vector submenu, and under Vector choose Normalize. (Not Normal; Normalize should be the last entry). Select Add again, go to Color submenu, and select Invert. Now, from the Render Layer node, click and hold on the Z output, and drag a line to connect with the Value input of the Normalize Node. (inputs are on the left sides of nodes, outputs are on the right.) Connect the Z to the Normalize node, connect the output of the Normalize node to the Color input of Invert, and connect the Color output of Invert to the Image input of the smaller Composite node. When done, the nodes should look something like this:

[attachment=2447:BlenderScreenNodes.png]


Now, if you click the little camera icon on the Render Layer node, it will render the view from the camera, capture the depth (Z) map of the render, feed that Z map through a normalize and invert process, and spit out the final result as the render. From the render preview window, you can select Image->Save As Image to save out the displacement map.

This is slightly different than the baking method I discussed earlier, and will probably be a little bit easier, at least to do the displacement maps.
Awesome! Thanks so much, just one more thing, I added a 2nd camera, but when I press 0 it goes to the old one, How do I toggle which camera the render will use? Also is there a way to orbit the camera around the center point of the asteroid?
Need to get the 2nd image to view the exact opposite side of the asteroid, or at least as close as possible to it.


You can select the asteroid and press Shift+S, and select Cursor to Selected. This will move the 3D cursor to the center point of the selected object. Then, down at the bottom of the 3D view you will see a button that, in initial state, looks like two small white spheres intersecting at a blue rectangle. Click on it and you will get a submenu that allows you to set the pivot point. If you select 3D Cursor in this menu, then all rotations will be performed relative to the 3D Cursor which is now at the center of the asteroid.

You can use 1 camera for both views. Orient the camera, take a snapshot, then, with the camera selected, press 'r' followed by 'z', and type 180 then Enter. This is shorthand for Rotate, Around Z-Axis, 180 degrees. Conversely, you can press 'n' to get a Numeric control menu that allows you to set things like scale, translation, and axis rotations for the currently selected object via dialog rather than shorthand. At any rate, since the pivot point is set to the 3D Cursor, this will cause the camera to rotate around the Z axis 180 degrees to look at the other side of the asteroid. Take another snapshot from there for the other side.

On a side note, for some reason the Blender developers insist on releasing Blender builds with a default blend file that includes a camera in a wonky position. I usually use the 'n' menu to correct it, or just delete the default camera and create a new one.
Asteriod1Heightmapfront.png
Asteriod1Heightmapback.png

Thanks a ton, I can't tell you how helpful this was! I have been looking around for about two months off and on to try and find out how to solve a problem that I never thought would be a problem.. lol
Our game can finally have LoD and that is extremely exciting!

I appreciate all the help!

This topic is closed to new replies.

Advertisement